Lexmark T614 Setup Guide (1.4 MB) - Page 26
Configuring and, Printing - manual
 |
UPC - 734646289009
View all Lexmark T614 manuals
Add to My Manuals
Save this manual to your list of manuals |
Page 26 highlights
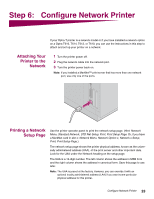
Configuring and Printing Network Environment TCP/IP Novell NetWare AppleTalk OS/2 Warp Server Page 24 28 29 29 Troubleshooting For troubleshooting information, look on the Drivers, MarkVision and Utilities CD. Click View Documentation and look for the MarkNet link. About the Drivers, MarkVision and Utilities CD You may have more than one version of the Drivers, MarkVision and Utilities CD, received at different times with different Lexmark products. Always use the latest version CD. TCP/IP Set the IP address, netmask, and gateway You must assign an IP address, netmask, and gateway to the printer for other network devices to find it on the network. • If you have DHCP, the proper address values are automatically assigned. To verify that the assignment has happened, print a network setup page and make sure the IP address, netmask and gateway appear as non-zero. • If you don't have DHCP, there are other methods you can use to manually assign the address such as the printer operator panel, static ARP and telnet, RARP and telnet, BOOTP, or MarkVision™ or other Lexmark utility. Instructions for three of these methods follow. Note: For instructions on other ways to set the IP address, look on the Drivers, MarkVision, and Utilities CD. Click View Documentation and look for the MarkNet link. Printer operator panel A simple way to set the IP address, netmask and gateway inside the printer is to use the printer operator panel. You need to be at the printer to use this method. 1 On the printer operator panel, choose Network Menu, Standard Network, STD Net Setup, TCP/IP, Set IP Address. Or, if you have a MarkNet™ card installed in slot x, choose Network Menu, Network Option x, Network Option x Setup, TCP/IP, Set IP Address. (Hint: Press Menu> until you see the correct menu item, and then press Select.) 2 When the current IP address is displayed, use the buttons to change the address. (Hint: Pressing Select advances you to the next segment in the address. Pressing Menu> increases the number by one.
-
 1
1 -
2
-
3
-
4
-
5
-
6
-
7
-
8
-
9
-
10
-
11
-
12
-
13
-
14
-
15
-
16
-
17
-
18
-
19
-
20
-
 21
21 -
 22
22 -
 23
23 -
 24
24 -
 25
25 -
 26
26 -
 27
27 -
 28
28 -
 29
29 -
 30
30 -
 31
31 -
32
-
33
-
34
-
35
-
36
-
37
 |
 |