Lexmark T614 Setup Guide (1.4 MB) - Page 29
Point-to-point printing LexIP - printer driver
 |
UPC - 734646289009
View all Lexmark T614 manuals
Add to My Manuals
Save this manual to your list of manuals |
Page 29 highlights
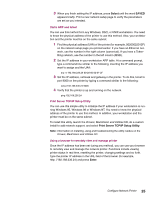
Point-to-point printing (LexIP) You can print from any Windows 95, Windows 98 or Windows NT workstation directly to a Lexmark printer located anywhere on the IP network. No server is required. 1 Install the TCP/IP software component on the workstation. Look on the Drivers, MarkVision and Utilities CD for the software. (Hint: Do a custom install to add network support, and select TCP/IP.) 2 Create a printer object on the workstation: a Click Start, Settings, Printers, Add Printer. b Windows 95/98: When prompted, select Local Printer (not Network). This gives you access to the Lexmark Network Printer Monitor later. Windows NT: When prompted, select My Computer (not Network printer server). This gives you access to the Lexmark Network Printer Monitor later. c Select the correct printer driver. Note: You can obtain the latest Lexmark printer drivers from our web site located at: www.lexmark.com. d Select any port (LPT, COM, or FILE) for the initial setup. Later, you will change the port to a logical port. e Click Next, and then continue following the instructions on the screen until the printer object has been created. 3 Associate the printer object with the physical printer. a Select the newly created printer object in the printers folder. b Windows 95/98: Click File, Properties, Details, Add Port. Windows NT: Click File, Properties, Ports, Add Port. c Click Other, Lexmark Network Printer Monitor, then click OK. A list of available printers is shown. If your printer does not appear in the list, click Add Adapter, and then follow the instructions on the screen until it does appear. d Find the IP address of your printer in the list, and then select it. e Specify a logical port name to associate with the printer, and then click OK. Note: If you assign a logical port name of LPT1, LPT2, LPT3 or LPT4, you can print from DOS using LexIP. For example: c:\>copy FileName LPT3 f Verify that the logical port name you assigned to the printer now shows in the box labeled Print to the following port. g Click OK. Configure Network Printer 27
-
 1
1 -
2
-
3
-
4
-
5
-
6
-
7
-
8
-
9
-
10
-
11
-
12
-
13
-
14
-
15
-
16
-
17
-
18
-
19
-
20
-
21
-
22
-
23
-
 24
24 -
 25
25 -
 26
26 -
 27
27 -
 28
28 -
 29
29 -
 30
30 -
 31
31 -
 32
32 -
 33
33 -
 34
34 -
35
-
36
-
37
 |
 |
