Lexmark T614 Setup Guide (1.4 MB) - Page 27
Select, SAVED, Print Server TCP/IP Setup Utility, Enter - driver for windows 7
 |
UPC - 734646289009
View all Lexmark T614 manuals
Add to My Manuals
Save this manual to your list of manuals |
Page 27 highlights
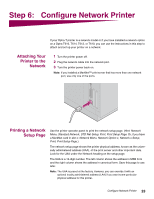
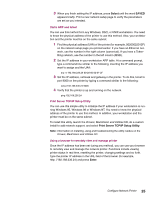
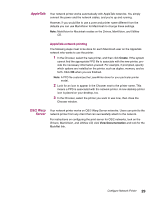
3 When you finish setting the IP address, press Select until the word SAVED appears briefly. Print a new network setup page to verify the parameters are set as you intended. Static ARP and telnet You can use this method from any Windows, OS/2, or UNIX workstation. You need to know the physical address of the printer to use this method. Also, your workstation and the printer must be on the same subnet. 1 Find the physical address (UAA) of the printer (for example, 00200022012F) on the network setup page you printed earlier. If you have an Ethernet network, use the number in the right column (canonical). If you have a TokenRing network, use the number in the left column (MSB). 2 Set the IP address in your workstation ARP table. At a command prompt, type a command line similar to the following, inserting the IP address you want to assign and the UAA: arp -s 192.168.236.24 00-20-00-22-01-2F 3 Set the IP address, netmask and gateway in the printer. To do this, telnet to port 9000 on the printer by typing a command similar to the following: telnet 192.168.236.24 9000 4 Verify that the printer is up and running on the network. ping 192.168.236.24 Print Server TCP/IP Setup Utility You can use this simple utility to initialize the IP address if your workstation is running Windows 95, Windows 98 or Windows NT. You need to know the physical address of the printer to use this method. In addition, your workstation and the printer must be on the same subnet. To install this utility, launch the Drivers, MarkVision and Utilities CD, do a custom install to add network support, and select Print Server TCP/IP Setup Utility. Note: Information on installing, using and troubleshooting the utility resides on the Drivers, MarkVision and Utilities CD. Using a browser to remotely view and manage printer Once the IP address has been set (using any method), you can use your browser to remotely view and manage the network printer. Functions include viewing printer status in real time, resetting the printer, changing settings and so forth. Type the printer IP address in the URL field of the browser (for example, http: //192.168.236.24) and press Enter. Configure Network Printer 25
-
 1
1 -
2
-
3
-
4
-
5
-
6
-
7
-
8
-
9
-
10
-
11
-
12
-
13
-
14
-
15
-
16
-
17
-
18
-
19
-
20
-
21
-
 22
22 -
 23
23 -
 24
24 -
 25
25 -
 26
26 -
 27
27 -
 28
28 -
 29
29 -
 30
30 -
 31
31 -
 32
32 -
33
-
34
-
35
-
36
-
37
 |
 |