Lexmark T620 Setup Guide - Page 29
Step 5: Verify printer setup, Turning on the printer, Printing a network setup - configuration page
 |
View all Lexmark T620 manuals
Add to My Manuals
Save this manual to your list of manuals |
Page 29 highlights
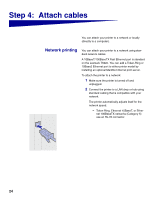
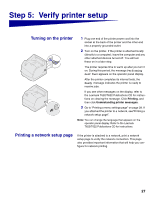
Step 5: Verify printer setup Turning on the printer 1 Plug one end of the printer power cord into the socket at the back of the printer and the other end into a properly grounded outlet. 2 Turn on the printer. If the printer is attached locally (directly to a computer), leave the computer and any other attached devices turned off. You will turn these on in a later step. The printer requires time to warm up after you turn it on. During this period, the message Performing Self Test appears on the operator panel display. After the printer completes its internal tests, the Ready message indicates the printer is ready to receive jobs. If you see other messages on the display, refer to the Lexmark T620/T622 Publications CD for instructions on clearing the message. Click Printing, and then click Understanding printer messages. 3 Go to "Printing a menu settings page" on page 28. If you attached the printer to a network, see"Printing a network setup page". Note: You can change the language that appears on the operator panel display. Refer to the Lexmark T620/T622 Publications CD for instructions. Printing a network setup page If the printer is attached to a network, print a network setup page to verify the network connection. This page also provides important information that will help you configure for network printing. 27
-
 1
1 -
2
-
3
-
4
-
5
-
6
-
7
-
8
-
9
-
10
-
11
-
12
-
13
-
14
-
15
-
16
-
17
-
18
-
19
-
20
-
21
-
22
-
23
-
 24
24 -
 25
25 -
 26
26 -
 27
27 -
 28
28 -
 29
29 -
 30
30 -
 31
31 -
 32
32 -
 33
33 -
 34
34 -
35
-
36
-
37
-
38
 |
 |