Lexmark X852E User's Reference - Page 40
Protect the Job Account list, Select a tracking mode, Enter, Configuration, Security, Submit
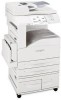 |
UPC - 734646002806
View all Lexmark X852E manuals
Add to My Manuals
Save this manual to your list of manuals |
Page 40 highlights
Protect the Job Account list To prevent the Job Account list from being modified by unauthorized individuals, set a password to protect the information stored on the print server. 1 Type the IP address of the MFP in the URL field of your browser, and then press Enter. 2 Click Configuration. 3 Under the Other heading, click Security. 4 Enter a user name and a password. Note: The user name is MarkNet. The password is whatever you assign. You must type it a second time for verification. 5 Click Submit. Select a tracking mode 1 Type the IP address of the MFP in the URL field of your browser, and then press Enter. 2 Click Configuration. 3 Click MFP Job Accounting. 4 Select one of the tracking modes. For a list of available tracking modes, see "List of tracking modes" on page 36. 5 Specify a timeout. The timeout is the amount of time that passes after a scan is completed before the control panel is relocked. 6 Click Submit. Configure Job Accounting 35
-
 1
1 -
2
-
3
-
4
-
5
-
6
-
7
-
8
-
9
-
10
-
11
-
12
-
13
-
14
-
15
-
16
-
17
-
18
-
19
-
20
-
21
-
22
-
23
-
24
-
25
-
26
-
27
-
28
-
29
-
30
-
31
-
32
-
33
-
34
-
 35
35 -
 36
36 -
 37
37 -
 38
38 -
 39
39 -
 40
40 -
 41
41 -
 42
42 -
 43
43 -
 44
44 -
 45
45 -
46
-
47
-
48
-
49
-
50
-
51
-
52
-
53
-
54
-
55
-
56
-
57
-
58
-
59
-
60
-
61
 |
 |
