LiftMaster EL2000 EL25-KEYPAD PROGRAMMING Manual - Page 46
Add, Edit or Delete Transmitter, Add a Basic Transmitter: 90
 |
View all LiftMaster EL2000 manuals
Add to My Manuals
Save this manual to your list of manuals |
Page 46 highlights
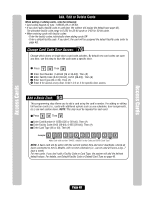
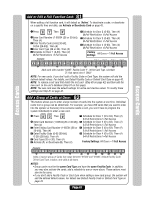
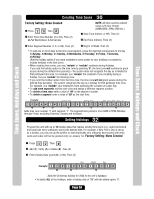
Add, Edit or Delete Transmitter Codes When adding or editing transmitter codes, note the following: • The label on the back of the transmitter displays the codes necessary to program the transmitter. ID Number Button Number Codes for Buttons 1-3 Codes for Button 4 PASSPORT SW ID SEQ FC PIN 1-3 03 00 03412241 4 03 00 16345009 Sequence Code Facility Code Transmitter Number Button Opens Relay For Door 1 1 2 2 3 3 4 4 Transmitters Transmitters • Keep a record of each transmitter code you assign; in particular, write down the resident names associated with each transmitter. This will help when adding, editing, or deleting transmitter codes later. • Once the ID number, sequence, facility and transmitter number are programmed use the chart in the illustration. • When adding transmitters buttons 1-3 are automatically entered and active. You do not have to repeat a step for buttons 2 and 3. Add a Basic Transmitter: 90 Add a Basic transmitter to the system's database. A basic transmitter will be active, unlock all doors/gates assigned to the RF module with no time constraints (i.e., can be used 24 hours a day, 7 days a week). For Full Function transmitters (i.e., transmitters with additional options such as schedules, assignments per door), see next page. 1 Press Then 4 Enter Sequence Code (0-2). Then (#) 2 Enter Transmitter Number (1-65534). Then (#) 5 Enter ID Number (0-26). Then (#) 3 Enter Facility Code (0-255). Then (#) 6 Enter Button Number (1-4). Then (#) Important: Steps 1-6 must be performed for EACH Transmitter assigned. Example: 1 2 3 4 5 6 Activates transmitter number "34430", facility code "3", sequence code "2", ID number "4" and button "1". NOTE: To replace a lost transmitter first delete the lost transmitter (Step 100 on page 47) and then add the new transmitter to the unit's database (Step 90 on this page). NOTE: The new card uses the default settings for active and inactive values. To modify these settings use Step 98 on page 48. Page 45
-
 1
1 -
2
-
3
-
4
-
5
-
6
-
7
-
8
-
9
-
10
-
11
-
12
-
13
-
14
-
15
-
16
-
17
-
18
-
19
-
20
-
21
-
22
-
23
-
24
-
25
-
26
-
27
-
28
-
29
-
30
-
31
-
32
-
33
-
34
-
35
-
36
-
37
-
38
-
39
-
40
-
 41
41 -
 42
42 -
 43
43 -
 44
44 -
 45
45 -
 46
46 -
 47
47 -
 48
48 -
 49
49 -
 50
50 -
 51
51 -
52
-
53
-
54
-
55
-
56
-
57
-
58
-
59
-
60
-
61
-
62
-
63
-
64
-
65
-
66
-
67
-
68
-
69
-
70
-
71
-
72
-
73
-
74
-
75
-
76
-
77
-
78
-
79
-
80
 |
 |
