LiftMaster EL2000 EL25-KEYPAD PROGRAMMING Manual - Page 65
Postal Lock/Autocall/Exit/Door Sensor Devices, Autocall Device
 |
View all LiftMaster EL2000 manuals
Add to My Manuals
Save this manual to your list of manuals |
Page 65 highlights
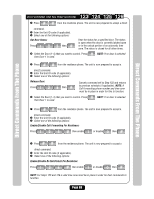
Postal/Lock/Autocall/Exit/Door Sensor Devices Postal/Lock/Autocall/Exit/Door Sensor Devices Postal Lock/Autocall/Exit/Door Sensor Devices Postal Lock Switch 60 When a postal carrier triggers a postal lock switch, the assigned door number's relay will activate. The postal entry door should be near the postal lock switch. Once the postal input is detected then the relays for the door activate for their programmed time. They do not stay active if postal input remains triggered. Factory Setting: Door 1 1 Press Then 2 Enter Door Number to be Opened (0-4, 0=No Postal Lock). Then (#) NOTE: A "Door Number" is an external access control device where the postal carrier can gain entry. Example: 1 2 Assigns Postal Lock Switch to "Door 2". Important: Whatever you assigned Your Door Settings applies to this setting. See page 25. Factory Settings: Door 1 activates Relay 1, Door 2 activates Relay 2, Door 3 activates Relay 3, Door 4 activates Relay 4 Autocall Device 70 The Autocall device calls the resident and can activate specific relays (a light or a buzzer) 1 Press Then 2 Enter Relays to be Activated (0000-1111). Then (#) 0=Deactivate, 1=Activate (1st digit=Relay 4, 2nd digit =Relay 3, etc.) Example: Relay 4 Relay 3 Relay 2 Relay 1 1 Deact Activate Deact Deact 2 When a loop detector type device is triggered, only Relay "3" will activate. To enter programming mode from the unit Press *** and the 6-Digit Password (2 short beeps will be heard) Exiting programming mode allows changes to take effect Important: The Pound Key (#) must be used as Data Field Separator and to Save Data at the end of the sequence. Time must be entered using a 24-hour format (8AM=0800, 3PM=1500 etc.). Audio Feedback: Programming input is valid. Audio Feedback: Input is not valid. If you make an error during an entry, press the asterisk key (*) to begin again. Page 64
-
 1
1 -
2
-
3
-
4
-
5
-
6
-
7
-
8
-
9
-
10
-
11
-
12
-
13
-
14
-
15
-
16
-
17
-
18
-
19
-
20
-
21
-
22
-
23
-
24
-
25
-
26
-
27
-
28
-
29
-
30
-
31
-
32
-
33
-
34
-
35
-
36
-
37
-
38
-
39
-
40
-
41
-
42
-
43
-
44
-
45
-
46
-
47
-
48
-
49
-
50
-
51
-
52
-
53
-
54
-
55
-
56
-
57
-
58
-
59
-
 60
60 -
 61
61 -
 62
62 -
 63
63 -
 64
64 -
 65
65 -
 66
66 -
 67
67 -
 68
68 -
 69
69 -
 70
70 -
71
-
72
-
73
-
74
-
75
-
76
-
77
-
78
-
79
-
80
 |
 |
