Linksys EFG250 /en/US/docs/storage/nass/csbcdp/efg250/user/guide/EFG250_V2_use - Page 12
The Front Panel, Ready/Status, Disk Full, BackUp, Disk 2, Power Button, Front Panel - firmware
 |
UPC - 745883559220
View all Linksys EFG250 manuals
Add to My Manuals
Save this manual to your list of manuals |
Page 12 highlights
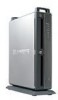
EtherFast Network Attached Storage (250GB with PrintServer) The Front Panel The Network Attached Storage's LEDs, which indicate status information about network activity, and power button are located on the front panel. Ready/Status Green or Orange. This LED is solidly lit green when the Network Attached Storage is working properly. It flashes during start-up, shutdown, any self-test, or a firmware upgrade. If the LED is orange, there is an error. LAN Green or Orange. The LAN LED serves two purposes. If the LED is continuously lit, the Network Attached Storage is successfully connected to a device through the LAN port. If the LED flashes, it indicates network activity. If the LED is orange, there is a data collision. Disk Green. The Disk LED flashes when the Network Attached Storage is reading or writing data. Disk Full Green. The Disk Full LED lights up when the Network Attached Storage has reached its maximum storage capacity. It flashes when it reaches 98% of total capacity. BackUp Green. The BackUp LED flashes when the Network Attached Storage's backup utility is active. Disk 2 Disk 1 Power Button Green. The Disk 2 LED flashes when Disk 2 is reading or writing data. Green. The Disk 1 LED flashes when Disk 1 is reading or writing data. If the Network Attached Storage is powered off, you can start it up by briefly pressing the power button. To power down the Network Attached Storage, press the power button, and its internal shutdown process will begin. The Network Attached Storage must be powered off this way, or through the Administration - Status tab of the Web-based Utility (refer to "Chapter 5: Configuring the Network Attached Storage"). Figure 2-2: Front Panel Chapter 2: Getting to Know the Network Attached Storage 5 The Front Panel
-
 1
1 -
2
-
3
-
4
-
5
-
6
-
 7
7 -
 8
8 -
 9
9 -
 10
10 -
 11
11 -
 12
12 -
 13
13 -
 14
14 -
 15
15 -
 16
16 -
 17
17 -
18
-
19
-
20
-
21
-
22
-
23
-
24
-
25
-
26
-
27
-
28
-
29
-
30
-
31
-
32
-
33
-
34
-
35
-
36
-
37
-
38
-
39
-
40
-
41
-
42
-
43
-
44
-
45
-
46
-
47
-
48
-
49
-
50
-
51
-
52
-
53
-
54
-
55
-
56
-
57
-
58
-
59
-
60
-
61
 |
 |
