Linksys EFG250 /en/US/docs/storage/nass/csbcdp/efg250/user/guide/EFG250_V2_use - Page 14
Connecting the Network Attached Storage - problems
 |
UPC - 745883559220
View all Linksys EFG250 manuals
Add to My Manuals
Save this manual to your list of manuals |
Page 14 highlights
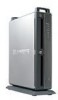
EtherFast Network Attached Storage (250GB with PrintServer) Chapter 3: Connecting the Network Attached Storage Follow the steps below to physically connect the Network Attached Storage to your network. 1. Connect an Ethernet network cable to the LAN port of the Network Attached Storage. Then connect the other end of the cable to a switch, router, or PC. 2. (Optional) Connect a standard parallel printer cable to the PRINTER port of the Network Attached Storage. Then connect the other end to your printer. (For more information about adding a printer to your network, refer to "Appendix C: Setting Up the Built-in PrintServer.") 3. Plug the supplied power adapter into the Network Attached Storage's power port. Then plug the power adapter into an electrical outlet, preferably a surge protector. 4. Press the power button once on the front panel of the Network Attached Storage. If you have connected a printer to the Network Attached Storage, then power on the printer. 5. The Network Attached Storage will run a self-test lasting two or three seconds prior to actual boot-up. During the self-test, most of its LEDs will be lit or flashing. After the self-test, the boot process will begin and should last only a few minutes. When most of the LEDs turn off and only the Ready/Status LED is solidly lit green, the boot-up process is complete. If the Ready/Status LED is orange or the Network Attached Storage repeatedly beeps, then there is a hardware problem. Review the descriptions of the beeper codes in "Chapter 2: Getting to Know the Network Attached Storage" for more information. Proceed to "Chapter 4: Setting Up the Network Attached Storage." Figure 3-1: Connect the Ethernet Network Cable Figure 3-2: Connect the Power Adapter Chapter 3: Connecting the Network Attached Storage 7
-
 1
1 -
2
-
3
-
4
-
5
-
6
-
7
-
8
-
 9
9 -
 10
10 -
 11
11 -
 12
12 -
 13
13 -
 14
14 -
 15
15 -
 16
16 -
 17
17 -
 18
18 -
 19
19 -
20
-
21
-
22
-
23
-
24
-
25
-
26
-
27
-
28
-
29
-
30
-
31
-
32
-
33
-
34
-
35
-
36
-
37
-
38
-
39
-
40
-
41
-
42
-
43
-
44
-
45
-
46
-
47
-
48
-
49
-
50
-
51
-
52
-
53
-
54
-
55
-
56
-
57
-
58
-
59
-
60
-
61
 |
 |
