Mackie SR408 / SR568 Owner's Manual - Page 3
Level-setting Procedure
 |
View all Mackie SR408 / SR568 manuals
Add to My Manuals
Save this manual to your list of manuals |
Page 3 highlights
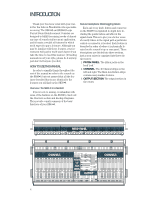
READ THIS PAGE!!! We realize that you must have a powerful hankerin' to try out your new SR40•8. Or you might be one of those people who never read manuals. Either way, all we ask is that you read this page now, and the rest can wait until you're good and ready. But do read it - you'll be glad you did. LEVEL-SETTING PROCEDURE There isn't too much to setting levels. No rocket science here (well... maybe a bit). Here's what you need to do: Hyper-Quick-Turbo Method 1.Set the TRIM controls at minimum (fully counterclockwise). 2. Set the METERING: INPUT SECTION switch to PFL mode so your Fader settings won't affect your input meter readings. 3. Set the METERING: OUTPUT SECTION switch to AFL mode so that the Meters reflect the actual output levels. 4. Set all of the Faders to their "U" markings. 5. Ask the musicians to start playing. 6. Set a rough mix, using the TRIM controls. The goal is to get Meter readings at or around 0dB for all of the inputs. 7. Once you've adjusted the input levels, use the Channel Faders to set the Channel levels, and leave the TRIM controls alone. 8. If the overall level gets too loud, bring the overall LEFT and RIGHT level down a bit, 10dB at the most. You may need to reduce the TRIM settings further. Alternate Method This method results in the faders being in a straight line across the board. 1. Set the METERING: INPUT SECTION switch to PFL mode so your Fader settings won't affect your input meter readings. 2. Set the METERING: OUTPUT SECTION switch to AFL mode so that the Meters reflect the actual output levels. 3. While the musicians are playing, watch each Channel Meter and adjust the TRIM control so that level is near 0dB as read on the Channel's Meter. 4. After setting the Channel EQ, you will probably want to readjust the TRIM control slightly to bring the Meter back to near the 0dB reading. 5. As the mix comes together, readjust the TRIM control down so that the Channel Fader can be set at its "U" (unity gain) setting. 6. You can also SOLO the Channel and monitor its level via the LEFT, RIGHT, and CENTER Meters in the output section. Other Nuggets of Wisdom Before plugging or unplugging a cord from a Channel or a MAIN AUX RETURN (A1-A4), be sure to engage the MUTE switch first. If you shut down your equipment, turn off your amplifiers first. When powering up, turn on your amplifiers last. Save the shipping boxes! We're sure that you can find an empty airport hanger or boat moorage to store them. You may need them someday, and you don't want to have to pay for them again. Please write your serial numbers here for future reference (i.e., insurance claims, tech support, return authorization, etc.): Console Purchased at: Power Supply Date of purchase: Part No. 820-052-00 Rev. B 6/97 3 ©1997 Mackie Designs Inc., All Rights Reserved. Printed in the U.S.A.
-
 1
1 -
 2
2 -
 3
3 -
 4
4 -
 5
5 -
 6
6 -
 7
7 -
 8
8 -
 9
9 -
10
-
11
-
12
-
13
-
14
-
15
-
16
-
17
-
18
-
19
-
20
-
21
-
22
-
23
-
24
-
25
-
26
-
27
-
28
-
29
-
30
-
31
-
32
-
33
-
34
-
35
-
36
-
37
-
38
-
39
-
40
-
41
-
42
-
43
-
44
-
45
-
46
-
47
-
48
-
49
-
50
-
51
-
52
-
53
-
54
-
55
-
56
-
57
-
58
-
59
-
60
-
61
-
62
-
63
-
64
-
65
-
66
-
67
-
68
-
69
-
70
-
71
-
72
-
73
-
74
-
75
-
76
-
77
-
78
-
79
-
80
-
81
-
82
-
83
-
84
-
85
-
86
 |
 |
