Mackie SR408 / SR568 Owner's Manual - Page 47
Previewing Snapshots
 |
View all Mackie SR408 / SR568 manuals
Add to My Manuals
Save this manual to your list of manuals |
Page 47 highlights
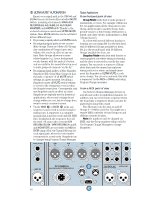
45, press 4 and then 5, followed by the DO IT button. If you're at Snapshot 45 and you want to jump to Snapshot 3, press 0 and then 3, followed by the DO IT button. If you make a mistake, simply press the CLEAR button and reenter the number, or just enter the new numbers. You can scroll through Snapshots and have them become engaged as soon as the number appears in the display. Press and hold the DO IT button while you press the Up or Down Arrow button. Another method for selecting and engaging Snapshots is to put ULTRA MUTE into AutoIncrement mode (a.k.a. Load-and-Go mode, or Show mode). This is useful when you have a sequence of Snapshots to engage during a scene or act. To initiate this mode, press and hold the CLEAR button followed by the Up Arrow button for two seconds. The display begins to blink, indicating that ULTRA MUTE is ready to engage the next Snapshot. Press the DO IT button to advance the display to the next Snapshot number. Press DO IT again to engage the next Snapshot and the display advances to the next Snapshot number. (Remember, a blinking display tells you that the Snapshot in the display is not engaged, but ready to be engaged as soon as you DO IT.) To end Auto-Increment mode and return to Normal mode, press and hold the CLEAR button followed by the Arrow Down button for two seconds. Previewing Snapshots Preview mode lets you see the mute configuration of a Snapshot without actually engaging it. This gives you the option of "looking ahead" at a forthcoming change in the mute configuration of the console to be sure that it is the one you really want. It also allows you to edit an existing Snapshot prior to engaging it. 1. Select a Snapshot. 2. Press the MUTE PREVIEW button. The LED above the MUTE PREVIEW button lights. 3. Select a different Snapshot by using either the Up/Down Arrow buttons or directly entering the Snapshot number via the number buttons . The MUTE LEDs for the channels assigned to the selected Snapshot will light and the Numeric Display will blink to let you know that you are only previewing the Snapshot and the channels are not actually muted. The channels that were muted prior to entering Preview mode remain muted, even if their LEDs are turned off. Remember, in Preview mode the MUTE LEDs are just showing you what might be should you decide to DO IT, not what actually is. You can manually add a channel to the Preview by pressing its MUTE button. Its MUTE LED blinks to let you know that it's not actually muted yet. 4. Once you've decided on a new Snapshot or modified Snapshot configuration, press DO IT and the new Snapshot, plus any manually muted channels, will engage. 5. Notice that the PREVIEW LED is still lit. You are still in Preview mode, and free to preview another Snapshot if you so desire. Otherwise, press MUTE PREVIEW again to exit Preview mode. 6. To exit Preview mode without making any changes to the current mute configuration, simply press the MUTE PREVIEW button again to turn it off. The MUTE LEDs revert back to indicating the current mute configuration of the console. Any mute switches selected during Preview are canceled. Note: The Numeric Display continues to blink and indicates the last number selected while in Preview mode. If you want the display to return to the Snapshot number currently engaged, either enter the number directly using the number buttons or use the Up/Down Arrow buttons. When the correct Snapshot number is in the display, the decimal point LED in the display stops blinking. Press the DO IT button to return the display to normal. 0 1 2 3 4 5 6 7 8 9 0-9 MODE GRP SNAP ULTRA MUTE™ SYSTEM BY PASS MUTE PREVIEW STORE CLEAR DO IT 47
-
 1
1 -
2
-
3
-
4
-
5
-
6
-
7
-
8
-
9
-
10
-
11
-
12
-
13
-
14
-
15
-
16
-
17
-
18
-
19
-
20
-
21
-
22
-
23
-
24
-
25
-
26
-
27
-
28
-
29
-
30
-
31
-
32
-
33
-
34
-
35
-
36
-
37
-
38
-
39
-
40
-
41
-
 42
42 -
 43
43 -
 44
44 -
 45
45 -
 46
46 -
 47
47 -
 48
48 -
 49
49 -
 50
50 -
 51
51 -
 52
52 -
53
-
54
-
55
-
56
-
57
-
58
-
59
-
60
-
61
-
62
-
63
-
64
-
65
-
66
-
67
-
68
-
69
-
70
-
71
-
72
-
73
-
74
-
75
-
76
-
77
-
78
-
79
-
80
-
81
-
82
-
83
-
84
-
85
-
86
 |
 |
