Mackie SR408 / SR568 Owner's Manual - Page 31
Subs Sub 1-8 Mixes
 |
View all Mackie SR408 / SR568 manuals
Add to My Manuals
Save this manual to your list of manuals |
Page 31 highlights
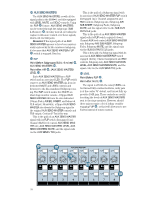
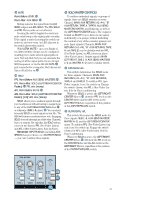
Remember: INPUTS SOLO has precedence over OUTPUTS SOLO - you can't combine these signals. SUBS (SUB 1-8 MIXES) This is where everything assigned via the 1-2, 3-4, 5-6, and 7-8 Channel assignment switches gets mixed together. Just after the mix stage, the signals are sent out to the SUB INSERTS , then they come back to their respective Subgroup Faders. Be aware: If the signal path of a subgroup appears to have been mysteriously replaced by its like-numbered AUX SEND MASTER, it's because that AUX SEND MASTER's FLIP switch is engaged. See for more details. FADER Point Before: SUB INSERTS . Point After: MUTE . A SUB mix is off with this Fader fully down, the "U" marking is unity gain, and fully up provides 10dB additional gain. MUTE Point Before: Fader . Point After: SUB OUTPUTS , PAN , CENTER (assignment) , respective MATRIX inputs. Muting a SUB removes the signal from these output paths: SUB OUTPUTS, SUB CENTER/L-R (ASSIGN), AFL SOLO, and the respectively-numbered MATRIX input. The INSERT, PFL SOLO, and PFL Meter paths are not affected. Pressing the switch toggles the electronic mute relay in the signal path's circuitry. If the signal is muted, pressing the switch un-mutes it, and vice versa. An LED adjacent to the switch glows when it is muted. With ULTRA MUTE™, up to ten Banks of ten different Mute Groups can be configured, enabling you to mute several signal paths at once. Not only that, but you can automate the muting of all the signal paths via an external MIDI sequencer or via the RS-232 DATA port connected to a computer. We'll discuss all this in detail later on . PAN Point Before: MUTE . Point After: L-R (ASSIGN) . PAN does not affect a subgroup's dedicated SUB OUTPUT. PAN adjusts the amount of signal sent to the LEFT versus the RIGHT mixes via the L-R (ASSIGN) switch and the SOLO balance (in AFL mode). With the PAN knob hard left, the signal feeds the LEFT mix and the left AFL SOLO (assuming their assignment switches are engaged). With the knob hard right, the signal feeds the RIGHT mix and the right AFL SOLO. With the PAN knob set somewhere in between left and right, the signal is divided between the LEFT and RIGHT buses. L-R (ASSIGN) Point Before: PAN . Point After: LEFT/RIGHT mixes . If you're doing a conventional stereo mix and using the Subgroups as master controls for groups of Channels before they enter the LEFT/RIGHT mix (by assigning these Channels to the Subgroup only ), simply engage the Subgroup's L-R switch, and the signal will be sent to the LEFT/RIGHT mix. With the PAN knob set at the center detent, the left and right sides receive equal signal levels. To feed only one side or the other, turn the PAN knob accordingly. CENTER (ASSIGN) Point Before: MUTE . Point After: CENTER mix . This switch works the same way as the Subgroup's L-R assignment switch - engage the switch and that signal is sent to the CENTER mix - but it is not a stereo signal. Since the CENTER assignment occurs before the PAN control , it receives the same level as the Fader output regardless of the PAN position. Be aware: If you're using the LEFT and RIGHT MAIN OUTPUTS but not the CENTER OUTPUT, and you want a subgroup's signal to appear in the center of the main LEFT/RIGHT mix, engage the L-R switch and set the PAN control to the center. Don't use the CENTER ASSIGN switch - It won't go anywhere, but it will appear in the PHONES mix, and that could mislead you into thinking it actually is in the LEFT/RIGHT mix. If you want to create a LEFT/RIGHT/ CENTER mix for your main feed, and also a LEFT/RIGHT mix with CENTER blended in for 31 OO 1 5 0 +10 AIR 16kHz ASSIGN CENTER L-R LR PAN 1 MUTE dB 10 5 U 5 10 20 30 40 50 60 SOLO
-
 1
1 -
2
-
3
-
4
-
5
-
6
-
7
-
8
-
9
-
10
-
11
-
12
-
13
-
14
-
15
-
16
-
17
-
18
-
19
-
20
-
21
-
22
-
23
-
24
-
25
-
 26
26 -
 27
27 -
 28
28 -
 29
29 -
 30
30 -
 31
31 -
 32
32 -
 33
33 -
 34
34 -
 35
35 -
 36
36 -
37
-
38
-
39
-
40
-
41
-
42
-
43
-
44
-
45
-
46
-
47
-
48
-
49
-
50
-
51
-
52
-
53
-
54
-
55
-
56
-
57
-
58
-
59
-
60
-
61
-
62
-
63
-
64
-
65
-
66
-
67
-
68
-
69
-
70
-
71
-
72
-
73
-
74
-
75
-
76
-
77
-
78
-
79
-
80
-
81
-
82
-
83
-
84
-
85
-
86
 |
 |
