Marantz SR4600 SR4600 User Manual - Page 20
Input Setup, Assignable Digital Input, Simple Setup - clear memory
 |
View all Marantz SR4600 manuals
Add to My Manuals
Save this manual to your list of manuals |
Page 20 highlights
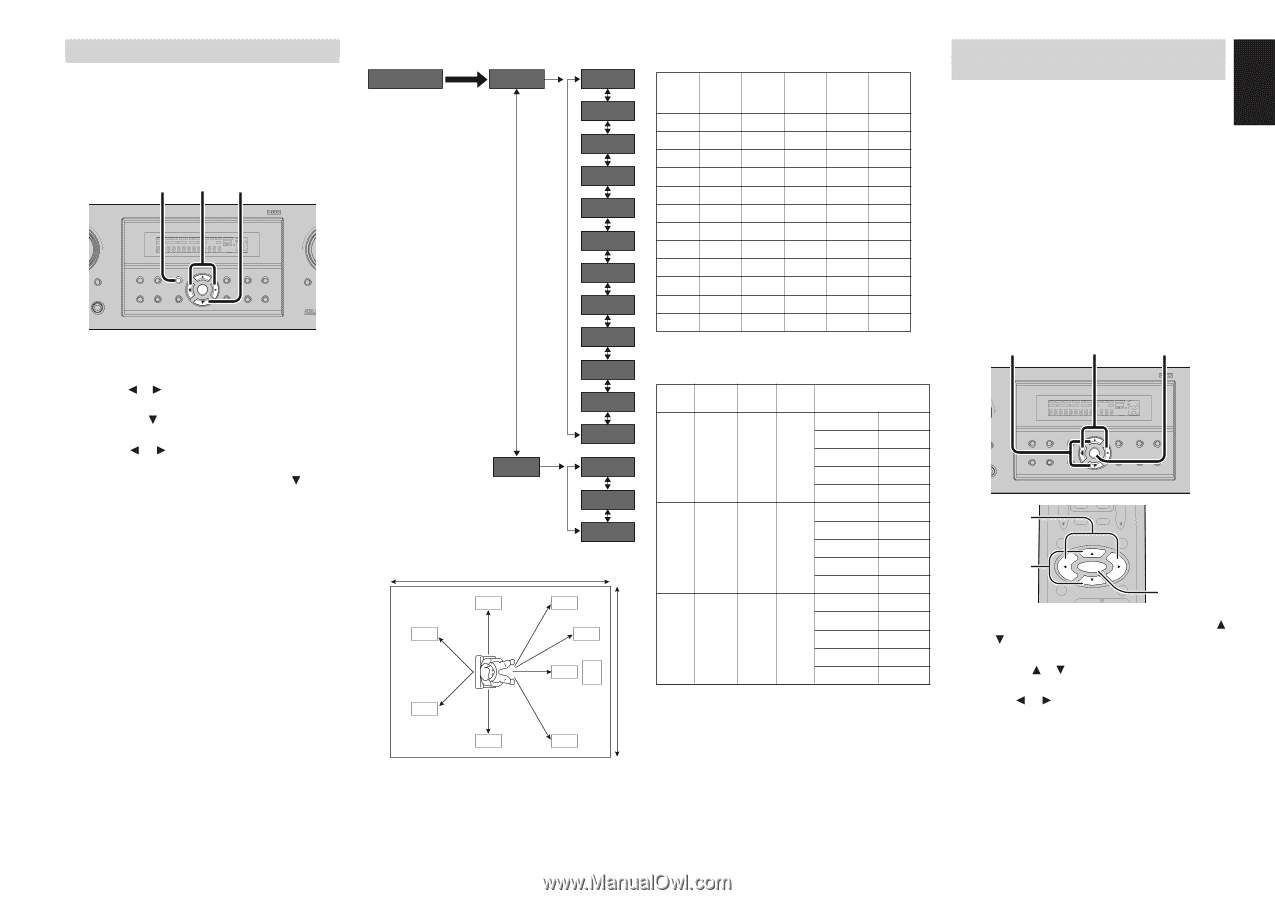
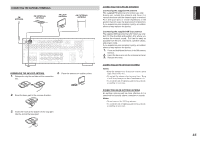
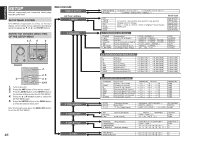
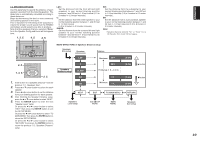
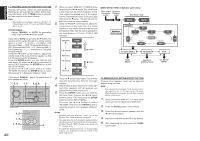
ENGLISH SIMPLE SETUP You can setup the speaker conditions quickly with SIMPLE SETUP menu. In this menu, the number of speakers and speaker delay time can be set. These settings can be changed more detail in "2. SPEAKER" setup menu. Press the SIMPLE SETUP button on the unit to enter this menu. 1. 2. 4. 3. 5. MENU STRUCTURE of Simple Setup SIMPLE SETUP SPEAKERS SURROUND RECEIVER SR4600 S. SPEAKER B PHONES DISP MULTI AUTO TUNED SLEEP AUTO SURR DIRECT ST V - OFF NIGHT PEAK ATT DISC 6.1 MT X 6.1 EQ ANALOG DIGITAL AAC PCM SURROUND DIGITAL LCR LFE SL S SR SURROUND MODE PURE DIRECT SIMPLE SETUP AUTO HT-EQ MENU ENTER DISPLAY MEMORY CLEAR EXIT BAND T-MODE DOWN MUTE 2.0 (ch) 2.1 (ch) 3.0 (ch) 3.1 (ch) 4.0 (ch) 4.1 (ch) 5.0 (ch) 5.1 (ch) 1. Press the SIMPLE SETUP button on the unit to enter the "SPEAKERS" menu. 2. Press or cursor button to select the speaker number. 3. Press the cursor button to enter the "ROOM" menu. 4. Press or cursor button to select the room size. 5. After finishing all setup, press the cursor button to exit the SIMPLE SETUP menu. Note • All Simple Setup menu is reset when the speaker setting is changed with Speaker Setup menu. ROOM 6.0 (ch) 6.1 (ch) 7.0 (ch) 7.1 (ch) LARGE MEDIUM SMALL D SL FL SBL (S) (SB) (SB) SBR (S) (F) (SW) SW (C) C TV W (F) SR FR The relation of the speakers number and conectted speaker Front CHANNEL L/R (F) 7.1 ch LARGE 7.0 ch LARGE 6.1 ch LARGE 6.0 ch LARGE 5.1 ch LARGE 5.0 ch LARGE 4.1 ch LARGE 4.0 ch LARGE 3.1 ch LARGE 3.0 ch LARGE 2.1 ch LARGE 2.0 ch LARGE Front Surround Surround Center L/R Back L/R (C) (S) (SB) SMALL SMALL 2ch SMALL SMALL 2ch SMALL SMALL 1ch SMALL SMALL 1ch SMALL SMALL NONE SMALL SMALL NONE NONE SMALL NONE NONE SMALL NONE SMALL NONE NONE SMALL NONE NONE NONE NONE NONE NONE NONE NONE Sub woofer (SW) YES NONE YES NONE YES NONE YES NONE YES NONE YES NONE The relation of the room size and floor space SIZE SMALL MEDIUM LARGE Floor space 10 m2 16 m2 24 m2 Width Depth (W) (D) Imaging Distance Front (F) 6 ft. (1.8 m) Center (C) 5 ft. (1.5 m) 2.7 m 3.6 m Surround (S) 4 ft. (1.2 m) Surr. Back (SB) 5 ft. (1.5 m) Sub Woofer (SW) 5 ft. (1.5 m) Front (F) 7 ft. (2.1 m) Center (C) 6 ft. (1.8 m) 3.6 m 4.5 m Surround (S) 5 ft. (1.5 m) Surr. Back (SB) 7 ft. (2.1 m) Sub Woofer (SW) 6 ft. (1.8 m) Front (F) 9 ft. (2.7 m) Center (C) 8 ft. (2.4 m) 4.5 m 5.4 m Surround (S) 7 ft. (2.1 m) Surr. Back (SB) 8 ft. (2.4 m) Sub Woofer (SW) 8 ft. (2.4 m) The relation of the room size and floor space is a roughly standard. 1. INPUT SETUP (ASSIGNABLE DIGITAL INPUT) Four digital inputs can be assigned as the desired source. Use this menu to select the digital input jack to be assigned to the input source. The Input Setup consists of 6 items, which are as below. • D1AUTO to D4AUTO : Digital AUTO mode If the input signal from the selected source is digital signal, this unit chooses a digital input automatically. • DIG.1 to DIG.4 : Digital FIXED mode The SR4600 chooses a digital input regardless of a input signal from the selected source. • ANA : Analog mode Use this menu to select the digital input jack to be assigned to the input source. 1. 3. 5. 4. 5. 2. 5. ND RECEIVER SR4600 DISP MULTI AUTO TUNED ST V - OFF NIGHT PEAK ATT ANALOG SURROUND SLEEP AUTO SURR DIRECT DISC 6.1 MTX 6.1 EQ DIGITAL DIGITAL LCR AAC PCM LFE SL S SR D EAKER NES SURROUND MODE PURE DIRECT SIMPLE SETUP AUTO HT-EQ MENU ENTER DISPLAY MEMORY CLEAR EXIT BAND T-MODE 4. 5. TV VOL. SLEEP MUTE MAIN VOL. OSD MENU 1. 3. 5. ENTER SET UP/ T.TONE PURE DIRECT AUTO MENU OFF DTS 2. 5. 1. Select "1.INPUT" in SETUP MENU with the or cursor button. 2. Press the ENTER button to enter the menu. 3. Press the or cursor button to select the input source. 4. Press or cursor button to select the input function. Select "DxAUTO", "DIG.x" or "ANA" for input sources. 17
-
 1
1 -
2
-
3
-
4
-
5
-
6
-
7
-
8
-
9
-
10
-
11
-
12
-
13
-
14
-
 15
15 -
 16
16 -
 17
17 -
 18
18 -
 19
19 -
 20
20 -
 21
21 -
 22
22 -
 23
23 -
 24
24 -
 25
25 -
26
-
27
-
28
-
29
-
30
-
31
-
32
-
33
-
34
-
35
-
36
-
37
-
38
-
39
-
40
-
41
 |
 |