Marantz SR7002 User Manual - English - Page 71
Marantz SR7002 Manual
 |
View all Marantz SR7002 manuals
Add to My Manuals
Save this manual to your list of manuals |
Page 71 highlights
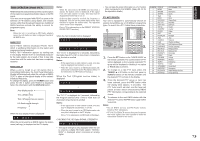
ENGLISH (FM) TUNING MODE (AUTO STEREO OR MONO) V-OFF PEAK ATT 6.1 NIGHT EQ ANALOG DIGITAL AAC PCM SURROUND DIGITAL LCR LFE SL S SR BAND T-MODE MEMORY CLEAR DISPLAY M-DAX SPEAKERS A/B R EXIT MIC VOLUME DOWN UP DIGITAL AUX 1 INPUT S-VIDEO VIDEO L AUDIO R USE PAGE 2 M D1 D2 D3 D4 D5 CH VOL TV DVD VCR DSS TUNER CD CD-R MD TAPE 1 AUX1 AUX2 LIGHT RC8001SR Learning Remote Controller AMP 2 In TUNER mode, press the T-MODE button on the remote controller to switch between AUTO STEREO and monaural sound. 1. Press the > button on the remote controller to display Page 2. 2. Each time the T-MODE (D3) button is pressed, the TUNER mode changes and the mode is displayed on the FL display. Analog / Digital Auto Mode (Only on the SR8002) T-MODE:DIG-AT For listening to HD Radio stations. See p.70 for more information on HD Radio technology. Note: • This mode is not available on the SR7002. Analog Auto Mode (when receiving FM broadcasts) T-MODE:ANA-AT AUTO STEREO mode is selected and the AUTO indicator is illuminated on the FL display. When stereo broadcasts are received, the ST indicator is illuminated on the FL display. Note: • This mode is not available when BAND is set to AM. Analog Mono Mode T-MODE:MONO MONO mode is selected and the AUTO indicator disappears from the FL display. Monaural broadcasts are received in TUNER mode. Note: • On the SR7002, the TUNER mode cannot be changed when BAND is set to AM. • The SR7002 does not display the mode on the FL display when the TUNER MODE is switched. The AUTO indictor appears on the FL display when the mode is switched to Analog Auto Mode. (See page 9) • If the unit receives a weak signal or it is difficult to receive a stereo signal, press the T-MODE button on the remote controller or the unit to switch to MONO mode. This reduces the amount of noise and makes broadcasts easier to hear. The AUTO indicator on the FL display disappears. PRESET MEMORY With this unit you can preset up to 60 FM/AM stations in any order. For each station, you can memorize the frequency and reception mode if desired. AUTO PRESET MEMORY This function automatically scans the FM and AM band and enters all stations with proper signal strength into the memory. 2. 4. 1. 3. 2. 5. AV SURROUND RECEIVER SR8002 INPUT SELECTOR PURE DIRECT DSD DISP MULTI AUTO TUNED SLEEP AUTO SURR DIRECT ST SPKR A B V-OFF PEAK ATT DISC 6.1 MTX 6.1 NIGHT EQ ANALOG DIGITAL AAC PCM SURROUND DIGITAL LCR LFE SL S SR STANDBY POWER ON/OFF PHONES SURROUND MODE AUTO MULTI MULTI SPEAKER BAND T-MODE MEMORY CLEAR PURE DIRECT THX 7.1CH INPUT MENU ENTER DISPLAY EXIT M-DAX SPEAKERS A/B MIC VOLUME DOWN UP DIGITAL AUX 1 INPUT S-VIDEO VIDEO L AUDIO R 1. To select FM , press the BAND button on the front panel. 2. While pressing the MEMORY button, press the 1 cursor button. "AUTO PRESET" will appear on the display, and scanning starts from the lowest frequency. 3. Each time the tuner finds a station, scanning will pause and the station will be played for five seconds. During this time, the following operations are possible. The band can be changed by the BAND button. 4. If no button is pressed during this period, the current station is memorized in location Preset 01. If you wish to skip the current station, press the 3 cursor button during this period, this station is skipped and auto presetting continues. 5. Operation stops automatically when all 60 preset memory positions are filled or when auto scanning attains the highest end of all bands. If you desire to stop the auto preset memory at anytime, press the CLEAR button. MANUAL PRESET MEMORY 3. 2. 4. DIRECT SD DISP MULTI AUTO TUNED SLEEP AUTO SURR DIRECT ST SPKR A B V-OFF PEAK ATT DISC 6.1 MTX 6.1 NIGHT EQ ANALOG DIGITAL AAC PCM SURROUND DIGITAL LCR LFE SL S SR SURROUND MODE AUTO MULTI MULTI SPEAKER BAND T-MODE MEMORY CLEAR PURE DIRECT THX 7.1CH INPUT MENU ENTER DISPLAY EXIT M-DAX SPEAKERS A/B MIC DO DIG PREV MENU TEST 1 7.1CH 4 DISP 7 CLEAR LIP.SYNC GUIDE CH.SEL 2 ATT 5 OSD 8 THX 0 MUTE EXIT SURR 3 SPK-AB 6 SLEEP 9 MEMO 3. 2. (Using the unit) 1. Tune into the radio station you desire (Refer to the "MANUAL TUNING" or "AUTO TUNING" section). 2. Press the MEMORY button on the front panel. "- -" (preset number) starts blinking on the display. 3. Select the preset number by pressing the 1 or 2 cursor buttons, while this is still blinking (approx. 5 seconds) 4. Press the MEMORY button again to enter. The display stops blinking. The station is now stored in the specified preset memory location. (Using the remote controller) 1. Tune into the radio station you desire (Refer to the "MANUAL TUNING" or "AUTO TUNING" section). 2. Press the MEMO button on the remote controller. "- -" (preset number) starts blinking on the display. 3. Enter the desired preset number by pressing the numeric buttons. Note: • When entering a single digit number (2 for example), either input "02" or just input "2" and wait for a few seconds. 68
-
 1
1 -
2
-
3
-
4
-
5
-
6
-
7
-
8
-
9
-
10
-
11
-
12
-
13
-
14
-
15
-
16
-
17
-
18
-
19
-
20
-
21
-
22
-
23
-
24
-
25
-
26
-
27
-
28
-
29
-
30
-
31
-
32
-
33
-
34
-
35
-
36
-
37
-
38
-
39
-
40
-
41
-
42
-
43
-
44
-
45
-
46
-
47
-
48
-
49
-
50
-
51
-
52
-
53
-
54
-
55
-
56
-
57
-
58
-
59
-
60
-
61
-
62
-
63
-
64
-
65
-
 66
66 -
 67
67 -
 68
68 -
 69
69 -
 70
70 -
 71
71 -
 72
72 -
 73
73 -
 74
74 -
 75
75 -
 76
76 -
77
-
78
-
79
-
80
-
81
-
82
-
83
-
84
-
85
-
86
-
87
-
88
-
89
-
90
-
91
-
92
-
93
-
94
 |
 |
