Maytag MDB7609AWB Installation Instructions
Maytag MDB7609AWB - 24" Tall Tub Dishwasher Manual
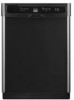 |
UPC - 883049182827
View all Maytag MDB7609AWB manuals
Add to My Manuals
Save this manual to your list of manuals |
Maytag MDB7609AWB manual content summary:
- Maytag MDB7609AWB | Installation Instructions - Page 1
INSTALLATION INSTRUCTIONS UNDERCOUNTER DISHWASHER STAINLESSSTEELGIANT TUB MODELS INSTRUCTIONS D'INSTALLATION LAVE-VAISSELLESOUS PLAN DE TRAVAIL MODELES GEANTS DE CUVE D'ACIER INOXYDABLE Table of Contents 2 Table des matieres 23 W10199707A - Maytag MDB7609AWB | Installation Instructions - Page 2
door until latched. • Observe all governing codes and ordinances. • Install this dishwasher as specified in these instructions. • Installation should be performed by a qualified service technician. The dishwasher must be installed to meet all electrical and plumbing national and local codes and - Maytag MDB7609AWB | Installation Instructions - Page 3
Parts Gather the recommended tools and parts before starting installation. Read and follow the instructions provided with any tools listed here. All Installations hO01SeA appr0ved lmisaterkdedPofWorerUse With dishwaSher Additional parts supplied with certain models only: IB0tt°mS°und - Maytag MDB7609AWB | Installation Instructions - Page 4
freezing is not covered by the warranty. A side panel kit is available from your dealer for installing your dishwasher at the end of your cabinetry. A moisture barrier accessory (Part Number 4396277) is available from your dealer for installing underneath the countertop. Call 1-8OO-688-99OO to order - Maytag MDB7609AWB | Installation Instructions - Page 5
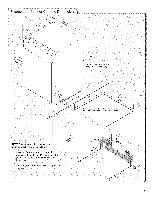
and Cabinet Opening Dimensions (1._c ./ /" _lnsulation may be compressed {not used on all models) Check that all surfaces have no protrusions [hat would prohibit dishwasher installation, 3 NOTE: Shaded areas of cabinet walls show where utility connections may be installed. 3 II *Measured from - Maytag MDB7609AWB | Installation Instructions - Page 6
fittings. • If required, the air gap should be installed in accordance with the air gap installation instructions. When you are connecting the air gap a rubber connecting dishwasher with a power supply cord: • Use UL listed power supply cord kit (Part No. 4317824) marked for use with dishwasher. • - Maytag MDB7609AWB | Installation Instructions - Page 7
installing dishwasher. Failure to do so can result in death or electrical shock. breaker box before insta!ling dishwashe_ Yes _F0]low instructions Install Drain Hose" section. If they do not reach far enough, follow the instructions inside a cabinet next to the dishwasher cabinet opening. Drill a 1 - Maytag MDB7609AWB | Installation Instructions - Page 8
right-hand cabinet side or rear. See product and cabinet opening dimensions. Drill a 1/2" (1.3 cm) hole in the cabinet side hole until smooth. Metal cabinet: Cover hole with grommet (Part Number 302797 - not provided). 8 Measure overall length of dishwasher should have a manual shutoff valve. - Maytag MDB7609AWB | Installation Instructions - Page 9
of the disposer or a waste tee must be made before the drain trap and at least 20" (50.8 cm) above the floor where the dishwasher will be installed. Helpful "lip: To reduce vibration of the hose, keep the hose away from the floor. Option A, Waste disposer - no air gap ....Drai 1. Using a hammer - Maytag MDB7609AWB | Installation Instructions - Page 10
type clamps (not provided) to connect from air gap to disposer inlet. 10 Connect black end of drain hose to air gap and cut if needed. (Do not cut air gap. Install moisture barrier (on some models) I Moisture barrier 1. Make sure the area under the cabinet is clean and dry for installation of the - Maytag MDB7609AWB | Installation Instructions - Page 11
provided). Wrap tape around coarse threads two to four times to prohibit leaks. Helpful "13p:Place cardboard under dishwasher until installed in cabinet opening to avoid damaging floor covering. Do not use door panel as a work table without first covering with a towel to avoid scratching the door - Maytag MDB7609AWB | Installation Instructions - Page 12
lower part of dishwasher tub. Pull cord through strain relief in terminal bow. Take notice when installing or removing the dishwasher in order to reduce the chance of damaging the power supply cord. Select UL listed or CSA approved twist-on wire connectors (included with power supply cord kit) rated - Maytag MDB7609AWB | Installation Instructions - Page 13
W!re _ black ground connector If needed, see website for animated representation of this step. Visit www.maytag.eom under FAQ tab. J Power cord - Secure cord on conduit connector 0 Measure height of cabinet opening from underside of countertop to floor where dishwasher will be installed (you - Maytag MDB7609AWB | Installation Instructions - Page 14
Failure to do so can result in back or other injury. 1__.]Stand dishwasher uprigh Instaltlhe Door Handle (on some models) Using two or more people, stand dishwasher upright. NOTE: Do not install kickplate until instructed. Remove the door handle and hardware bag containing the setscrews and Allen - Maytag MDB7609AWB | Installation Instructions - Page 15
tensioner to a higher number hole and replace screw. Reattach door spring to rear leg. NOTE: Tensioners on both sides of dishwasher should be secured at same holes. Align front of dishwasher door panel with front of cabinet doors. You may need to adjust alignment to be even with your cabinets. 15 - Maytag MDB7609AWB | Installation Instructions - Page 16
then ferrule onto copper tubing about 1" (2.5 cm). NOTE: To avoid vibration during operation, route the water supply line so that it does not touch the dishwasher base, frame or motor. Copper tubing only: Put the tubing into the 90 ° elbow fitting as far as it will go (the copper tubing bends - Maytag MDB7609AWB | Installation Instructions - Page 17
so that it does not touch dishwasher motor or lower part of dishwasher tub. Pull cable through cable clamp in terminal box. Select UL listed or CSA approved twist-on wire connectors (not included) rated to connect your household wiring to 16-gauge dishwasher wiring. Using pliers, squeeze open the - Maytag MDB7609AWB | Installation Instructions - Page 18
ground dishwasher. Connect ground wire to green ground connector in terminal box. Do not use an extension cord. Failure to follow these instructions can be sure both are secured. Connect wires black to black and white to white, using UL listed or CSA approved twist-on wire connectors (not - Maytag MDB7609AWB | Installation Instructions - Page 19
, granite, etc., you must use side mounting kit (Part Number 8212560). Follow kit instructions. (Brackets are included with kit.) Check that top of door does not contact screws, brackets, or countertop. If it does, adjust leveling legs. Open dishwasher door, remove lower dish rack, and place towel - Maytag MDB7609AWB | Installation Instructions - Page 20
.einstatlhl elowerdish rack. If neededs,eewebsiteforanimatedrepresentation of thisstep.Visitwww.maytag.com/anchourindger FAQtab. Complete Installation Hold the two panels together and place them against dishwasher leg. Using a Phillips or 1/4" screwdriver, reinstall the screws through - Maytag MDB7609AWB | Installation Instructions - Page 21
none of these solve the problem, call 1-800-688-9900, or in Canada, call 1-800-807-6777. Additional Tips Expect longer wash times. Your new dishwasher will average 2 to 3 hours per load, but use nearly 40% less energy than older models. Designed with a low wattage, low energy consumption motor, your - Maytag MDB7609AWB | Installation Instructions - Page 22
Notes 22 - Maytag MDB7609AWB | Installation Instructions - Page 23
d'emplacement 25 Exigences d'evacuation 27 Specifications de I'alimentation en eau 27 Specifications electriq ues 27 Instructions d'installation 28 Preparation de I'ouverture d'encastrement du placard - Moyens de raccordement preexistants ..... 28 Preparation de I'ouverture - Maytag MDB7609AWB | Installation Instructions - Page 24
entreprendre I'installation. Lire et observer les instructions fournies avec chacun des outils de la liste ci-dessous. Toutes les installations Outillage par un 61ectricien qualifi6 agr66. D'autre part, pour les premieres installations Outillage n6cessaire : PerCeuSe 61ectrique avec m_ches - Maytag MDB7609AWB | Installation Instructions - Page 25
de niveau sur le plancher entre I'avant et I'arriere de I'emplacement d'installation, il pourrait 6tre necessaire d'utiliser des cales pour etablir I'aplomb de I'appareil). Censeil utile : Veiller a mesurer correctement les dimensions et s'assurer que le lave-vaisselle est d'aplomb si le plancher - Maytag MDB7609AWB | Installation Instructions - Page 26
Dimensions du produit et de I'ouverture d'encastrement du placard ./ / *La plaque d'insonorisation peut _tre comprimee (pas utilis6e sur tousles mod_les) Verifier que toutes de toute protrusion I'installation les surfaces sont libres qui pourrait emp_cher du lave-vaisselle REMARQUE • La zone - Maytag MDB7609AWB | Installation Instructions - Page 27
de diametre interieur minimal de 1/2" pour le conduit d'evacuation. • Si necessaire, le dispositif de brise-siphon dolt _tre installe conformement aux instructions d'installation de ce dernier. Lors du raccordement du dispositif de brisesiphon a la canalisation d'egout en T ou au raccord de broyeur - Maytag MDB7609AWB | Installation Instructions - Page 28
emplacements indiques, passer a la section "Installation du tuyau d'evacuation". S'ils ne sont pas assez longs, suivre les instructions dans la section "Preparation de I'ouverture paroi laterale ou arriere du placard. 28 Voir les dimensions du produit et de I'ouverture d'encastrement du placard. - Maytag MDB7609AWB | Installation Instructions - Page 29
I'ouverture du placard. Emplacement Percer un trou de 3/4" (1,9 cm) dans le c6te droit de la paroi laterale ou arriere du placard. Voir les dimensions du produit et de I'ouverture d'encastrement du placard. Percer un trou de 1/2" (1,3 cm) dans la paroi laterale ou arriere du placard. Placard en - Maytag MDB7609AWB | Installation Instructions - Page 30
dechets dolt 6tre realise en amont du siphon du circuit d'evacuation eta au moins 20" (50,8 cm) au-dessus du plancher de I'espace d'installation du lave-vaisselle. Censeil utile : Afin de minimiser les vibrations du tuyau, le tenir a distance du plancher. Option A - broyeur a d_chets - sans brise - Maytag MDB7609AWB | Installation Instructions - Page 31
mod@les) h__ surcertainsmodeles) l Barriere anti-humidite 1. Veiller ace que la zone se trouvant sous le placard soit propre et seche avant d'installer la barriere antihumidit& 2. Oter I'endos de la barriere anti-humidite et appliquer la barriere sur le dessous du plan de travail, le long - Maytag MDB7609AWB | Installation Instructions - Page 32
peut causer des blessures graves ou des coupures. Risque du poids excessif Utiliser deux personnes ou plus pour d_placer et installer le lave-vaisselle. Le non=respect de cette instruction peut causer une blessure au dos ou d'autre blessure. Garnir le filetage du raccord coude de 90 ° de ruban de - Maytag MDB7609AWB | Installation Instructions - Page 33
Ne pas utiliser un cable de rallonge. Le non=respect de ces instructions peut causer un d_ces, un incendie ou un choc 61ectrique. QI'uutielilsattyepuer deemcopnlonie lave-vaisselle. REIVlARQUE : Ne pas pre-torsader les brins de conducteurs. Installer le connecteur de ills en le faisant pivoter. Tirer doucement sur les - Maytag MDB7609AWB | Installation Instructions - Page 34
,isiterlesiteWebpourunerepresentation videodecetteetapeV. isitewr ww.maytag.cosmous I'ongletFAQ. f:valuation de on peut enlever les roulettes arriere pour obtenir un degagement supplementaire. On pourra ainsi installer le lave-vaisselle dans une ouverture d'encastrement du placard elevee de 33 7/8" - Maytag MDB7609AWB | Installation Instructions - Page 35
de fixation/_/ de la poign6e de porte Risque du poids excessif Utiliser deux personnes ou plus pour d_placer et installer le lave-vaisselle. Le non=respect de cette instruction peut causer une blessure au dos ou d'autre blessure. A I'aide d'au moins deux personnes, mettre le lavevaisselle en - Maytag MDB7609AWB | Installation Instructions - Page 36
. REMARQUE : Le fait qu'il n'y ait que peu d'espace entre le lave-vaisselle et I'ouverture d'encastrement du placard ne pose pas de probleme. Ne pas enlever la plaque d'insonorisation -celle-ci reduit le niveau sonore. REMARQUE : En cas d'utilisation d'un cordon d'alimentation, veiller a acheminer - Maytag MDB7609AWB | Installation Instructions - Page 37
AlignerI'avandt upanneadueportedulave-vaisselle avecI'avandt esportesdesplacardsII.faudrapeut-6tre ajusteIr'alignemendtecelui-cpi ourqu'ilsoiten affleuremenatveclesplacards. Placelre niveaucentrelapartiesuperieurdeeI'ouverture avandt elacuve.VerifieIr'aplombtransversadle I'appareiSl. ilelave- - Maytag MDB7609AWB | Installation Instructions - Page 38
ousleraccordcoudede 90°. OuvrirI'alimentatioenneauet inspecteprour identifietroutefuite.Siunefuiteseproduitr,epeter I'etapeprecedente. Aubesoinv,isiterlesiteWebpourunerepresentation videodecetteetapeV. isiterwww.maytag.cem/drain sousI'ongletFAQ. Apres que le tuyau soit raccorde, 6ter la serviette - Maytag MDB7609AWB | Installation Instructions - Page 39
Ne pas utiliser un cable de rallonge. Le non-respect de ces instructions peut causer un d_c_s, un incendie ou un choc _lectrique. J Raccordement horaire). Serrer fermement le conducteur de liaison a la terre. REMARQUE : Installer un connecteur de ills (homologation UL ou CSA). Tirer doucement sur - Maytag MDB7609AWB | Installation Instructions - Page 40
site Web pour une representation video de cette etape. Visiter www.maytag.com/electrical sous I'onglet FAQ. Fixation du lave-vaisselle dans un ensemble de montage par le c6te (piece numero 8212560). Suivre les instructions de I'ensemble. (Brides comprises dans I'ensemble). Placer les conducteurs a - Maytag MDB7609AWB | Installation Instructions - Page 41
site Web pour une representation video de cette etape. Visiter www.maytag.com/anchoring sous I'onglet FAQ. Achever l'installation Ouvrirla porteet verifierquela distancentre I'ouverturdeuplacardpourI'installatiodnulavevaisselletlacuveestlam6medesdeuxc6tesS. i la distancen'estpaslam6med, esserreler - Maytag MDB7609AWB | Installation Instructions - Page 42
la broche de liaison a la terre. Ne pas utiliser un adaptateur. Ne pas utilJser un c&ble de rallonge. Le non=respect de ces instructions peut causer un d_c_s, un incendie ou un choc _lectrique. Cordon d'alimentation electrique Branchement dans une prise 3 alveoles reliee a la terre Verifier que - Maytag MDB7609AWB | Installation Instructions - Page 43
[_ Lire les instructions d'utilisation du lave aucune de ces verifications ne resout le probleme, composer le 1-800-688-9900. Au Canada, composer le 1-800-807-6777. Conseils lavage d'exception. Certains modeles sont dotes d'un capteur optique de niveau d'eau; pour ces modeles, le premier programme - Maytag MDB7609AWB | Installation Instructions - Page 44
trademark/TM Trademark of Maytag Corporation or its related companies. @Marque d6pos_e/TM Marque de commerce de Maytag Corporation ou de ses compagnies affili_es, Used under license by Maytag Limited in Canada, Emploi sous licence par Maytag Limited au Canada, 2/09 Printed in U.S.A. Imprim6
-
 1
1 -
 2
2 -
 3
3 -
 4
4 -
 5
5 -
 6
6 -
 7
7 -
8
-
9
-
10
-
11
-
12
-
13
-
14
-
15
-
16
-
17
-
18
-
19
-
20
-
21
-
22
-
23
-
24
-
25
-
26
-
27
-
28
-
29
-
30
-
31
-
32
-
33
-
34
-
35
-
36
-
37
-
38
-
39
-
40
-
41
-
42
-
43
-
44
 |
 |

INSTALLATION INSTRUCTIONS
UNDERCOUNTER DISHWASHER
STAINLESSSTEELGIANT TUBMODELS
INSTRUCTIONSD'INSTALLATION
LAVE-VAISSELLESOUS PLAN DE TRAVAIL
MODELES GEANTS DE CUVE D'ACIER INOXYDABLE
Table
of Contents
...................................
2
Table
des matieres
..................................
23
W10199707A