Memorex MVBD2535 User Guide - Page 40
Connection, Manual Network Setup, Network Setup Menu, Network Test, Information Setup Menu, Quick
 |
View all Memorex MVBD2535 manuals
Add to My Manuals
Save this manual to your list of manuals |
Page 40 highlights
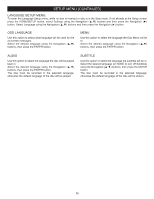
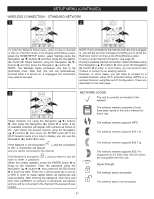
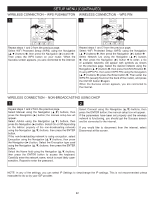
SETUP MENU (CONTINUED) NETWORK SETUP MENU: To enter the Network Setup menu, while no disc is inserted or disc is in the Stop mode, if not already at the Setup screen press the HOME/SETUP button, select Settings using the Navigation (π,†) buttons and then press the Navigation (®) button. Select Network using the Navigation (π,†) buttons and then press the Navigation (®) button. CONNECTION If using a wired internet connection, select WIRED using the Navigation (π,†) buttons, then press the ENTER button, and the unit will automatically be configured to access the internet. If successful, you will get the message, Wired network connection successfully set up. If using a wireless internet connection, see pages 41-42. NETWORK TEST The unit will perform a network test. When the test is complete, a confirmation window will appear. Press the ENTER button to select "OK". If the test fails, double-check your Ethernet cable connection, wireless router, IP settings, or contact your ISP. MANUAL NETWORK SETUP Link Status: If the network connection is active, "Link Up" appears below Link Status. If the network connection is not active, "Link Down" displays below Link Status. MAC Address: This will show the MAC Address. IP Mode: Select Off to disable the interface. Select Manual to manually configure network settings, such as IP address, subnet mask, and gateway settings. Select Dynamic to use the DHCP to automatically obtain the IP Address. You can configure the IP Address, Subnet Mask, Gateway, Primary DNS and Secondary DNS, but it is not recommended unless informed to do so by your ISP provider. Press the ENTER button when confirming these options. INFORMATION SETUP MENU: To enter the Network Setup menu, while no disc is inserted or disc is in the Stop mode, if not already at the Setup screen press the HOME/SETUP button, select Settings using the Navigation (π,†) buttons and then press the Navigation (®) button. Select Info using the Navigation (π,†) buttons and then press the Navigation (®) button. The information on the unit, such as Software Version, Software Date, Hardware Version, etc. will appear. These items cannot be changed. QUICK SETUP MENU: To enter the Quick Setup menu, while no disc is inserted or disc is in the Stop mode, if not already at the Setup screen press the HOME/SETUP button, select Settings using the Navigation (π,†) buttons and then press the Navigation (®) button. Select Quick Setup using the Navigation (π,†) buttons and then press the Navigation (®) button. If you select "Yes, perform Quick Setup", you can select OSD language, Resolution and TV aspect, or select "No, thanks. I'll go through the full setup menu later" to return to the previous menu. 39
-
 1
1 -
2
-
3
-
4
-
5
-
6
-
7
-
8
-
9
-
10
-
11
-
12
-
13
-
14
-
15
-
16
-
17
-
18
-
19
-
20
-
21
-
22
-
23
-
24
-
25
-
26
-
27
-
28
-
29
-
30
-
31
-
32
-
33
-
34
-
 35
35 -
 36
36 -
 37
37 -
 38
38 -
 39
39 -
 40
40 -
 41
41 -
 42
42 -
 43
43 -
 44
44 -
 45
45 -
46
-
47
-
48
-
49
-
50
-
51
-
52
-
53
-
54
-
55
-
56
-
57
-
58
-
59
-
60
-
61
-
62
-
63
-
64
-
65
-
66
-
67
-
68
-
69
-
70
-
71
-
72
-
73
-
74
-
75
-
76
-
77
-
78
-
79
-
80
-
81
-
82
-
83
-
84
-
85
-
86
-
87
-
88
-
89
-
90
-
91
-
92
-
93
-
94
-
95
-
96
-
97
-
98
-
99
-
100
-
101
-
102
-
103
-
104
-
105
-
106
-
107
-
108
-
109
-
110
-
111
-
112
-
113
-
114
-
115
-
116
-
117
-
118
-
119
-
120
-
121
-
122
-
123
-
124
-
125
-
126
-
127
-
128
-
129
-
130
-
131
-
132
-
133
-
134
-
135
-
136
-
137
-
138
-
139
-
140
-
141
-
142
-
143
-
144
-
145
-
146
-
147
-
148
-
149
-
150
-
151
-
152
-
153
-
154
-
155
-
156
-
157
-
158
-
159
-
160
-
161
-
162
-
163
-
164
-
165
-
166
-
167
-
168
-
169
-
170
-
171
-
172
-
173
-
174
-
175
-
176
-
177
-
178
-
179
-
180
-
181
-
182
-
183
-
184
-
185
-
186
-
187
-
188
-
189
-
190
-
191
-
192
-
193
-
194
 |
 |