Memorex MVBD2535 User Guide - Page 43
Wireless Connection - Wps Pushbutton, Wireless Connection - Wps Pin, Wireless Connection - Non-
 |
View all Memorex MVBD2535 manuals
Add to My Manuals
Save this manual to your list of manuals |
Page 43 highlights
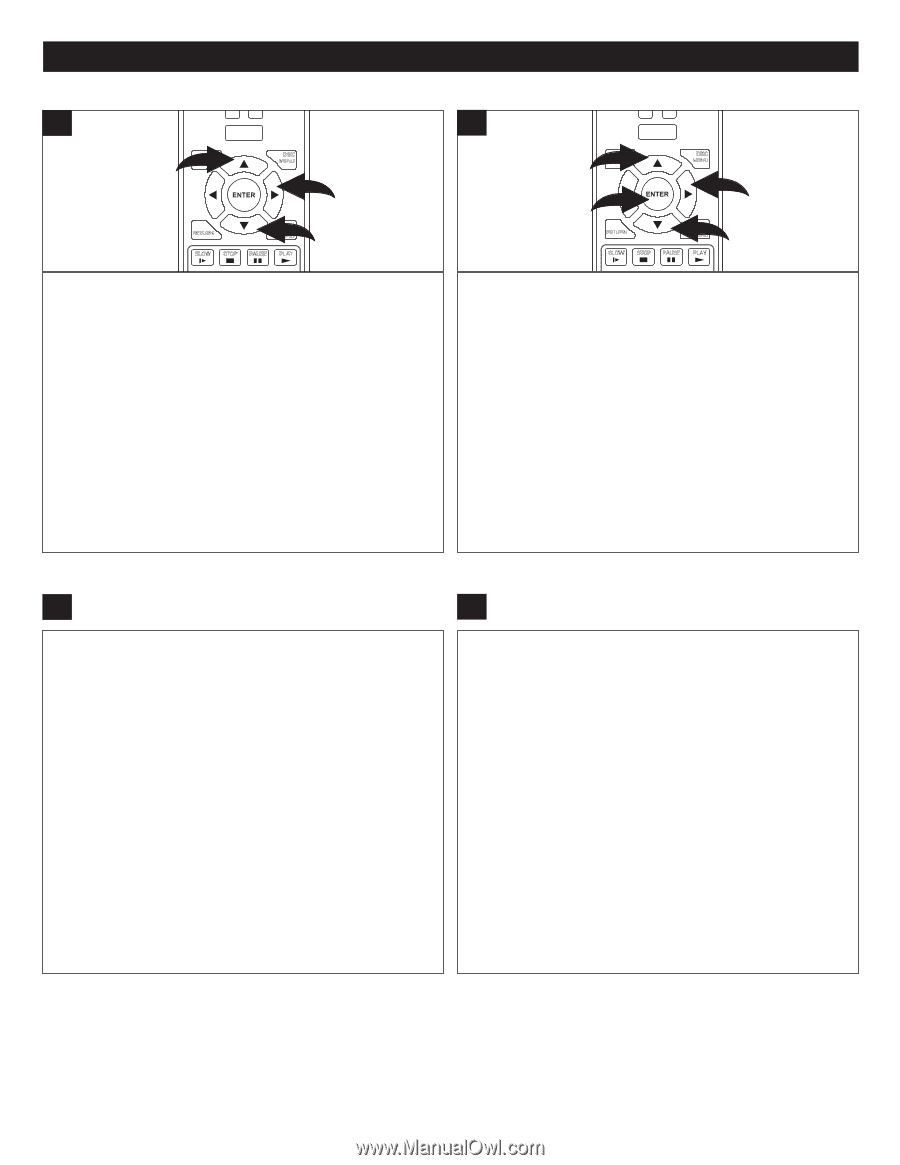
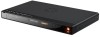
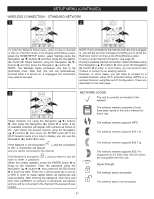
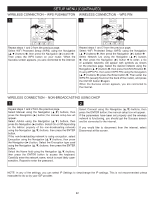
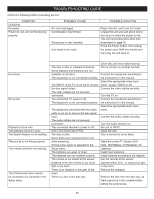
SETUP MENU (CONTINUED) WIRELESS CONNECCLEARTION - WPS SEARCH PUSHBUTTON ANGLE TV RES. 1 HOME/SETUP WIRELESS CONNECLECAR TION - WPS SEARCH PIN ANGLE TV RES. 1 HOME/SETUP 1 DISPLAY DISC MENU 2 RETURN 1POP-UP MENU SLOW STOP PAUSE PLAY 1 DISPLAY 3 DISC MENU 2 RETURN 1POP-UP MENU SLOW STOP PAUSE PLAY Repeat steps 1 and 2 from PREV. RtEWhe pF.FrevNiEoXTus page. Select WiFi Protected Setup (WPS) STEP SUBTITLE AUDIO using the Navigation (π,†) buttons 1, then press the Navigation (®) button 2. RANDOM A-B REPEAT Then press the WPS button on your router. When the Success screen appears, you are connected to the internet. Repeat steps 1 and 2 fPrREoV. mREtWhe pF.FrevNiEoXT us page. Select WiFi Protected Setup (WPS) STEP SUBTITLE AUDIO using the Navigation (π,†) buttons 1, then press the Navigation (®) button 2. RANDOM A-B REPEAT Select Network List using the Navigation (π,†) buttons 1, then press the Navigation (®) button 2 to enter; a list of available networks will appear with symbols as shown on the previous page. Select the desired network using the Navigation (π,†) buttons 1, then press the ENTER button 3. If using WPS Pin, then select WPS PIN using the Navigation (π,†) buttons 1; press the Enter button 3. Then enter the WPS Pin (usually found on the back of the router), and press the ENTER button 3 again. When the Success screen appears, you are connected to the internet. WIRELESS CONNECTION - NON-BROADCASTING USING DHCP 1 2 Repeat steps 1 and 2 from the previous page. Select Manual using the Navigation (π,†) buttons, then press the Navigation (®) button; the manual setup box wil appear. Select AdHoc using the Navigation (π,†) buttons, then press the Navigation (®) button. Select On or Off depending on the AdHoc property of the non-broadcasting network) using the Navigation (π,†) buttons, then press the ENTER button. If the non-broadcasting network is using encryption, select Encryption using the Navigation (π,†) buttons, then press the Navigation (®) button. Select the Encryption type used using the Navigation (π,†) buttons, then press the ENTER button. Select the Name field using the Navigation (π,†) buttons, then press the ENTER button to access the keyboard. Carefully enter the network name, which is most likely case- sensitive. Repeat to enter the password. Select Connect using the Navigation (π,†) buttons, then press the ENTER button; the manual setup box wil appear. If the parameters have been set properly and the wireless network is functioning, you should get the Success screen and be connected to the internet. If you would like to disconnect from the internet, select Disconnect at this screen. NOTE: In any of the settings, you can select IP Settings to view/change the IP settings. This is not recommended unless instructed to do so by your ISP provider. 42
-
 1
1 -
2
-
3
-
4
-
5
-
6
-
7
-
8
-
9
-
10
-
11
-
12
-
13
-
14
-
15
-
16
-
17
-
18
-
19
-
20
-
21
-
22
-
23
-
24
-
25
-
26
-
27
-
28
-
29
-
30
-
31
-
32
-
33
-
34
-
35
-
36
-
37
-
 38
38 -
 39
39 -
 40
40 -
 41
41 -
 42
42 -
 43
43 -
 44
44 -
 45
45 -
 46
46 -
 47
47 -
 48
48 -
49
-
50
-
51
-
52
-
53
-
54
-
55
-
56
-
57
-
58
-
59
-
60
-
61
-
62
-
63
-
64
-
65
-
66
-
67
-
68
-
69
-
70
-
71
-
72
-
73
-
74
-
75
-
76
-
77
-
78
-
79
-
80
-
81
-
82
-
83
-
84
-
85
-
86
-
87
-
88
-
89
-
90
-
91
-
92
-
93
-
94
-
95
-
96
-
97
-
98
-
99
-
100
-
101
-
102
-
103
-
104
-
105
-
106
-
107
-
108
-
109
-
110
-
111
-
112
-
113
-
114
-
115
-
116
-
117
-
118
-
119
-
120
-
121
-
122
-
123
-
124
-
125
-
126
-
127
-
128
-
129
-
130
-
131
-
132
-
133
-
134
-
135
-
136
-
137
-
138
-
139
-
140
-
141
-
142
-
143
-
144
-
145
-
146
-
147
-
148
-
149
-
150
-
151
-
152
-
153
-
154
-
155
-
156
-
157
-
158
-
159
-
160
-
161
-
162
-
163
-
164
-
165
-
166
-
167
-
168
-
169
-
170
-
171
-
172
-
173
-
174
-
175
-
176
-
177
-
178
-
179
-
180
-
181
-
182
-
183
-
184
-
185
-
186
-
187
-
188
-
189
-
190
-
191
-
192
-
193
-
194
 |
 |