Memorex MVBD2535 User Guide - Page 42
Wireless Connection - Standard Network, Network Icons
 |
View all Memorex MVBD2535 manuals
Add to My Manuals
Save this manual to your list of manuals |
Page 42 highlights
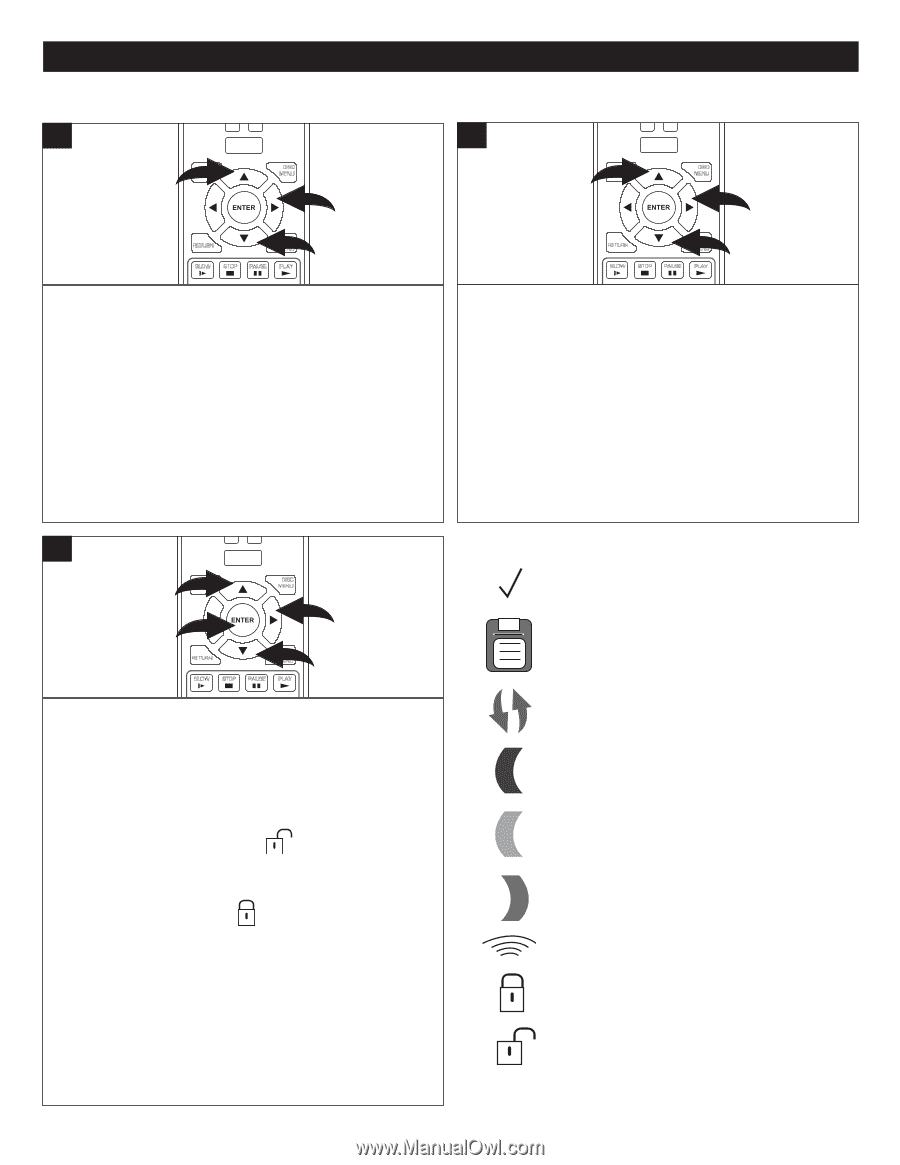
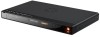
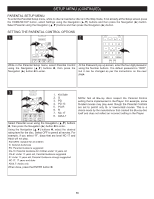
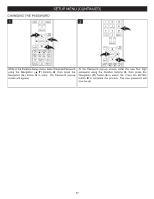
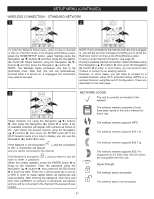
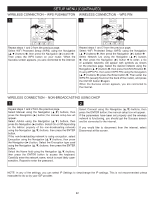
SETUP MENU (CONTINUED) WIRELESS CONNECLECAR TION -SEASRCHTANDARD NETWORK ANGLE TV RES. 1 HOME/SETUP 2 1 DISPLAY DISC MENU 2 CLEAR SEARCH ANGLE TV RES. HOME/SETUP 1 DISPLAY DISC MENU 2 RETURN 1POP-UP MENU SLOW STOP PAUSE PLAY To enter the Network SPReEV.tupREWmeFn.F u, NwEXThile no disc is inserted or disc is in the Stop moSdTEPe, if not SUBTITLE alrAUeDIaO dy at the Setup screen press the HOME/SETUP button, select Settings using the Navigation (π,†) RANDOM buttons 1 A-B and REPEAT then press the Navigation (®) button 2. Select POWER Network OPEN/CLOSE using the Navigation (π,†) buttons 1 and then press the Navigation (®) button 2. NOTE: The Wireless ASetuB p pC roceD dure only has to be performed once. After that, the unit will automatically connect when it is turned on. If unplugged, the connection may need to be reset. 3 CLEAR SEARCH ANGLE TV RES. HOME/SETUP 1 DISPLAY DISC MENU 2 3 RETURN b1POP-UP MENU SLOW STOP PAUSE PLAY Select Network List PREV. REW g F.F NEXT using the Navigation (π,†) buttons 1, then press the NavSiTgEPatioSUnBTITL(E®)AUDbIOutton 2 to enter; a list of available networks will appear wnith symbols as shown to the right. Select the b RANDOM A-B REPEAT desired network using the Navigation (π,†) buttons 1, then press the ENTER button 3. If the Wi-Fi network name is too logng to display, you can use the Navigation (®) button 2 to view. If the Network is not encryptedn ( ), and the connection is OK, a checkmark will appear and you will be connected to the internet. If the Network is encrypted ( ), and you select it, you will have to enter a password. When the screen appears, press the ENTER button 3 to bring up the keyboard. Enter the password using the Navigation (π,†) buttons 1, then press the ENTER button 3 to enter the letter. Press the x (arrow upxx) key to act as a Shift in order to make capital letters, as passwords are case-sensitive. After entering the password, click done and then click CONNECT to connect; a checkmark will appear and you will be connected to the internet if the password was correct. RETURN 1POP-UP MENU SLOW STOP PAUSE PLAY NOTE: If not connected toPREV. thReEWinteF.FrneNtEXwT hen the unit is plugged in, you will get an error message STEP SUBTITLE pArUoDImO pting you to press the Red Color button to bring up the Wired/Wireless option. RANDOM A-B REPEAT If using a wired internet connection, see page 39. If using a wireless internet connection: Select Wireless using the Navigation (π,†) buttons 1, then press the Navigation (®) button 2 to enter. In most cases, you can perform step 3 below to connect to an existing network. However, in some cases, you will have to connect to a wireless Network using Wi-Fi protected Setup (WPS) or a wireless Network using Manual IP Configuration. These are described on the next page. NETWORK ICONS The unit is currently connected to this network. The wireless network properties (if any) have been saved in the unit's memory for future use. The wireless network supports WPS. b The wireless network supports 802.11b. g The wireless network supports 802.11g. n The wireless network supports 802.11n (supported at 2.4 GHz only). Not all routers are compatible with this unit. Signal Strength. The wireless data is encrypted. The wireless data is not encrypted. 41
-
 1
1 -
2
-
3
-
4
-
5
-
6
-
7
-
8
-
9
-
10
-
11
-
12
-
13
-
14
-
15
-
16
-
17
-
18
-
19
-
20
-
21
-
22
-
23
-
24
-
25
-
26
-
27
-
28
-
29
-
30
-
31
-
32
-
33
-
34
-
35
-
36
-
 37
37 -
 38
38 -
 39
39 -
 40
40 -
 41
41 -
 42
42 -
 43
43 -
 44
44 -
 45
45 -
 46
46 -
 47
47 -
48
-
49
-
50
-
51
-
52
-
53
-
54
-
55
-
56
-
57
-
58
-
59
-
60
-
61
-
62
-
63
-
64
-
65
-
66
-
67
-
68
-
69
-
70
-
71
-
72
-
73
-
74
-
75
-
76
-
77
-
78
-
79
-
80
-
81
-
82
-
83
-
84
-
85
-
86
-
87
-
88
-
89
-
90
-
91
-
92
-
93
-
94
-
95
-
96
-
97
-
98
-
99
-
100
-
101
-
102
-
103
-
104
-
105
-
106
-
107
-
108
-
109
-
110
-
111
-
112
-
113
-
114
-
115
-
116
-
117
-
118
-
119
-
120
-
121
-
122
-
123
-
124
-
125
-
126
-
127
-
128
-
129
-
130
-
131
-
132
-
133
-
134
-
135
-
136
-
137
-
138
-
139
-
140
-
141
-
142
-
143
-
144
-
145
-
146
-
147
-
148
-
149
-
150
-
151
-
152
-
153
-
154
-
155
-
156
-
157
-
158
-
159
-
160
-
161
-
162
-
163
-
164
-
165
-
166
-
167
-
168
-
169
-
170
-
171
-
172
-
173
-
174
-
175
-
176
-
177
-
178
-
179
-
180
-
181
-
182
-
183
-
184
-
185
-
186
-
187
-
188
-
189
-
190
-
191
-
192
-
193
-
194
 |
 |