Netgear RND4000 RND4000 User Manual - Page 40
Changing between X-RAID and Flex-RAID Modes, Snapshots, Taking and Scheduling Snapshots - reset
 |
UPC - 606449053272
View all Netgear RND4000 manuals
Add to My Manuals
Save this manual to your list of manuals |
Page 40 highlights
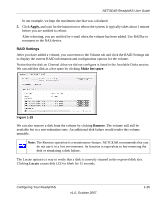
NETGEAR ReadyNAS User Guide When you receive a completion notification for the fourth disk, reboot the ReadyNAS. During reboot, volume capacity is expanded with the additional capacity from each disk. For instance, if you replaced four 250GB disks with four 600GB disks, the capacity of the volume increases by approximately 350GB x 3 (the fourth disk is reserved for parity). The expansion process takes several hours depending on the expanded capacity, and you will be notified by e-mail when the process is complete. There is no access to the ReadyNAS during this time. Changing between X-RAID and Flex-RAID Modes You can switch between X-RAID and Flex-X-RAID modes. The process involves setting the ReadyNAS to the factory default and using RAIDar to configure the volume during a 10-minute delay window during boot. See Chapter 3, "Resetting Your System (System Switch) for more information. Snapshots The Volume screen allows you to schedule and take snapshots. You can visualize a snapshot as a frozen image of a volume at the time you take the snapshot. Snapshots are typically used for backups, during which time the original volume can continue to operate normally. As primary storage becomes larger, offline backups tend to become increasingly difficult as backup time increases beyond offline hours. Snapshots allow backups to occur without the need to take your systems offline. Snapshots also can be used as temporary backups. For example, if a file on the NAS device becomes infected with a virus, the uninfected file can be restored from a prior snapshot taken before the attack. Taking and Scheduling Snapshots To take or schedule a snapshot: 1. Click the Snapshot tab The Snapshot screen will display. You can specify how often a snapshot should be taken. Snapshots can be scheduled in intervals from once every 4 hours to once a week. Note: If you do not see a Snapshot tab within your volume tab, you did not reserve any space for snapshots when you added the volume. The ReadyNAS ships with a snapshot reserved space of 5 GB. 2. Specify the frequency and the days that you wish to schedule a snapshot: 1-28 v1.0, October 2007 Configuring Your ReadyNAS
-
 1
1 -
2
-
3
-
4
-
5
-
6
-
7
-
8
-
9
-
10
-
11
-
12
-
13
-
14
-
15
-
16
-
17
-
18
-
19
-
20
-
21
-
22
-
23
-
24
-
25
-
26
-
27
-
28
-
29
-
30
-
31
-
32
-
33
-
34
-
 35
35 -
 36
36 -
 37
37 -
 38
38 -
 39
39 -
 40
40 -
 41
41 -
 42
42 -
 43
43 -
 44
44 -
 45
45 -
46
-
47
-
48
-
49
-
50
-
51
-
52
-
53
-
54
-
55
-
56
-
57
-
58
-
59
-
60
-
61
-
62
-
63
-
64
-
65
-
66
-
67
-
68
-
69
-
70
-
71
-
72
-
73
-
74
-
75
-
76
-
77
-
78
-
79
-
80
-
81
-
82
-
83
-
84
-
85
-
86
-
87
-
88
-
89
-
90
-
91
-
92
-
93
-
94
-
95
-
96
-
97
-
98
-
99
-
100
-
101
-
102
-
103
-
104
-
105
-
106
-
107
-
108
-
109
-
110
-
111
-
112
-
113
-
114
-
115
-
116
-
117
-
118
-
119
-
120
 |
 |
