Netgear RND4000 RND4000 User Manual - Page 59
Remove files from backup destination, Remove deleted files on backup target for rsync - test
 |
UPC - 606449053272
View all Netgear RND4000 manuals
Add to My Manuals
Save this manual to your list of manuals |
Page 59 highlights
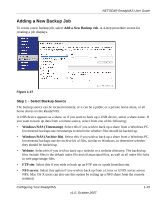
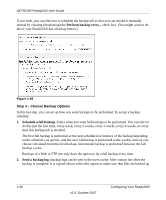
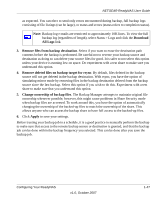
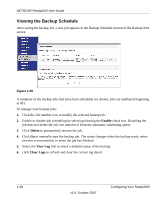
NETGEAR ReadyNAS User Guide as expected. You can elect to send only errors encountered during backup, full backup logs consisting of file listings (can be large), or status and errors (status refers to completion status). Note: Backup log e-mails are restricted to approximately 10K lines. To view the full backup log (regardless of length), select Status > Logs and click the Download All Logs link. 3. Remove files from backup destination. Select if you want to erase the destination path contents before the backup is performed. Be careful not to reverse your backup source and destination as doing so can delete your source files for good. It is safer to not select this option unless your device is running low on space. Do experiment with a test share to make sure you understand this option. 4. Remove deleted files on backup target for rsync. By default, files deleted in the backup source will not get deleted in the backup destination. With rsync, you have the option of simulating mirror mode by removing files in the backup destination deleted from the backup source since the last backup. Select this option if you wish to do this. Experiment with a test share to make sure that you understand this option. 5. Change ownership of backup files. The Backup Manager attempts to maintain original file ownership whenever possible; however, this might cause problems in Share Security mode when backup files are accessed. To work around this, you have the option of automatically changing the ownership of the backed-up files to match the ownership of the share. This allows anyone who can access the backup share to have full access to the backed-up files. 6. Click Apply to save your settings. Before trusting your backup job to a schedule, it is a good practice to manually perform the backup to make sure that access to the remote backup source or destination is granted, and that the backup job can be done within the backup frequency you selected. This can be done after you save the backup job. Configuring Your ReadyNAS v1.0, October 2007 1-47
-
 1
1 -
2
-
3
-
4
-
5
-
6
-
7
-
8
-
9
-
10
-
11
-
12
-
13
-
14
-
15
-
16
-
17
-
18
-
19
-
20
-
21
-
22
-
23
-
24
-
25
-
26
-
27
-
28
-
29
-
30
-
31
-
32
-
33
-
34
-
35
-
36
-
37
-
38
-
39
-
40
-
41
-
42
-
43
-
44
-
45
-
46
-
47
-
48
-
49
-
50
-
51
-
52
-
53
-
 54
54 -
 55
55 -
 56
56 -
 57
57 -
 58
58 -
 59
59 -
 60
60 -
 61
61 -
 62
62 -
 63
63 -
 64
64 -
65
-
66
-
67
-
68
-
69
-
70
-
71
-
72
-
73
-
74
-
75
-
76
-
77
-
78
-
79
-
80
-
81
-
82
-
83
-
84
-
85
-
86
-
87
-
88
-
89
-
90
-
91
-
92
-
93
-
94
-
95
-
96
-
97
-
98
-
99
-
100
-
101
-
102
-
103
-
104
-
105
-
106
-
107
-
108
-
109
-
110
-
111
-
112
-
113
-
114
-
115
-
116
-
117
-
118
-
119
-
120
 |
 |
