Netgear RND4000 RND4000 User Manual - Page 97
Replacing the Failed Disk on the ReadyNAS 600/X6, Warning
 |
UPC - 606449053272
View all Netgear RND4000 manuals
Add to My Manuals
Save this manual to your list of manuals |
Page 97 highlights
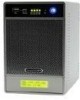
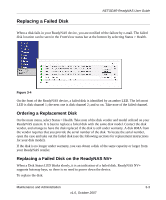
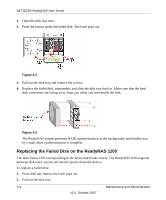
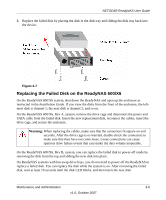
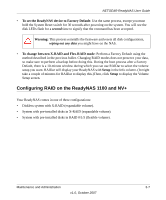
NETGEAR ReadyNAS User Guide 3. Replace the failed disk by placing the disk in the disk tray and sliding the disk tray back into the device. . Figure 3-7 Replacing the Failed Disk on the ReadyNAS 600/X6 On the ReadyNAS 600/X6 system, shut down the ReadyNAS and open up the enclosure as instructed in the Installation Guide. If you view the disks from the front of the enclosure, the leftmost disk is channel 1; the next disk is channel 2; and so on. On the ReadyNAS 600/X6, Rev A, system, remove the drive cage and disconnect the power and SATA cable from the failed disk. Insert the new replacement disk, reconnect the cables, insert the drive cage, and secure the enclosure. Warning: When replacing the cables, make sure that the connectors fit square-on and securely. After the drive cage is re-inserted, double-check the connectors to make sure that they have not come loose. Loose connections can cause spurious drive failure events that can render the data volume inoperable. On the ReadyNAS 600/X6, Rev B, system, you can replace the failed disk in power-off mode by removing the disk from the top and sliding the new disk into place. On ReadyNAS systems with hot-swap drive bays, you do not need to power off the ReadyNAS to replace a failed disk. You can replace the disk while the system is on. After removing the failed disk, wait at least 10 seconds until the disk LED blinks, and then insert the new disk. Maintenance and Administration 3-5 v1.0, October 2007
-
 1
1 -
2
-
3
-
4
-
5
-
6
-
7
-
8
-
9
-
10
-
11
-
12
-
13
-
14
-
15
-
16
-
17
-
18
-
19
-
20
-
21
-
22
-
23
-
24
-
25
-
26
-
27
-
28
-
29
-
30
-
31
-
32
-
33
-
34
-
35
-
36
-
37
-
38
-
39
-
40
-
41
-
42
-
43
-
44
-
45
-
46
-
47
-
48
-
49
-
50
-
51
-
52
-
53
-
54
-
55
-
56
-
57
-
58
-
59
-
60
-
61
-
62
-
63
-
64
-
65
-
66
-
67
-
68
-
69
-
70
-
71
-
72
-
73
-
74
-
75
-
76
-
77
-
78
-
79
-
80
-
81
-
82
-
83
-
84
-
85
-
86
-
87
-
88
-
89
-
90
-
91
-
 92
92 -
 93
93 -
 94
94 -
 95
95 -
 96
96 -
 97
97 -
 98
98 -
 99
99 -
 100
100 -
 101
101 -
 102
102 -
103
-
104
-
105
-
106
-
107
-
108
-
109
-
110
-
111
-
112
-
113
-
114
-
115
-
116
-
117
-
118
-
119
-
120
 |
 |
