Netgear RND4000 RND4000 User Manual - Page 46
Adding Shares, Shares screen, enter the share name, description and, optionally
 |
UPC - 606449053272
View all Netgear RND4000 manuals
Add to My Manuals
Save this manual to your list of manuals |
Page 46 highlights
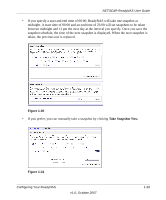
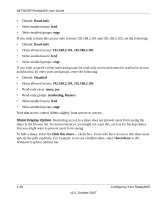
NETGEAR ReadyNAS User Guide Figure 1-36 Adding Shares To add a share: 1. From the main menu, select Volumes > Volume Settings. If more than one volume is configured, click on the volume you wish to add the share. 2. Select Add Shares. Add Shares has two views, depending on the security mode. In the Add Shares screen, enter the share name, description and, optionally, the password and disk quota. (The share password and share disk quota are available only in the security mode). Figure 1-37 1-34 v1.0, October 2007 Configuring Your ReadyNAS
-
 1
1 -
2
-
3
-
4
-
5
-
6
-
7
-
8
-
9
-
10
-
11
-
12
-
13
-
14
-
15
-
16
-
17
-
18
-
19
-
20
-
21
-
22
-
23
-
24
-
25
-
26
-
27
-
28
-
29
-
30
-
31
-
32
-
33
-
34
-
35
-
36
-
37
-
38
-
39
-
40
-
 41
41 -
 42
42 -
 43
43 -
 44
44 -
 45
45 -
 46
46 -
 47
47 -
 48
48 -
 49
49 -
 50
50 -
 51
51 -
52
-
53
-
54
-
55
-
56
-
57
-
58
-
59
-
60
-
61
-
62
-
63
-
64
-
65
-
66
-
67
-
68
-
69
-
70
-
71
-
72
-
73
-
74
-
75
-
76
-
77
-
78
-
79
-
80
-
81
-
82
-
83
-
84
-
85
-
86
-
87
-
88
-
89
-
90
-
91
-
92
-
93
-
94
-
95
-
96
-
97
-
98
-
99
-
100
-
101
-
102
-
103
-
104
-
105
-
106
-
107
-
108
-
109
-
110
-
111
-
112
-
113
-
114
-
115
-
116
-
117
-
118
-
119
-
120
 |
 |

NETGEAR ReadyNAS User Guide
1-34
Configuring Your ReadyNAS
v1.0, October 2007
Adding Shares
To add a share:
1.
From the main menu, select Volumes > Volume Settings. If more than one volume is
configured, click on the volume you wish to add the share.
2.
Select Add Shares. Add Shares has two views, depending on the security mode. In the Add
Shares screen, enter the share name, description and, optionally, the password and disk quota.
(The share password and share disk quota are available only in the security mode).
Figure 1-36
Figure 1-37