Netgear RND4000 RND4000 User Manual - Page 60
Viewing the Backup Schedule, Enable, Delete, View Log, Clear Logs
 |
UPC - 606449053272
View all Netgear RND4000 manuals
Add to My Manuals
Save this manual to your list of manuals |
Page 60 highlights
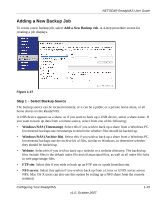
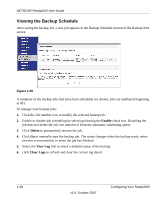
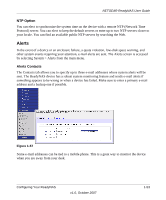
NETGEAR ReadyNAS User Guide Viewing the Backup Schedule After saving the backup job, a new job appears in the Backup Schedule section of the Backup Jobs screen. Figure 1-50 A summary of the backup jobs that have been scheduled are shown; jobs are numbered beginning at 001. To manage your backup jobs: 1. Click the Job number icon to modify the selected backup job. 2. Enable or disable job scheduling by selecting/clearing the Enable check box. Disabling the job does not delete the job, but removes it from the automatic scheduling queue. 3. Click Delete to permanently remove the job. 4. Click Go to manually start the backup job. The status changes when the backup starts, when an error is encountered, or when the job has finished. 5. Select the View Log link to check a detailed status of the backup. 6. click Clear Logs to refresh and clear the current log detail. 1-48 v1.0, October 2007 Configuring Your ReadyNAS
-
 1
1 -
2
-
3
-
4
-
5
-
6
-
7
-
8
-
9
-
10
-
11
-
12
-
13
-
14
-
15
-
16
-
17
-
18
-
19
-
20
-
21
-
22
-
23
-
24
-
25
-
26
-
27
-
28
-
29
-
30
-
31
-
32
-
33
-
34
-
35
-
36
-
37
-
38
-
39
-
40
-
41
-
42
-
43
-
44
-
45
-
46
-
47
-
48
-
49
-
50
-
51
-
52
-
53
-
54
-
 55
55 -
 56
56 -
 57
57 -
 58
58 -
 59
59 -
 60
60 -
 61
61 -
 62
62 -
 63
63 -
 64
64 -
 65
65 -
66
-
67
-
68
-
69
-
70
-
71
-
72
-
73
-
74
-
75
-
76
-
77
-
78
-
79
-
80
-
81
-
82
-
83
-
84
-
85
-
86
-
87
-
88
-
89
-
90
-
91
-
92
-
93
-
94
-
95
-
96
-
97
-
98
-
99
-
100
-
101
-
102
-
103
-
104
-
105
-
106
-
107
-
108
-
109
-
110
-
111
-
112
-
113
-
114
-
115
-
116
-
117
-
118
-
119
-
120
 |
 |
