Netgear RNR4410 Software Manual - Page 103
Set Ethernet Options, Enable WINS Support, Network > Interfaces, Apply
 |
UPC - 606449056853
View all Netgear RNR4410 manuals
Add to My Manuals
Save this manual to your list of manuals |
Page 103 highlights
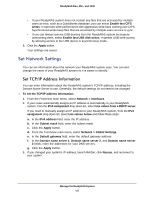
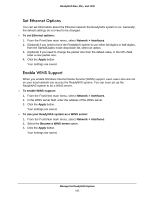
ReadyNAS Duo, NV+, and 1100 Set Ethernet Options You can set information about the Ethernet network the ReadyNAS system is on. Generally, the default settings do not need to be changed. To set Ethernet options: 1. From the FrontView main menu, select Network > Interfaces. 2. (Optional) If you need to force the ReadyNAS system to use either full-duplex or half-duplex, from the Speed/Duplex mode drop-down list, select an option. 3. (Optional) If you need to change the packet size from the default value, in the MTU field, enter a new packet size. 4. Click the Apply button. Your settings are saved. Enable WINS Support When you enable Windows Internet Name Service (WINS) support, even users who are not on your local network can access the ReadyNAS system. You can even set up the ReadyNAS system to be a WINS server. To enable WINS support: 1. From the FrontView main menu, select Network > Interfaces. 2. In the WINS server field, enter the address of the WINS server. 3. Click the Apply button. Your settings are saved. To use your ReadyNAS system as a WINS server: 1. From the FrontView main menu, select Network > Interfaces. 2. Select the Become a WINS server option. 3. Click the Apply button. Your settings are saved. Manage the ReadyNAS System 103
-
 1
1 -
2
-
3
-
4
-
5
-
6
-
7
-
8
-
9
-
10
-
11
-
12
-
13
-
14
-
15
-
16
-
17
-
18
-
19
-
20
-
21
-
22
-
23
-
24
-
25
-
26
-
27
-
28
-
29
-
30
-
31
-
32
-
33
-
34
-
35
-
36
-
37
-
38
-
39
-
40
-
41
-
42
-
43
-
44
-
45
-
46
-
47
-
48
-
49
-
50
-
51
-
52
-
53
-
54
-
55
-
56
-
57
-
58
-
59
-
60
-
61
-
62
-
63
-
64
-
65
-
66
-
67
-
68
-
69
-
70
-
71
-
72
-
73
-
74
-
75
-
76
-
77
-
78
-
79
-
80
-
81
-
82
-
83
-
84
-
85
-
86
-
87
-
88
-
89
-
90
-
91
-
92
-
93
-
94
-
95
-
96
-
97
-
 98
98 -
 99
99 -
 100
100 -
 101
101 -
 102
102 -
 103
103 -
 104
104 -
 105
105 -
 106
106 -
 107
107 -
 108
108 -
109
-
110
-
111
 |
 |
