Netgear RNR4410 Software Manual - Page 81
Create a Backup Job, Backup > Add a New Backup Job, Apply
 |
UPC - 606449056853
View all Netgear RNR4410 manuals
Add to My Manuals
Save this manual to your list of manuals |
Page 81 highlights
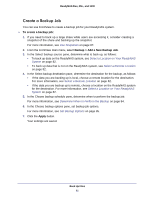
ReadyNAS Duo, NV+, and 1100 Create a Backup Job You can use FrontView to create a backup job for your ReadyNAS system. To create a backup job: 1. If you need to back up a large share while users are accessing it, consider creating a snapshot of the share and backing up the snapshot. For more information, see Use Snapshots on page 87. 2. From the FrontView main menu, select Backup > Add a New Backup Job. 3. In the Select backup source pane, determine what to back up, as follows: • To back up data on the ReadyNAS system, see Select a Location on Your ReadyNAS System on page 82. • To back up data that is not on the ReadyNAS system, see Select a Remote Location on page 82. 4. In the Select backup destination pane, determine the destination for the backup, as follows: • If the data you are backing up is local, choose a remote location for the destination. For more information, see Select a Remote Location on page 82. • If the data you are backup up is remote, choose a location on the ReadyNAS system for the destination. For more information, see Select a Location on Your ReadyNAS System on page 82. 5. In the Choose backup schedule pane, determine when to perform the backup job. For more information, see Determine When to Perform the Backup on page 84. 6. In the Choose backup options pane, set backup job options. For more information, see Set Backup Options on page 85. 7. Click the Apply button. Your settings are saved. Back Up Files 81
-
 1
1 -
2
-
3
-
4
-
5
-
6
-
7
-
8
-
9
-
10
-
11
-
12
-
13
-
14
-
15
-
16
-
17
-
18
-
19
-
20
-
21
-
22
-
23
-
24
-
25
-
26
-
27
-
28
-
29
-
30
-
31
-
32
-
33
-
34
-
35
-
36
-
37
-
38
-
39
-
40
-
41
-
42
-
43
-
44
-
45
-
46
-
47
-
48
-
49
-
50
-
51
-
52
-
53
-
54
-
55
-
56
-
57
-
58
-
59
-
60
-
61
-
62
-
63
-
64
-
65
-
66
-
67
-
68
-
69
-
70
-
71
-
72
-
73
-
74
-
75
-
 76
76 -
 77
77 -
 78
78 -
 79
79 -
 80
80 -
 81
81 -
 82
82 -
 83
83 -
 84
84 -
 85
85 -
 86
86 -
87
-
88
-
89
-
90
-
91
-
92
-
93
-
94
-
95
-
96
-
97
-
98
-
99
-
100
-
101
-
102
-
103
-
104
-
105
-
106
-
107
-
108
-
109
-
110
-
111
 |
 |
