Netgear RNR4410 Software Manual - Page 55
Select Who Can Access a Share Using HTTP with the User Security Mode
 |
UPC - 606449056853
View all Netgear RNR4410 manuals
Add to My Manuals
Save this manual to your list of manuals |
Page 55 highlights
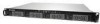
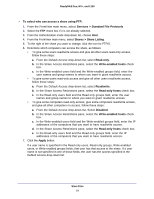
ReadyNAS Duo, NV+, and 1100 To select which computers can access a share using FTP: 1. From the FrontView main menu, select Shares > Share Listing. 2. To the right of the share you want to change, click the icon for FTP/S. If FrontView does not display an icon for FTP, you need to enable this file-sharing protocol on your ReadyNAS system. For more information, see Manage File-Sharing Protocols on page 43. 3. To specify that users must be at a specific computer before they have read-only access to the share, follow these steps: a. In the Share Access Restrictions pane, select the Read-enabled hosts check box. b. In the Read-enabled hosts field, enter a comma-separated list of the IP addresses of the computers. Users at other computers cannot access the share, even if their user names or groups are listed in another field. 4. To specify that users must be at a specific computer before they have read/write access to the share, follow these steps: a. In the Share Access Restrictions pane, select the Write-enabled hosts check box. b. In the Write-enabled hosts field, enter a comma-separated list of the network addresses for the computers Users at other computers cannot access the share, even if their user names or groups are listed in another field. 5. Click the Apply button. If a computer is specified in the Read-only hosts or Write-enabled hosts fields, users at that computer have that access to the share. If a computer is not specified in one of those fields, users at that computer cannot access the share. Select Who Can Access a Share Using HTTP with the User Security Mode If users access your share with HTTP, you have these choices for security: • If your ReadyNAS system is on a small local network and you can trust everyone on the network, you can let anyone on the network access the share. • If you need more security, you can specify which users can access the share and what type of access they can have. Every user has the same type of access. • For the most security, you can specify that a user must be at a specific computer to access the share. If that computer is in a locked room, users must know the correct user name and password and they need a key to the room. To specify a computer, you use its IP address, for example, 10.1.10.104. Store Files 55
-
 1
1 -
2
-
3
-
4
-
5
-
6
-
7
-
8
-
9
-
10
-
11
-
12
-
13
-
14
-
15
-
16
-
17
-
18
-
19
-
20
-
21
-
22
-
23
-
24
-
25
-
26
-
27
-
28
-
29
-
30
-
31
-
32
-
33
-
34
-
35
-
36
-
37
-
38
-
39
-
40
-
41
-
42
-
43
-
44
-
45
-
46
-
47
-
48
-
49
-
 50
50 -
 51
51 -
 52
52 -
 53
53 -
 54
54 -
 55
55 -
 56
56 -
 57
57 -
 58
58 -
 59
59 -
 60
60 -
61
-
62
-
63
-
64
-
65
-
66
-
67
-
68
-
69
-
70
-
71
-
72
-
73
-
74
-
75
-
76
-
77
-
78
-
79
-
80
-
81
-
82
-
83
-
84
-
85
-
86
-
87
-
88
-
89
-
90
-
91
-
92
-
93
-
94
-
95
-
96
-
97
-
98
-
99
-
100
-
101
-
102
-
103
-
104
-
105
-
106
-
107
-
108
-
109
-
110
-
111
 |
 |
