Netgear WNAP210 WNAP210 Reference Manual - Page 32
Deploying the Access Point, Wireless Network Name SSID, NETGEAR, Channel/Frequency, Apply - slow
 |
UPC - 606449062694
View all Netgear WNAP210 manuals
Add to My Manuals
Save this manual to your list of manuals |
Page 32 highlights
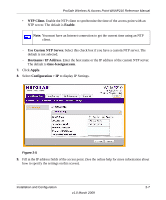
ProSafe Wireless-N Access Point WNAP210 Reference Manual • Wireless Network Name (SSID). Enter a 32-character (maximum) service set ID in this field; the characters are case-sensitive. When the wireless access point is deployed in "infrastructure" mode, the SSID assigned to a wireless device must match the wireless access point SSID for the wireless device to communicate with the access point. If they do not match, you will not get a wireless connection to the access point. The default is NETGEAR. • Broadcast Wireless Network Name (SSID). If Yes, the access point broadcasts its SSID allowing wireless stations which have a "null" (blank) SSID to adopt the correct SSID. If set to No, the SSID is not broadcast. The default is Yes. • Channel/Frequency. From the drop-down list, select the channel you wish to use on your wireless LAN. The wireless channels to use in the United States. and Canada are 1 to 11; for Europe and Australia, 1 to 13. The default is Auto. It should not be necessary to change the wireless channel unless you experience interference (shown by lost connections or slow data transfers). Should this happen, you might want to experiment with different channels to see which is the best. See the article "Wireless Networking Basics" available on the NETGEAR website. (A link to this article and other articles of interest can be found in Appendix B, "Related Documents.") 3. Click Apply to save your wireless settings. Deploying the Access Point Now that you have completed the setup steps, you can deploy the access point in your network. If necessary, you can now reconfigure the computer you used in Step1 "Installing the WNAP210 Wireless Access Point" on page 2-4. Tip: Before mounting the WNAP210 in a high location, first set up and test the WNAP210 to verify wireless network connectivity. To deploy the access point: 1. Disconnect the access point from the PC, and position it where it will be deployed. The best location is elevated, such as on a wall or ceiling or on the top of a cubicle, at the center of your wireless coverage area, and within line of sight of all the mobile devices. 2-10 v1.0 March 2009 Installation and Configuration
-
 1
1 -
2
-
3
-
4
-
5
-
6
-
7
-
8
-
9
-
10
-
11
-
12
-
13
-
14
-
15
-
16
-
17
-
18
-
19
-
20
-
21
-
22
-
23
-
24
-
25
-
26
-
 27
27 -
 28
28 -
 29
29 -
 30
30 -
 31
31 -
 32
32 -
 33
33 -
 34
34 -
 35
35 -
 36
36 -
 37
37 -
38
-
39
-
40
-
41
-
42
-
43
-
44
-
45
-
46
-
47
-
48
-
49
-
50
-
51
-
52
-
53
-
54
-
55
-
56
-
57
-
58
-
59
-
60
-
61
-
62
-
63
-
64
-
65
-
66
-
67
-
68
-
69
-
70
-
71
-
72
-
73
-
74
-
75
-
76
-
77
-
78
-
79
-
80
-
81
-
82
-
83
-
84
-
85
-
86
-
87
-
88
-
89
-
90
-
91
-
92
-
93
-
94
-
95
-
96
-
97
-
98
-
99
-
100
-
101
-
102
-
103
-
104
-
105
-
106
-
107
-
108
-
109
-
110
-
111
-
112
-
113
-
114
-
115
-
116
-
117
-
118
-
119
-
120
-
121
-
122
-
123
-
124
-
125
-
126
 |
 |
