Netgear WNAP210 WNAP210 Reference Manual - Page 34
Mounting the Access Point Using the Wall Mount Kit (Optional), Wall Mount Kit, Optional - problems
 |
UPC - 606449062694
View all Netgear WNAP210 manuals
Add to My Manuals
Save this manual to your list of manuals |
Page 34 highlights
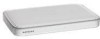
ProSafe Wireless-N Access Point WNAP210 Reference Manual To log in using the default IP Address: 1. Open a Web browser such as Internet Explorer, Mozilla Firefox, or Netscape Navigator. Connect to the access point by entering its default address of http://192.168.0.236 into your browser. Your Web browser should automatically find the access point and display the home screen. 2. Enter admin for the user name and password for the password, both in lower case letters or use a new LAN address and password if you have set them up. 3. Click Login. 4. Select Configuration > Wireless. Verify your operating mode, 11b, 11bg, or 11ng. Verify that the correct (default) channel has been selected for your network. It should not be necessary to change the wireless channel unless you notice interference problems or are near another wireless access point. Select a channel that is not being used by any other wireless networks within several hundred feet of your wireless access point. 5. Click Apply to save any changes. Mounting the Access Point Using the Wall Mount Kit (Optional) Tip: Before mounting the access point in a high location, first set up and test the access point to verify wireless network connectivity. To install the wireless access point mounting brackets: 1. Disconnect the access point and position it where it will be deployed. The best location is elevated, such as on a wall or ceiling or the top of a cubicle, at the center of your wireless coverage area, and within line of sight of all the mobile devices (see Figure 2-7 on page 2-13). 2. Use the paper template provided to determine the location for the mounting holes. Drill holes 3/8 in. (~ 9 mm) and 13/16 in. (~20 mm) deep. The holes should be 10 1/4 in. ( 26 cm) appart, as shown in (A). Then tap in the anchors as shown in (B). 3. The tabs at the center of each of the brackets hook into the center vent slots on the bottom of the access point. The tabs on the ends of the brackets hook into the corner vent slots on the top of the access point. Hook the center tabs of one bracket in first. Then gently snap the tabs at the ends of the bracket into the top vents as shown in (C). Repeat for the second bracket. 2-12 v1.0 March 2009 Installation and Configuration
-
 1
1 -
2
-
3
-
4
-
5
-
6
-
7
-
8
-
9
-
10
-
11
-
12
-
13
-
14
-
15
-
16
-
17
-
18
-
19
-
20
-
21
-
22
-
23
-
24
-
25
-
26
-
27
-
28
-
 29
29 -
 30
30 -
 31
31 -
 32
32 -
 33
33 -
 34
34 -
 35
35 -
 36
36 -
 37
37 -
 38
38 -
 39
39 -
40
-
41
-
42
-
43
-
44
-
45
-
46
-
47
-
48
-
49
-
50
-
51
-
52
-
53
-
54
-
55
-
56
-
57
-
58
-
59
-
60
-
61
-
62
-
63
-
64
-
65
-
66
-
67
-
68
-
69
-
70
-
71
-
72
-
73
-
74
-
75
-
76
-
77
-
78
-
79
-
80
-
81
-
82
-
83
-
84
-
85
-
86
-
87
-
88
-
89
-
90
-
91
-
92
-
93
-
94
-
95
-
96
-
97
-
98
-
99
-
100
-
101
-
102
-
103
-
104
-
105
-
106
-
107
-
108
-
109
-
110
-
111
-
112
-
113
-
114
-
115
-
116
-
117
-
118
-
119
-
120
-
121
-
122
-
123
-
124
-
125
-
126
 |
 |
