Oki C830dn User Guide - Page 67
Pressing gently down on the cartridge to ensure that it is firmly seated, push
 |
View all Oki C830dn manuals
Add to My Manuals
Save this manual to your list of manuals |
Page 67 highlights
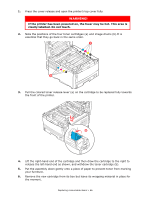
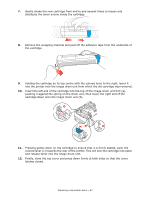
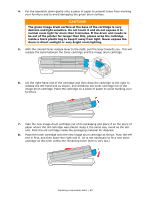
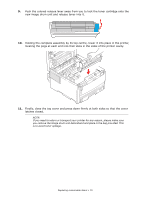
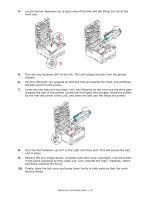
7. Gently shake the new cartridge from end to end several times to loosen and distribute the toner evenly inside the cartridge. 8. Remove the wrapping material and peel off the adhesive tape from the underside of the cartridge. 9. Holding the cartridge by its top centre with the colored lever to the right, lower it into the printer over the image drum unit from which the old cartridge was removed. 10. Insert the left end of the cartridge into the top of the image drum unit first (a), pushing it against the spring on the drum unit, then lower the right end of the cartridge down onto the image drum unit (b). a c b 11. Pressing gently down on the cartridge to ensure that it is firmly seated, push the colored lever (c) towards the rear of the printer. This will lock the cartridge into place and release toner into the image drum unit. 12. Finally, close the top cover and press down firmly at both sides so that the cover latches closed. Replacing consumable items > 67
-
 1
1 -
2
-
3
-
4
-
5
-
6
-
7
-
8
-
9
-
10
-
11
-
12
-
13
-
14
-
15
-
16
-
17
-
18
-
19
-
20
-
21
-
22
-
23
-
24
-
25
-
26
-
27
-
28
-
29
-
30
-
31
-
32
-
33
-
34
-
35
-
36
-
37
-
38
-
39
-
40
-
41
-
42
-
43
-
44
-
45
-
46
-
47
-
48
-
49
-
50
-
51
-
52
-
53
-
54
-
55
-
56
-
57
-
58
-
59
-
60
-
61
-
 62
62 -
 63
63 -
 64
64 -
 65
65 -
 66
66 -
 67
67 -
 68
68 -
 69
69 -
 70
70 -
 71
71 -
 72
72 -
73
-
74
-
75
-
76
-
77
-
78
-
79
-
80
-
81
-
82
-
83
-
84
-
85
-
86
-
87
-
88
-
89
-
90
-
91
-
92
-
93
-
94
-
95
 |
 |
