Oki C830dn User Guide - Page 77
Emory, Upgrade
 |
View all Oki C830dn manuals
Add to My Manuals
Save this manual to your list of manuals |
Page 77 highlights
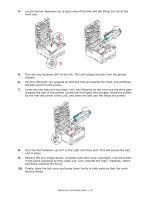
MEMORY UPGRADE (C830 ONLY) The basic C830 printer model comes equipped with 256MB of main memory. This can be upgraded with an additional memory board of 256MB or 512MB, giving a maximum total memory capacity of 768MB. Installation takes a few minutes, and requires a medium size cross-head (philips type) screwdriver. 1. Switch the printer off and disconnect the AC power cable. 2. Press the cover release (a) and open the printer's top cover fully. WARNING! If the printer has been powered on recently, the fuser will be hot. This area is clearly labelled. Do not touch. 3. Pull down the MP Tray using the depressions (b). Lift the front cover release lever and lower the front cover. 2. 3. a b b 4. Remove the screw (a) securing the right-hand side cover. 4. a 5. 5. Lift the edge of the side cover slightly and pull the cover away from the printer at the top. Lift the cover slightly to detach it from the printer. Place it safely to one side. 6. Carefully remove the new memory board from its wrapping. Try to handle the board only by its short edges, avoiding contact with any metal parts as far as possible. In particular, avoid touching the edge connector. Installing upgrades > 77
-
 1
1 -
2
-
3
-
4
-
5
-
6
-
7
-
8
-
9
-
10
-
11
-
12
-
13
-
14
-
15
-
16
-
17
-
18
-
19
-
20
-
21
-
22
-
23
-
24
-
25
-
26
-
27
-
28
-
29
-
30
-
31
-
32
-
33
-
34
-
35
-
36
-
37
-
38
-
39
-
40
-
41
-
42
-
43
-
44
-
45
-
46
-
47
-
48
-
49
-
50
-
51
-
52
-
53
-
54
-
55
-
56
-
57
-
58
-
59
-
60
-
61
-
62
-
63
-
64
-
65
-
66
-
67
-
68
-
69
-
70
-
71
-
 72
72 -
 73
73 -
 74
74 -
 75
75 -
 76
76 -
 77
77 -
 78
78 -
 79
79 -
 80
80 -
 81
81 -
 82
82 -
83
-
84
-
85
-
86
-
87
-
88
-
89
-
90
-
91
-
92
-
93
-
94
-
95
 |
 |
