Oki C830dn User Guide - Page 76
Enter, Menu up, Configuration, Online
 |
View all Oki C830dn manuals
Add to My Manuals
Save this manual to your list of manuals |
Page 76 highlights
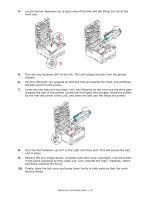
DUPLEX UNIT Note: the Duplex Unit is optional on some models. The duplex unit adds the function of two-sided printing, using less paper and making large documents easier to handle. It also enables booklet printing, which uses even less paper and makes large documents even easier to handle. The duplex unit slides straight into the rear of the printer and requires no tools to install. 1. Unpack the new unit and remove any transit material from it. 2. Switch the printer off. It is not necessary to disconnect the AC power cable. 3. Ensure that the unit is the right way up, as shown, and push it into the slot behind the rear panel. The panel will swing inwards as you push the unit into it. Push the unit all the way in until it stops and latches home. 4. Switch the printer on and wait for it to warm up (about 1 minute). 5. Print a menu map as follows: (a) Press the Enter button. (b) Press the Menu up button, then the Enter button to select the Print Information menu. (c) Select Configuration with the Enter button. (d) Press the Enter button once more to execute the Configuration menu. (e) When the Configuration map is printed, press Online to exit the menu system. 6. Examine the first page of the menu map. 7. Near the top of the page, between the two horizontal lines, you will see the current printer configuration. This list should indicate that the duplex unit is now installed. All that remains is to adjust the printer driver to make full use of the new features ("Adjusting printer drivers" on page 83). Installing upgrades > 76
-
 1
1 -
2
-
3
-
4
-
5
-
6
-
7
-
8
-
9
-
10
-
11
-
12
-
13
-
14
-
15
-
16
-
17
-
18
-
19
-
20
-
21
-
22
-
23
-
24
-
25
-
26
-
27
-
28
-
29
-
30
-
31
-
32
-
33
-
34
-
35
-
36
-
37
-
38
-
39
-
40
-
41
-
42
-
43
-
44
-
45
-
46
-
47
-
48
-
49
-
50
-
51
-
52
-
53
-
54
-
55
-
56
-
57
-
58
-
59
-
60
-
61
-
62
-
63
-
64
-
65
-
66
-
67
-
68
-
69
-
70
-
 71
71 -
 72
72 -
 73
73 -
 74
74 -
 75
75 -
 76
76 -
 77
77 -
 78
78 -
 79
79 -
 80
80 -
 81
81 -
82
-
83
-
84
-
85
-
86
-
87
-
88
-
89
-
90
-
91
-
92
-
93
-
94
-
95
 |
 |
