Oki C942 C911dn/C931dn/C931DP/C941dn/C941DP/C942 Basic Users Guide - English - Page 51
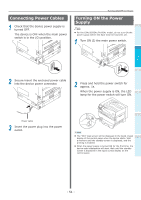
Connecting Power Cables, Turning ON the Power Supply, Secure insert the enclosed power cable
 |
View all Oki C942 manuals
Add to My Manuals
Save this manual to your list of manuals |
Page 51 highlights
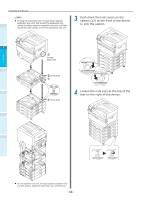
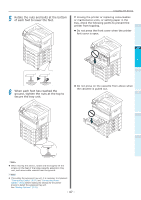
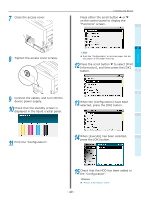
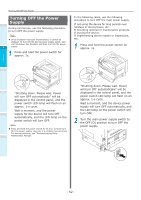
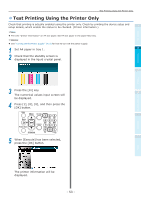
Connecting Power Cables 1 Check that the device power supply is turned OFF. The device is OFF when the main power switch is in the (O) position. Turning ON/OFF the Power Turning ON the Power Supply 1 Note For the C941/ES9541/Pro9541 model, do not turn ON the power supply before the Spot Color kit has been set. 1 Turn ON (I) the main power switch. 2 Before use Setting Up ON 3 Printing 2 Secure insert the enclosed power cable into the device power connector. 2 Press and hold the power switch for approx. 1s. When the power supply is ON, the LED 4 lamp for the power switch will turn ON. Basic Device Operations Appendix Power cable 3 Insert the power plug into the power outlet. Memo The "OKI" logo screen will be displayed in the liquid crystal display of the control panel when the device starts. Wait a moment until the standby screen is displayed, and the printing is enabled. When the power supply is turned ON for the first time, the device auto initialization will start. Wait until the standby screen is displayed in the liquid crystal display on the control panel. Index - 51 -
-
 1
1 -
2
-
3
-
4
-
5
-
6
-
7
-
8
-
9
-
10
-
11
-
12
-
13
-
14
-
15
-
16
-
17
-
18
-
19
-
20
-
21
-
22
-
23
-
24
-
25
-
26
-
27
-
28
-
29
-
30
-
31
-
32
-
33
-
34
-
35
-
36
-
37
-
38
-
39
-
40
-
41
-
42
-
43
-
44
-
45
-
 46
46 -
 47
47 -
 48
48 -
 49
49 -
 50
50 -
 51
51 -
 52
52 -
 53
53 -
 54
54 -
 55
55 -
 56
56 -
57
-
58
-
59
-
60
-
61
-
62
-
63
-
64
-
65
-
66
-
67
-
68
-
69
-
70
-
71
-
72
-
73
-
74
-
75
-
76
-
77
-
78
-
79
-
80
-
81
-
82
-
83
-
84
-
85
-
86
-
87
-
88
-
89
-
90
-
91
-
92
-
93
-
94
-
95
-
96
-
97
-
98
-
99
-
100
-
101
-
102
-
103
-
104
-
105
-
106
-
107
-
108
-
109
-
110
-
111
-
112
-
113
-
114
-
115
-
116
-
117
-
118
-
119
-
120
-
121
-
122
-
123
-
124
-
125
-
126
-
127
-
128
-
129
-
130
-
131
-
132
-
133
-
134
-
135
-
136
-
137
-
138
-
139
-
140
-
141
 |
 |
