Oki C942 C911dn/C931dn/C931DP/C941dn/C941DP/C942 Basic Users Guide - English - Page 57
Connecting Cables, Preparations
 |
View all Oki C942 manuals
Add to My Manuals
Save this manual to your list of manuals |
Page 57 highlights
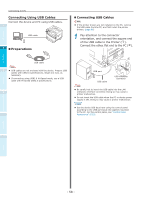
Connecting Cables Connect the device to a PC or network. The device is equipped with the LAN (network) interface connectors and USB interface connectors as standard. Connections can be made to the network directly using LAN cables, and to the PC using USB cables. Connecting Using LAN Cables Connecting the device to a network such as LAN (Ethernet*), etc., enables the device to be shared by all the PCs on the network. This system can be used by OS such as Windows or Mac, etc. *: The device is equipped with network interfaces compatible with 10BASE-T/100BASE -TX/1000BASE-T as standard. Windows Macintosh Connecting the PC „„Connecting LAN Cables 1 Connect the LAN cable to the LAN (network) interface connector ( ). 1 Connect the other end of the LAN cable to the hub connector ( ). Before use 2 Setting Up LAN cable LAN (network) interface Connector 3 Printing Basic Device Operations Windows 4 Macintosh Hub „„ Preparations Appendix LAN cable Hub Note LAN cables and hubs are not enclosed with the device. Prepare LAN cables (category 5 or greater, twist pair cable, straight) and hubs as necessary. The setup must be changes if using with 1000BASE-T as the factory default settings are "Gigabit network: Disabled" in the administrator setup menu. Setup method: In the control panel, select [Admin Setup]> Enter the password> [Network Setup]> [Gigabit network]> [Enable]. Index - 57 -
-
 1
1 -
2
-
3
-
4
-
5
-
6
-
7
-
8
-
9
-
10
-
11
-
12
-
13
-
14
-
15
-
16
-
17
-
18
-
19
-
20
-
21
-
22
-
23
-
24
-
25
-
26
-
27
-
28
-
29
-
30
-
31
-
32
-
33
-
34
-
35
-
36
-
37
-
38
-
39
-
40
-
41
-
42
-
43
-
44
-
45
-
46
-
47
-
48
-
49
-
50
-
51
-
 52
52 -
 53
53 -
 54
54 -
 55
55 -
 56
56 -
 57
57 -
 58
58 -
 59
59 -
 60
60 -
 61
61 -
 62
62 -
63
-
64
-
65
-
66
-
67
-
68
-
69
-
70
-
71
-
72
-
73
-
74
-
75
-
76
-
77
-
78
-
79
-
80
-
81
-
82
-
83
-
84
-
85
-
86
-
87
-
88
-
89
-
90
-
91
-
92
-
93
-
94
-
95
-
96
-
97
-
98
-
99
-
100
-
101
-
102
-
103
-
104
-
105
-
106
-
107
-
108
-
109
-
110
-
111
-
112
-
113
-
114
-
115
-
116
-
117
-
118
-
119
-
120
-
121
-
122
-
123
-
124
-
125
-
126
-
127
-
128
-
129
-
130
-
131
-
132
-
133
-
134
-
135
-
136
-
137
-
138
-
139
-
140
-
141
 |
 |
