Oki C942 C911dn/C931dn/C931DP/C941dn/C941DP/C942 Basic Users Guide - English - Page 58
Connecting Using USB Cables, Pay attention to the connector, orientation, and connect the square end
 |
View all Oki C942 manuals
Add to My Manuals
Save this manual to your list of manuals |
Page 58 highlights
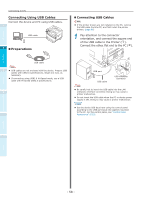
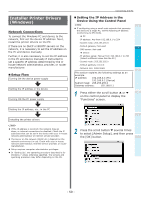
Before use Setting Up Connecting the PC Connecting Using USB Cables Connect the device and PC using USB cables. 1 USB cable 2 „„Preparations „„Connecting USB Cables Note If the printer drivers are not installed on the PC, remove the USB cable fromthe PC, and first install the printer drivers. (page 66) 1 Pay attention to the connector orientation, and connect the square end of the USB cable to the Printer ( ). Connect the other, flat end to the PC ( ). USB cable Note 3 USB cables are not enclosed with the device. Prepare USB cables with USB2.0 specifications, length 2m max. as necessary. If connecting using USB2.0 Hi-Speed mode, use a USB cable with Hi-Speed USB2.0 specifications. 4 USB port USB cable USB interface connector Note Be careful not to insert the USB cable into the LAN (network) interface connector. Doing so may cause a printer malfunction. Do not insert the USB cable when the PC or device power supply is ON. Doing so may cause a printer malfunction. Memo Set the device USB baud rate using the control panel according to the USB port baud rate (speed) mounted to the PC. For the control panel, see "Control Panel Appearance" (P.25). Printing Basic Device Operations Appendix Index - 58 -
-
 1
1 -
2
-
3
-
4
-
5
-
6
-
7
-
8
-
9
-
10
-
11
-
12
-
13
-
14
-
15
-
16
-
17
-
18
-
19
-
20
-
21
-
22
-
23
-
24
-
25
-
26
-
27
-
28
-
29
-
30
-
31
-
32
-
33
-
34
-
35
-
36
-
37
-
38
-
39
-
40
-
41
-
42
-
43
-
44
-
45
-
46
-
47
-
48
-
49
-
50
-
51
-
52
-
 53
53 -
 54
54 -
 55
55 -
 56
56 -
 57
57 -
 58
58 -
 59
59 -
 60
60 -
 61
61 -
 62
62 -
 63
63 -
64
-
65
-
66
-
67
-
68
-
69
-
70
-
71
-
72
-
73
-
74
-
75
-
76
-
77
-
78
-
79
-
80
-
81
-
82
-
83
-
84
-
85
-
86
-
87
-
88
-
89
-
90
-
91
-
92
-
93
-
94
-
95
-
96
-
97
-
98
-
99
-
100
-
101
-
102
-
103
-
104
-
105
-
106
-
107
-
108
-
109
-
110
-
111
-
112
-
113
-
114
-
115
-
116
-
117
-
118
-
119
-
120
-
121
-
122
-
123
-
124
-
125
-
126
-
127
-
128
-
129
-
130
-
131
-
132
-
133
-
134
-
135
-
136
-
137
-
138
-
139
-
140
-
141
 |
 |
