Olympus DS 2300 DS-2300 Online Instructions (English)
Olympus DS 2300 - 16 MB Digital Voice Recorder Manual
 |
UPC - 050332153530
View all Olympus DS 2300 manuals
Add to My Manuals
Save this manual to your list of manuals |
Olympus DS 2300 manual content summary:
- Olympus DS 2300 | DS-2300 Online Instructions (English) - Page 1
DIGITAL VOICE RECORDER DS-2300 ONLINE INSTRUCTIONS Thank you for purchasing an Olympus Digital Voice Recorder. Please read these instructions for information about using the product correctly and safely. Keep the instructions handy for future reference. To ensure successful recordings, we recommend - Olympus DS 2300 | DS-2300 Online Instructions (English) - Page 2
DSS Player Using DSS Player Software 42 Operating Environment 43 Installing Software 44 Uninstalling Software 47 Using Online Help 49 Connection to Your PC 50 Running DSS Player 52 Window Names 54 5 Managing Files on Your PC Download Voice Files from the Recorder ......... 55 Play a Voice - Olympus DS 2300 | DS-2300 Online Instructions (English) - Page 3
6 Other Practical Use Methods Using the Recorder as a Reader/Writer 80 7 Other Information Alarm Message List 81 Troubleshooting 82 Accessories (optional 83 Specifications 84 Technical Assistance and Support 85 1 2 3 4 5 6 7 3 - Olympus DS 2300 | DS-2300 Online Instructions (English) - Page 4
property, it is essential that you always read the warnings and information provided. Convention Used In this Manual • The word "card" is used to refer to the xDPicture Card. • The word "DSS Player" is used to refer to the DSS Player version 6 in Windows and Apple Macintosh environment. • The Notes - Olympus DS 2300 | DS-2300 Online Instructions (English) - Page 5
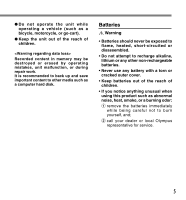
regarding data loss> Recorded content in memory may be destroyed or erased by operating mistakes, unit malfunction, or during repair work. It is recommended to back up and save important content to other media such as a computer hard disk Olympus representative for service. 5 - Olympus DS 2300 | DS-2300 Online Instructions (English) - Page 6
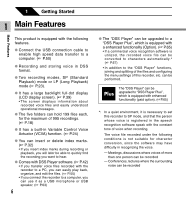
, you can use it as a USB microphone or USB speaker. ( P.63) 6 The "DSS Player" can be upgraded to a "DSS Player Plus", which is equipped with a enhanced functionality (Option). ( P.65) • If a commercial voice recognition software is utilized, the recorded voice file can be converted to characters - Olympus DS 2300 | DS-2300 Online Instructions (English) - Page 7
IBM, PC/AT, and ViaVoice are the trademarks or registered trademarks of International Business Machines Corporation. Microsoft, Windows and Windows Media are registered trademarks of Microsoft Corporation. Apple, Macintosh, iMac, Mac, and PowerMac are trademarks or registered trademarks of Apple - Olympus DS 2300 | DS-2300 Online Instructions (English) - Page 8
recorder first unless formatted with a CAMEDIA series Olympus digital camera. Card may not perform as expected when formatted by a different device. • The card has a service life. When reaching the end of its life, writing or erasing data on the card will be disabled. In this case, replace the card - Olympus DS 2300 | DS-2300 Online Instructions (English) - Page 9
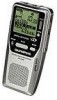
9 INDEX button 0 FOLDER/MENU button ! Built-in speaker @ STOP button # PLAY button $ ERASE button % DISPLAY button ^ Display (LCD panel) & Record/Play indicator lamp * POWER (ON/OFF) switch ( VOLUME (+) button ) VOLUME (-) button - Card cover = Card cover lock q Battery cover w PC (USB) terminal 9 - Olympus DS 2300 | DS-2300 Online Instructions (English) - Page 10
of Parts 1 Display (LCD Panel) Identification of Parts 1 2 9 8 3 7 4 6 5 1 Battery indicator 2 Folder 3 Current file number 4 Total number of recorded files in the folder 5 Character Information display 6 Erase lock indicator 7 Microphone sensitivity display 8 VCVA (Variable Control - Olympus DS 2300 | DS-2300 Online Instructions (English) - Page 11
An optional Ni-MH Rechargeable Battery from Olympus can be used for the recorder ( P.83). ...Notes • Be sure to turn OFF the recorder before replacing the batteries. Removing the batteries while the recorder is in use may corrupt the card. If you are recording into a file and the batteries run out - Olympus DS 2300 | DS-2300 Online Instructions (English) - Page 12
1 With the battery in the recorder and the card inserted properly, the recorder is ready to work. While the power switch on the back of the recorder is in the OFF position, none of the buttons or switch on the recorder will be active. Slide the power switch to the ON position to activate - Olympus DS 2300 | DS-2300 Online Instructions (English) - Page 13
Setting Time/Date (TIME&DATE) Setting Time/Date (TIME&DATE) Setting the correct time and date on the recorder is very important since every file recorded on the recorder will have the date and time information as part of the file header. This will simplify 1 the file management aspects later on. - Olympus DS 2300 | DS-2300 Online Instructions (English) - Page 14
button to set the date. 2 Press the REC button to accept the date. ...Notes • If you press the STOP button during the setup operation, the recorder will save the items that were set to that point. • You can set the time and date from your PC using DSS Player software ( P.42). 14 - Olympus DS 2300 | DS-2300 Online Instructions (English) - Page 15
Changing the Time/Date 1 Setting Time/Date (TIME&DATE) 1 Press and hold the FOLDER/ MENU button for 1 second or longer. The menu appears ( P.41). VCVA RREECCMMOODDEE MIC SENSE SUB MENU 2,4 3 2 Press the FF or REW button to choose "SUB MENU", and press the REC button. EXIT The sub menu - Olympus DS 2300 | DS-2300 Online Instructions (English) - Page 16
CARD" again. * When the system sounds are enabled. ...Notes • If an unformatted card is inserted, the recorder automatically displays the menu to menu format option ( P.35). • Never use any card in the recorder unless it has been formatted on this unit or on a CAMEDIA series Olympus 16 digital - Olympus DS 2300 | DS-2300 Online Instructions (English) - Page 17
Inserting and Ejecting a Card Ejecting a Card 2 1 1 Make sure the recorder is STOP mode. 2 Slide the card cover lock in the direction indicated by the arrow. The card cover is unlocked and the message "CARD COVER IS OPEN" appears on the display. When this message appears, the power is switched off - Olympus DS 2300 | DS-2300 Online Instructions (English) - Page 18
. You can use your DSS player to change a folder name ( P.62). Up to 199 messages can be recorded per folder. All recordings made in any of the folders will be in Digital Speech Standard (DSS) format. By default, the RECORD function is configured to record at the current position (overwrite - Olympus DS 2300 | DS-2300 Online Instructions (English) - Page 19
" or "FOLDER FULL" will be displayed when the memory or folder capacity is full. Delete any unnecessary files before recording any further ( P.29) or transfer voice files to your computer using DSS Player Software ( P.42). • You cannot select a different recording mode (SP or LP) than that of the - Olympus DS 2300 | DS-2300 Online Instructions (English) - Page 20
you want to overwrite. AUTHOR A 00M00S LENGTH : 4,6 1 3 Press the PLAY button to play the file. a Current playback time 27M58S b Total recording time of the file being played AUTHOR A a 00M05S LENGTH : b 27M58S 4 Press the STOP button where you want to start overwriting. 5 Press the - Olympus DS 2300 | DS-2300 Online Instructions (English) - Page 21
a folder. The folder name is displayed for 2 seconds. 3 5 2 2 Press the FF or REW button to choose the file into which you want to insert additional recordings. 6 1,4 3 Press the PLAY button to start playback. 4 While playing the file, press the FOLDER/MENU button to insert an additional - Olympus DS 2300 | DS-2300 Online Instructions (English) - Page 22
begins. 4 Press the FF or REW button to choose between "CONF." and "DICT.". CONF.: High-sensitivity mode that records sounds in all directions. DICT.: Low-sensitivity mode suited for dictation. 5 Press the REC button to complete the setup screen. 6 Press the FOLDER/MENU button to close the menu - Olympus DS 2300 | DS-2300 Online Instructions (English) - Page 23
1 second or 2 longer. VCVA "REC MODE" will be displayed on the REC MODE MIC SENSE 2,4 screen ( P.41). EXIT 3 2 Press the REC button. The recording mode setup process begins. 1,5 3 Press the FF or REW button to choose between "SP" and "LP". 4 Press the REC button to complete the setup - Olympus DS 2300 | DS-2300 Online Instructions (English) - Page 24
threshold volume level, the built-in Variable Control Voice Actuator (VCVA) starts recording automatically, and stops when the volume drops below the threshold level. The VCVA feature extends recording time and conserves memory by turning off recording 2 during silent periods. This helps make the - Olympus DS 2300 | DS-2300 Online Instructions (English) - Page 25
after 1 sec 1H25M01S STANDBY 2 7 approximately, and "STANDBY" flashes on the display. The record/play indicator lamp glows when recording starts and flashes when recording pauses. Using the Variable Control Voice Actuator (VCVA) Adjust the start/stop actuation level 1 Press the FOLDER/MENU - Olympus DS 2300 | DS-2300 Online Instructions (English) - Page 26
be adjusted by pressing the VOLUME (+) or VOLUME (-) button. 2 Connect the earphone to the EAR jack on the recorder. After recording is started, you can hear the sound being recorded through the earphone. VOLUME (+)/(-) button If the earphone is connected, no sound will come from the speaker - Olympus DS 2300 | DS-2300 Online Instructions (English) - Page 27
. 2 AUTHOR A 00M00S LENGTH : 27M58S Playing 3 Press the PLAY button to start playback. The record/play indicator lamp glows AUTHOR A green. a 00M05S a Current playback time LENGTH : b 27M58S b Total recording time of the file being played 4 Press the VOLUME (+) or VOLUME (-) button to - Olympus DS 2300 | DS-2300 Online Instructions (English) - Page 28
FF button while stopped or playing a file. Release the FF button. (CUE) Review (REV) Hold the REW button while stopped or playing a file. Release the REW the FF button once while fast-forwarding or twice while stopped, the recorder will stop at the end of the file (F.SKIP). • If you press the - Olympus DS 2300 | DS-2300 Online Instructions (English) - Page 29
Erasing Erasing { Erasing One File A selected file can be erased from a folder. 1 Press the FOLDER/MENU button to choose a folder. 2 2 Press the FF or REW button to choose the file you want to erase. 3,4 2 3 Press the ERASE button. "FILE ERASE ?" flashes on the display for approximately 8 - Olympus DS 2300 | DS-2300 Online Instructions (English) - Page 30
anything during this period because data may be corrupted. Battery removal setting/removal are not permissible, whether or not the battery is set in the recorder. 30 - Olympus DS 2300 | DS-2300 Online Instructions (English) - Page 31
erased. Locked files are not erased when you choose to erase all files from a folder ( P.29). Locked files are never erased except when the card is formatted ( P.35). 2,4,6 Locking Files (LOCK) 1 Select the file you want to LOCK, press and hold the FOLDER/MENU 3 button for 1 second or longer - Olympus DS 2300 | DS-2300 Online Instructions (English) - Page 32
index number appears on the display. 12M05S I NDEX 08 2 Locating an Index Mark SET 1 2 Hold the FF or REW button while playing a file. The recorder stops for 1 second when it reaches the index mark. Clearing an Index Mark 3 Locate the index mark you want to clear. 4 Press the ERASE button - Olympus DS 2300 | DS-2300 Online Instructions (English) - Page 33
the DISPLAY button. This help review and confirm different recorder settings and file information. 1 recorded. AUTHOR A 00M00S REC DATE : 3M16D2005Y AUTHOR A 00M00S REMAIN : 1H50M12S 5 Memory remaining Shows remaining recording time. { { 3 Time stamp Shows the time that the file was recorded - Olympus DS 2300 | DS-2300 Online Instructions (English) - Page 34
the sound input level graphically, the current time and the length of the file. AUTHOR ID 10M25S 14M00S 2 Remaining memory bars Displays the remaining time available for recording in bar AUTHOR ID 10M25S 14M00S E F mode, and the current time and length of the file. While in Insert - Olympus DS 2300 | DS-2300 Online Instructions (English) - Page 35
, must be formatted before they can be used with the recorder. The Olympus xD-Picture Card delivered with the recorder is preformatted and ready for use. To familiarize yourself with the formatting process, read the steps below. 2,4,6 1 Press and hold the FOLDER/ MENU button for 1 second or - Olympus DS 2300 | DS-2300 Online Instructions (English) - Page 36
the formatting process by opening the card cover or the battery cover. Doing so will damage the data or card. • When the card is formatted, all the stored data, including locked files, are erased. • If an unformatted card is inserted, the recorder automatically displays the format option in - Olympus DS 2300 | DS-2300 Online Instructions (English) - Page 37
about 2 seconds, but will not operate. • If the switch is moved to hold during playback (or recording), the playback (recording) status will stay and cannot be operated. (When playback has ended and the recording has ended due the remaining memory being used up, it will be in the stop state.) 37 - Olympus DS 2300 | DS-2300 Online Instructions (English) - Page 38
LCD Contrast Adjustment (CONTRAST) If you find it difficult to read the display information due to lighting, temperature, or other conditions, you can adjust the contrast using this function to easily see the LCD display (display - Olympus DS 2300 | DS-2300 Online Instructions (English) - Page 39
display backlight is ON by default. The display will lit for about 15 seconds when a button on the recorder is pressed. The backlight feature can be turned off from the menu. 2,4,6 1 Press and hold the FOLDER/ MENU button for 1 second or longer. The menu - Olympus DS 2300 | DS-2300 Online Instructions (English) - Page 40
System Sounds (BEEP) The recorder beeps to alert you to button operations or warn you of errors. System sounds may be turned off. System Sounds (BEEP) 3 2,4,6 1 Press and hold the FOLDER/ MENU button for 1 second or longer. The menu appears ( P.41). 2 Press - Olympus DS 2300 | DS-2300 Online Instructions (English) - Page 41
, the recorder will stop and apply the items that were set to that point. • The recorder will stop if you leave it idle for 3 minutes during a menu setup operation, when a selected item is not applied. • You can set the time and date on the recorder from your PC using DSS Player software ( P.42 - Olympus DS 2300 | DS-2300 Online Instructions (English) - Page 42
DSS Player Using DSS Player Software The DSS Player Software can be used to do the following: • Playback voice files on your PC and on the recorder when connected via USB. Download files from the recorder to the PC or upload files from the PC to the recorder. • If an upgrade (Option) to DSS Player - Olympus DS 2300 | DS-2300 Online Instructions (English) - Page 43
Basic Operating Environment of DSS Player Windows PC: IBM PC/AT compatible PC Operating System: Microsoft Windows Me/ 2000 Professional/XP iMac/ iBook/ eMac/ Power Mac/ PowerBook (The computer must support a standard USB port) 4 (Processor 500 MHz or faster is recommended) Operating - Olympus DS 2300 | DS-2300 Online Instructions (English) - Page 44
the DSS player software from the included Software CD. Applications included with "DSS Player" • DSS Player: Recorded voice files can be downloaded to the PC for complete file management and playback solution. • Acrobat Reader is installed on your PC. It is required to view the accompanying manual - Olympus DS 2300 | DS-2300 Online Instructions (English) - Page 45
screen automatically. Installing Software Installing the Device Driver 11 Connect the recorder to your PC, referring to "Connection to Your PC" ( P.50). When you connect the recorder to your PC for the first time after installing DSS Player, the recorder's driver will be installed automatically - Olympus DS 2300 | DS-2300 Online Instructions (English) - Page 46
Installing Software Installing Software Macintosh 1 Insert DSS Player into the CD-ROM drive. 2 Double-click CD icon. Double-click the desired language to select it. 4 3 Double-click the following icon. 4 Click [Continue] when the DSS Player opening screen appears. 5 Confirm your acceptance of the - Olympus DS 2300 | DS-2300 Online Instructions (English) - Page 47
To uninstall any of the software component of the DSS player software installed on your PC, follow the steps below. Windows 1 Exit DSS Player. 2 Select [Control Panel] from [start] menu. 3 Click [Add/Remove programs] in the control panel window. 4 4 A list of applications that have been - Olympus DS 2300 | DS-2300 Online Instructions (English) - Page 48
] file in the location where you installed the file. 4 Delete the Help File. Delete the [DSS Player Help] file in the following location. System Folder : Help ...Note The voice files you made are stored in the [MESSAGE] folder. If you don't need them, delete them. You can confirm the location - Olympus DS 2300 | DS-2300 Online Instructions (English) - Page 49
. To open Online Help, you have the following options. Windows • Click the [start] button, select [All Programs], then [Olympus DSS Player], then click [Help]. • While DSS Player is running, choose [Contents] from the [Help] menu. • While DSS Player is running, press [F1] on the keyboard. Macintosh - Olympus DS 2300 | DS-2300 Online Instructions (English) - Page 50
the USB cable. The batteries will not be in use. Windows When the recorder is connected and "My Computer" is opened, a removable disk drive is displayed. If "Add New Hardware Wizard" appears, cancel the wizard by pressing the [Cancel] button and then install DSS Player. Macintosh If the recorder is - Olympus DS 2300 | DS-2300 Online Instructions (English) - Page 51
screen. Click [Safely Remove Hardware]. It will read [Stop USB Disk-Drive] for Windows Me. The drive letter will differ depending on the PC being used. 1 4 2 Disconnect the USB cable. Connection to Your PC Macintosh 1 Move the icon of the recorder's drive displayed on desktop to trash box by - Olympus DS 2300 | DS-2300 Online Instructions (English) - Page 52
Running DSS Player Windows By connecting the recorder to your PC, you can automatically start the DSS Player to reinstate again. 2 23 Running DSS Player Manual start 1 Start Windows. 2 Click the [start] button, select [All Programs], then [Olympus DSS Player]. 3 Click [Olympus DSS Player]. - Olympus DS 2300 | DS-2300 Online Instructions (English) - Page 53
Macintosh To start, open the "DSS Player" folder created upon installation and double-click the icon. When it starts for the first time after installation, user information needs to be registered. Please see P.46 for details. 4 ...Note The Mac version DSS Player has no automatic start function. 53 - Olympus DS 2300 | DS-2300 Online Instructions (English) - Page 54
DSS Player is started 4 Macintosh 4 1 Play Control Bar Control buttons to play and stop voice files. 2 Dictation Folder Window Will display the directory structure of the DSS, WMA, WAVE (Windows only) and AIFF (Macintosh only)-format files stored on your PC's hard disk. 54 3 Device Manager Window - Olympus DS 2300 | DS-2300 Online Instructions (English) - Page 55
Device Manager window, select the folder that contains the voice file you would like to download. The illustration shows that Folder A has been 1 selected. Download Voice Files from the Recorder 2 Select the voice file. Select the voice file you would like to download from the Voice File List - Olympus DS 2300 | DS-2300 Online Instructions (English) - Page 56
Download Voice Files from the Recorder 3 Download the voice file. Windows From the [Download] menu, click [Download Selected Files]. Macintosh From the [Tools] menu, click [Download Selected Files]. Download Voice Files from the Recorder 5 3 4 Download complete. Do not disconnect the USB cable - Olympus DS 2300 | DS-2300 Online Instructions (English) - Page 57
DS23 0001.DSS Extension File number ....... A serial number automatically assigned by a Digital Voice Recorder. User ID ....... The name that has been set on the Digital Voice Recorder. The default name on the Digital Voice Recorder is "DS23". The user ID can be modified with DSS Player ( P.61). 57 - Olympus DS 2300 | DS-2300 Online Instructions (English) - Page 58
Files to the Recorder DSS Player has a feature to enable you to upload DSS-format voice files from your PC to the recorder. 1 Select the folder. Select the folder that contains the voice file to upload from the Dictation Folder 1 2 window. 2 Select the voice file. Select the voice file to - Olympus DS 2300 | DS-2300 Online Instructions (English) - Page 59
is completed. You can also drag and drop files from the Voice File List Box to the Device Manager window...Notes • NEVER remove the card or disconnect the USB cable while the record/play indicator lamp is flashing. If you do, the data on the card will get destroyed. • If a file with the same name - Olympus DS 2300 | DS-2300 Online Instructions (English) - Page 60
on the PC directly using the recorder and the DSS Player. While the recorder is connected to the PC with the USB cable, the Remote Dictation window in the DSS Player allows you to create a new recording or edit an existing recording. The recorder will act as a sophisticated microphone with the - Olympus DS 2300 | DS-2300 Online Instructions (English) - Page 61
Digital Voice Recorder. 1 Enter the user ID in the [Transfer User ID] window. Windows From the [Download] menu. Macintosh From the [Tools] menu. 2 Click [Transfer]. The new user ID will be transferred to the Digital Voice Recorder. 1 2 ...Note NEVER remove the card or disconnect the USB cable - Olympus DS 2300 | DS-2300 Online Instructions (English) - Page 62
names of the folders on the Digital Voice Recorder is updated with the new folder names. Device Window folder names consist of a string of 12 or fewer single-byte alphanumeric characters. ... Note NEVER remove the card or disconnect the USB cable while the record/play indicator lamp is flashing - Olympus DS 2300 | DS-2300 Online Instructions (English) - Page 63
microphone when connected to a PC. If you use the recorder as a USB speaker, you can output voice through the recorder instead of using the PC speaker. When used as a microphone, you can record voice on your PC using your favorite application. Windows 1 Click the icon in the toolbar to change the - Olympus DS 2300 | DS-2300 Online Instructions (English) - Page 64
as a USB microphone If this recorder is connected by USB, it can function as a USB microphone. Also, if an upgrade ( P.65) is executed to the DSS Player Plus, voice recognition software or other applications using this recorder as a microphone, voice can be input to a computer. Windows 2000, Me - Olympus DS 2300 | DS-2300 Online Instructions (English) - Page 65
DSS Player functions, voice recognition using voice recognition software, joining of files, sharing of files and the menu setting of this recorder can be utilized. Purchase and Upgrade To purchase "DSS Player Plus" and upgrading from "DSS Player" is operated in the following procedures. Windows - Olympus DS 2300 | DS-2300 Online Instructions (English) - Page 66
Plus When upgraded, the title of the main menu changes to [DSS Player Plus]. Also, you can confirm the upgrade by selecting [About DSS Player] from the [Help] menu on the tool bar. In the [About DSS Player] window, the [DSS Player Plus] should be displayed...Notes • To purchase the license number - Olympus DS 2300 | DS-2300 Online Instructions (English) - Page 67
instruction manual for the voice recognition software for details. The voice recognition software which is confirmed for use with this recorder is as follows. (As of February, 2005) IBM Corp. • IBM ViaVoice Pro USB Edition 10 ScanSoft, Inc. • Dragon NaturallySpeaking 8 Please inquire to the Olympus - Olympus DS 2300 | DS-2300 Online Instructions (English) - Page 68
up) When the DSS Player Plus and IBM's voice recognition software "ViaVoice" are used together, execute the setting in the following procedure to record the voice accurately, acquired from the built-in microphone or speaker. 1 Connect the recorder to your PC, and start the DSS Player Plus. 2 Click - Olympus DS 2300 | DS-2300 Online Instructions (English) - Page 69
Using Voice Recognition Software 6 Select a sound card. When the [Selecting a Sound Card] window appears, select [USB Audio Device] for [Input] and follow the instructions on screen. (Select [Microphone Control (DVR)] for Windows XP.) 7 Proceed with the AUDIO Setup according to the instruction on - Olympus DS 2300 | DS-2300 Online Instructions (English) - Page 70
NaturallySpeaking 8]. * If the DSS Player Plus has started, please close Olympus IC Recorder DS-2300] from the [Dictation source] list box, then click the [Next] button. 4 Description of Wizard. Description of this wizard will be displayed. Click the [Next] button. Using Voice Recognition Software - Olympus DS 2300 | DS-2300 Online Instructions (English) - Page 71
"Notes on Recording For Voice Recognition"( P.74) for recording tips. After the recording is finished, click the [Next] button. 6 Transferring the Recorded Voice. Click [Olympus DSS Player] button displayed on the screen. The DSS Player Plus will startup and then follow the instructions displayed - Olympus DS 2300 | DS-2300 Online Instructions (English) - Page 72
Using Voice Recognition Software Executing Voice Recognition DSS Player Plus can easily access ViaVoice and Dragon NaturallySpeaking 8 from the menu, and it enables text conversion of the file in the Voice File List Box. 1 Select the folder. From the Dictation Folder Window, select the folder in - Olympus DS 2300 | DS-2300 Online Instructions (English) - Page 73
start icon becomes an invalid display. 5 Noise Canceling Function Check [Use Noise Cancellation] in the [Voice Recognition] menu to output voice using the noise canceling function to the voice recognition software...Note The voice recognition of the file recorded in LP mode cannot be recognized. 73 - Olympus DS 2300 | DS-2300 Online Instructions (English) - Page 74
Using Voice Recognition Software Notes on Recording For Voice Recognition When recording voice to be processed with voice recognition, set up your DSS recorder as follows to improve recognition accuracy. • Speak normally. • It is recommended to use the noise- cancellation microphone ME12, when - Olympus DS 2300 | DS-2300 Online Instructions (English) - Page 75
Plus Joining Files In DSS Player Plus, designated multiple voice files can be joined and one voice file can be created. 1 Select the folder. From the Dictation Folder Window, select the folder which contains the files to be joined. 2 Select the voice files. From the Voice File List Box, select more - Olympus DS 2300 | DS-2300 Online Instructions (English) - Page 76
saved under the name specified in step 5, and stored in the 5 selected folder. Joining Files 5 64 ...Note If the files to be joined have different recording modes, the mode of the file listed at the top is selected. 76 - Olympus DS 2300 | DS-2300 Online Instructions (English) - Page 77
can be split into the two files in DSS Player Plus. 1 Select the folder. Select the folder containing the file to be split from the Dictation Folder Window. 2 Select the voice files. Select one file to split from the Voice File List Box. 3 Select [Split] from the [Edit] menu or press the button - Olympus DS 2300 | DS-2300 Online Instructions (English) - Page 78
Splitting Files Input file name (File name before splitting.) Output file name 5 (File name after splitting.) Split position (Time axis) 5 Playback / Stop button The display will change whenever the 6 button is pressed. 4 Playback slider Shows the current playback position and split - Olympus DS 2300 | DS-2300 Online Instructions (English) - Page 79
Plus Menu Setting of this Recorder The menu setting of this recorder can be changed in the "Configure recorder menu" screen in the computer. 1 Select [Configure recorder menu] from the [Download] menu. The "Configure recorder menu" dialog will be displayed. 2 Execute Menu Setting. Click the radio - Olympus DS 2300 | DS-2300 Online Instructions (English) - Page 80
USB Cable" ( P.50). 3 Open Windows Explorer or Finder window. The recorder will appear as a removable drive icon. 4 Copy data to card. While the data are being written or copied, the record/play indicator lamp on the recorder will flash. ...Note NEVER remove the card or disconnect the USB cable - Olympus DS 2300 | DS-2300 Online Instructions (English) - Page 81
Insert a card ( P.16). CARD COVER Card cover is IS OPEN opened The card cover is not closed. Close the card cover securely until it click ( P.16). SYSTEM ERROR System error System error detected in the This is a malfunction. Contact the recorder. place of purchase or Olympus Service Center - Olympus DS 2300 | DS-2300 Online Instructions (English) - Page 82
locked. Unlock the file ( P.31). Cannot find the Wrong folder. recorded voice Switch to the right folder. Cannot connect Sometimes a connection cannot be made You need to change the PC's USB to PC with some PCs running Windows XP. settings. See DSS Player online help for details ( P.49). 82 - Olympus DS 2300 | DS-2300 Online Instructions (English) - Page 83
Accessories (optional) PC Transcription kit : AS-2300 The AS-2300 transcription kit provides you with a PC-footswitch, a headset and DSS Player software for easy transcription of DSS recordings. xD-Picture Cards of 16, 32, 64, 128, 256 and 512 MB: M-XD16/32/64/128/256/512 Olympus CAMEDIA digital - Olympus DS 2300 | DS-2300 Online Instructions (English) - Page 84
Recording format DSS (Digital Speech Standard) Input level -70 dBv Sampling frequency SP mode: 12 kHz LP mode: 8 kHz Overall frequency response SP mode: 300 to 5,000 Hz LP mode: 300 to 3,000 Hz Recording time (16MB Card * Battery life is measured by Olympus. It varies greatly according to the - Olympus DS 2300 | DS-2300 Online Instructions (English) - Page 85
support for Olympus recorders and software only. Technical Hotline Number in the U.S. and Canada 1-888-553-4448 Technical Assistance and Support User Support E-mail address in the U.S. and Canada distec@olympus 23773 899 User Support E-mail address in Europe [email protected] 7 85 - Olympus DS 2300 | DS-2300 Online Instructions (English) - Page 86
.com For customers in North and South America Declaration of Conformity Model Number: DS-2300 Trade Name: DIGITAL VOICE RECORDER Responsible Party: OLYMPUS IMAGING AMERICA INC. Address: 2 Corporate Center Drive, PO BOX 9058 Melville, NY 11747-9058, U.S.A. Telephone Number: 800-622-6372
-
 1
1 -
 2
2 -
 3
3 -
 4
4 -
 5
5 -
 6
6 -
 7
7 -
8
-
9
-
10
-
11
-
12
-
13
-
14
-
15
-
16
-
17
-
18
-
19
-
20
-
21
-
22
-
23
-
24
-
25
-
26
-
27
-
28
-
29
-
30
-
31
-
32
-
33
-
34
-
35
-
36
-
37
-
38
-
39
-
40
-
41
-
42
-
43
-
44
-
45
-
46
-
47
-
48
-
49
-
50
-
51
-
52
-
53
-
54
-
55
-
56
-
57
-
58
-
59
-
60
-
61
-
62
-
63
-
64
-
65
-
66
-
67
-
68
-
69
-
70
-
71
-
72
-
73
-
74
-
75
-
76
-
77
-
78
-
79
-
80
-
81
-
82
-
83
-
84
-
85
-
86
 |
 |

DIGITAL VOICE
RECORDER
DS-2300
ONLINE
INSTRUCTIONS
Thank you for purchasing an Olympus
Digital Voice Recorder.
Please read these instructions for information
about using the product correctly and safely.
Keep the instructions handy for future reference.
To ensure successful recordings, we
recommend that you test the record function
and volume before use.
E
N