Olympus WS-310M WS-300M Instructions (English) - Page 48
start Windows Media Player.
 |
UPC - 050332299368
View all Olympus WS-310M manuals
Add to My Manuals
Save this manual to your list of manuals |
Page 48 highlights
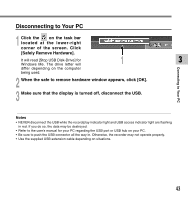
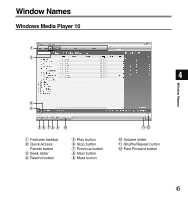
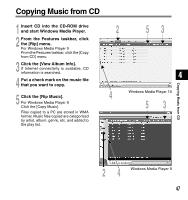
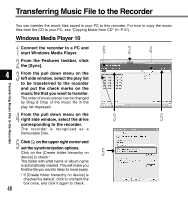
Transferring Music File to the Recorder You can transfer the music files saved in your PC to this recorder. For how to copy the music files from the CD to your PC, see "Copying Music from CD" ( P.47). Windows Media Player 10 Transferring Music File to the Recorder 1 Connect the recorder to a PC and start Windows Media Player. 2 From the Features taskbar, click the [Sync]. 4 3 From the pull down menu on the left side window, select the play list to be transferred to the recorder and put the check marks on the music file that you want to transfer. The order of music pieces can be changed by Drag & Drop of the music file in the play list displayed. 4 From the pull down menu on the right side window, select the drive corresponding to the recorder. The recorder is recognized as a Removable Disk. 5 Click on the upper right corner and set the synchronization options. Click on the [Create folder hierarchy on device] to check.* The folder with artist name or album name is automatically created. This will make you find the file you want to listen to more easily. * If [Create folder hierarchy on device] is checked by default, click to uncheck the box once, and click it again to check. 48 62 3 5 4 5
-
 1
1 -
2
-
3
-
4
-
5
-
6
-
7
-
8
-
9
-
10
-
11
-
12
-
13
-
14
-
15
-
16
-
17
-
18
-
19
-
20
-
21
-
22
-
23
-
24
-
25
-
26
-
27
-
28
-
29
-
30
-
31
-
32
-
33
-
34
-
35
-
36
-
37
-
38
-
39
-
40
-
41
-
42
-
 43
43 -
 44
44 -
 45
45 -
 46
46 -
 47
47 -
 48
48 -
 49
49 -
 50
50 -
 51
51 -
 52
52 -
 53
53 -
54
-
55
-
56
-
57
-
58
-
59
-
60
-
61
-
62
-
63
-
64
-
65
-
66
-
67
-
68
-
69
-
70
-
71
-
72
-
73
-
74
-
75
-
76
-
77
-
78
-
79
-
80
-
81
-
82
-
83
-
84
-
85
-
86
-
87
 |
 |
