Olympus WS-310M WS-300M Instructions (English) - Page 50
Transferring Music File to the Recorder - case
 |
UPC - 050332299368
View all Olympus WS-310M manuals
Add to My Manuals
Save this manual to your list of manuals |
Page 50 highlights
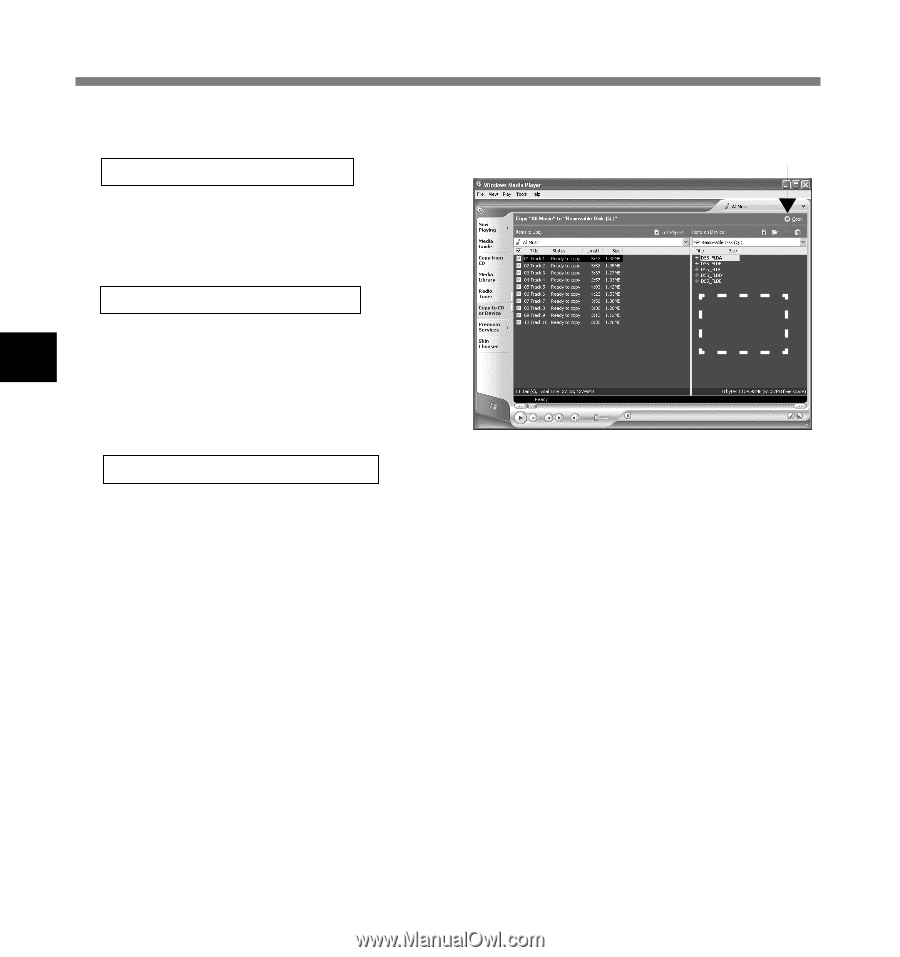
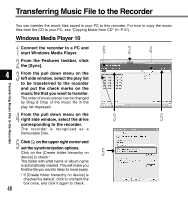
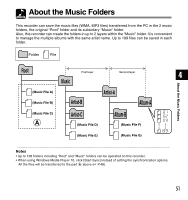
Transferring Music File to the Recorder 5 Select the destination folder. 6 To transfer to "Root" folder The empty column part of the item on the device (Root of the drive) is selected. To transfer to "Music" folder 4 Select the "Music" folder. Creating the "Artist name" folder or "Album name" folder beforehand will make the file management easier (The folders can be created in up to 2 layers in the "Music" folder.) ( P.51). empty column part Transferring Music File to the Recorder To transfer to the voice folder Select a folder from DSS_FLDA to DSS_FLDE. (Functions such as partial repeat, fast playback, slow playback and auto backspace review, available. They are useful for learning languages.) 6 Click the [Copy]. The file is transferred to the recorder. The music file transferred to the recorder is displayed in Item on the window. ...Notes • Copying the music files with DRM purchased online music distribution service to a portable device such as this recorder may be restricted. • Refer to the online help of Windows Media Player for details. • If the music files are transferred to the recorder until it reaches to the maximum memory, the message "Cannot make the system file. Connect to PC and delete unnecessary file" may appear on this recorder's display. In such a case, erase the files to make free space (hundreds of KB to dozens of MB depending on the music file sizes) for the management file. (The more capacity for the management file will be necessary as the number of the music files increases.) 50
-
 1
1 -
2
-
3
-
4
-
5
-
6
-
7
-
8
-
9
-
10
-
11
-
12
-
13
-
14
-
15
-
16
-
17
-
18
-
19
-
20
-
21
-
22
-
23
-
24
-
25
-
26
-
27
-
28
-
29
-
30
-
31
-
32
-
33
-
34
-
35
-
36
-
37
-
38
-
39
-
40
-
41
-
42
-
43
-
44
-
 45
45 -
 46
46 -
 47
47 -
 48
48 -
 49
49 -
 50
50 -
 51
51 -
 52
52 -
 53
53 -
 54
54 -
 55
55 -
56
-
57
-
58
-
59
-
60
-
61
-
62
-
63
-
64
-
65
-
66
-
67
-
68
-
69
-
70
-
71
-
72
-
73
-
74
-
75
-
76
-
77
-
78
-
79
-
80
-
81
-
82
-
83
-
84
-
85
-
86
-
87
 |
 |