Onkyo TX-DS575x Owner Manual
Onkyo TX-DS575x Manual
 |
View all Onkyo TX-DS575x manuals
Add to My Manuals
Save this manual to your list of manuals |
Onkyo TX-DS575x manual content summary:
- Onkyo TX-DS575x | Owner Manual - Page 1
25 Receiving RDS broadcasts (European models only 27 Recording a source 29 Using the remote controller 31 Programming the remote controller codes of other devices into the RC-392M 34 Using a Macro function 36 Appendix Troubleshooting guide 40 Specifications 41 Control guide Control positions - Onkyo TX-DS575x | Owner Manual - Page 2
damaged. 18. Servicing - The user should not attempt to service the appliance beyond that described in the operating instructions. All other servicing should be referred to qualified service personnel. 19. Outdoor Antenna Grounding - If an outside antenna is connected to the receiver, be sure the - Onkyo TX-DS575x | Owner Manual - Page 3
for other than personal use is illegal without permission of the copyright holder. 3. AC Fuse The fuse is located inside the chassis and is not user-serviceable. If power does not come on, contact your Onkyo authorized service station. 4. Care From time to time you should wipe the front and rear - Onkyo TX-DS575x | Owner Manual - Page 4
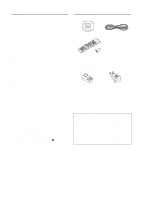
antenna × 1 Remote controller (RC-392M) × 1 Batteries (size AA or UM-3) × 2 Available on the models other than U.S., Canadian, and European models. Available for worldwide models. 75/300 ohm antenna adapter × 1 Conversion plug × 1 Use this plug if the power cord plug of the TX-DS575X does not - Onkyo TX-DS575x | Owner Manual - Page 5
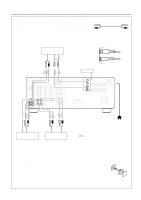
FRONT OUT R L MONITOR OUT SURROUND S R L SUBWOOFER PRE OUT CENTER SUB WOOFER MULTI CH INPUT DIGITAL INPUT COAXIAL 2 FRONT SPEAKERS B COAXIAL 1 L OPTICAL 2 OPTICAL 1 R SURROUND SPEAKERS L R REMOTE CONTROL AV RECEIVER MODEL NO. TX-DS575X 10kHz 9kHz AM FREQUENCY STEP 220-230V 120V - Onkyo TX-DS575x | Owner Manual - Page 6
OPTICAL 2 OPTICAL 1 R SURROUND SPEAKERS L R REMOTE CONTROL AC OUTLETS AC 230V 50Hz SWITCHED TOTAL 100W MAX. AV RECEIVER MODEL NO. TX-DS575X Ground OUTPUT Turntable INPUT (REC) OUTPUT (PLAY) Tape Deck : signal flow To wall outlet Do not plug in the power cord until all connections have - Onkyo TX-DS575x | Owner Manual - Page 7
OUT SURROUND S R L SUBWOOFER PRE OUT CENTER SUB WOOFER MULTI CH INPUT DIGITAL INPUT COAXIAL 2 FRONT SPEAKERS B COAXIAL 1 L OPTICAL 2 OPTICAL 1 R SURROUND SPEAKERS L R REMOTE CONTROL AC OUTLETS AC 230V 50Hz SWITCHED TOTAL 100W MAX. AV RECEIVER MODEL NO. TX-DS575X : signal flow AUDIO - Onkyo TX-DS575x | Owner Manual - Page 8
OUT R L MONITOR OUT SURROUND S R L SUBWOOFER PRE OUT CENTER SUB WOOFER MULTI CH INPUT DIGITAL INPUT COAXIAL 2 FRONT SPEAKERS B COAXIAL 1 L OPTICAL 2 OPTICAL 1 R SURROUND SPEAKERS L R REMOTE CONTROL AC OUTLETS AC 230V 50Hz SWITCHED TOTAL 100W MAX. AV RECEIVER MODEL NO. TX-DS575X 8 - Onkyo TX-DS575x | Owner Manual - Page 9
MULTI CH INPUT DIGITAL INPUT COAXIAL 2 FRONT SPEAKERS B COAXIAL 1 L OPTICAL 2 OPTICAL 1 R SURROUND SPEAKERS L R REMOTE CONTROL AC OUTLETS AC 230V 50Hz SWITCHED TOTAL 100W MAX. AV RECEIVER MODEL NO. TX-DS575X CD Player Cassette Tape Deck AC outlet connection You can connect the power - Onkyo TX-DS575x | Owner Manual - Page 10
2 OPTICAL 1 R SURROUND SPEAKERS L R REMOTE CONTROL AC OUTLETS AC 230V 50Hz SWITCHED TOTAL 100W MAX. AV RECEIVER MODEL NO. TX-DS575X -+ Active subwoofer Center Speaker • When you use only one speaker or wish to listen to monaural (mono) sound, a single speaker should never be connected in - Onkyo TX-DS575x | Owner Manual - Page 11
NIGHT/ LFE LEVEL FRONT EFFECT Re-EQ CONTROL MULTI CH INPUT DVD VIDEO 1 VIDEO 2 VIDEO 3 TAPE FM AM PHONO C D DOWN MASTER VOLUME UP BASS TREBLE AV RECEIVER TX-DS575X 1. To wall outlet 3. ON button 2. MODE AUDIO button 3. STNBY button Connecting the power • Before you plug in the - Onkyo TX-DS575x | Owner Manual - Page 12
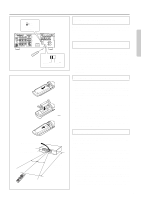
33 3 33 3 3 636 mm mm mm 15mm Connect the 75/300 ohm antenna adapter to the coaxial cable. 1 Insert the end of the cable. 2 Clamp it in place with pliers. 1 Wire A 4. Re-install the cover. Slit C 2 Directional linkage type splitter To TX-DS575X To TV (or VCR) Directional Iinkage Do not - Onkyo TX-DS575x | Owner Manual - Page 13
FM 75 ANTENNA AM FM 75 Outdoor antenna Connecting the AM loop antenna: The AM loop antenna is for indoor use only. Set it in the direction and position where you receive the clearest sound. Put it as far away as possible from the unit, TVs, speaker cables, and power cords. When reception is - Onkyo TX-DS575x | Owner Manual - Page 14
TREBLE AV RECEIVER TX-DS575X PRESET/MODE ADJ √/® button 1 SP/ SYS SETUP ENTER or ENTER / SCAN 2 ENTER or ENTER / SCAN PRESET/ MODE ADJ DOW N UP ENTER or ENTER / SCAN Setting the CONFIG parameters Set whether a speaker is used or not, and set the size of the connected speakers. 1. Press - Onkyo TX-DS575x | Owner Manual - Page 15
you can select only "SMALL" or "NONE" for the surround speakers. LARGE: When large speakers are used as the surround speaker. SMALL: When small speakers are used as the surround speaker. NONE: Surround speakers are not connected. Select whichever appropriate and press the ENTER/SCAN or ENTER button - Onkyo TX-DS575x | Owner Manual - Page 16
remote controller and produce the test tone to adjust the level of the connected speakers. speaker produces the test tone (pink noise) in the follow- ing order: LEFT (Front L ch) CENTER (Center ch) RIGHT (Front R ch) SUBWOOFER L-SURROUND R-SURROUND No sound will be output from the speakers - Onkyo TX-DS575x | Owner Manual - Page 17
LATE NIGHT/ FRONT EFFECT Re-EQ LFE LEVEL CONTROL MULTI CH INPUT DVD VIDEO 1 VIDEO 2 VIDEO 3 TAPE FM AM PHONO C D DOWN MASTER VOLUME UP BASS TREBLE AV RECEIVER TX-DS575X 1. Press the desired input selector button or MULTI CH INPUT button. The selected source name appears on the - Onkyo TX-DS575x | Owner Manual - Page 18
of connected device. Follow the steps (1-4) below. Note: The default setting is "ANALOG." In this case, you cannot play any digital signals from the digital input jacks (Dolby digital, DTS, etc.). OPT1 - The TX-DS575X plays back a digital signal input from the OPTICAL 1 jack. OPT2 - The TX-DS575X - Onkyo TX-DS575x | Owner Manual - Page 19
Selecting a sound source 1 2 4-1 4-2 LEFT SUBWOOFER CENTER L-SURROUND RIGHT R-SURROUND When Multi channel input is selected as a source Follow the steps below to adjust the level of each speaker if you have selected MULTI CH INPUT. 1. Press MODE AUDIO button on the remote controller. 2. Press - Onkyo TX-DS575x | Owner Manual - Page 20
selected input source name. or The timer setting will be cancelled if you turn off the power to the unit. Temporary muting (MUTING) (Remote controller only) Press the MUTING button. The "MUTING" appears on the display and the sound from the speakers or headphones will be switched off by the receiver - Onkyo TX-DS575x | Owner Manual - Page 21
that supports DTS when the "ANA- LOG" setting is selected on the TX-DS575X, the DTS encoded signal will not be decoded and noise will be output. This noise could damage the amplifier and speakers. Therefore, be sure to select "DIGITAL" and use the digital input jacks (OPTICAL/ COAXIAL) to connect the - Onkyo TX-DS575x | Owner Manual - Page 22
5 CH STEREO DSP ENTER/SCAN LATE NIGHT/ FRONT EFFECT Re-EQ LFE LEVEL CONTROL MULTI CH INPUT DVD VIDEO 1 VIDEO 2 VIDEO 3 TAPE FM AM PHONO C D DOWN MASTER VOLUME UP BASS TREBLE AV RECEIVER TX-DS575X 2. LISTENING MODE buttons These button allow you to select a listening mode - Onkyo TX-DS575x | Owner Manual - Page 23
speaker level is set to +1dB or higher, the maximum level indicated on the display will change if you raise the volume level. Refer to "About volume (VOLUME)" on page 20 for more information. • When you turn off the power, the level will be reset sound output from three front channels, and the sound - Onkyo TX-DS575x | Owner Manual - Page 24
radio station STANDBY/ON STANDBY POWER ON OFF A SPEAKERS B PHONES FM MUTE/MODE TUNING DOWN/UP PTY CONTROL MULTI CH INPUT DVD VIDEO 1 VIDEO 2 VIDEO 3 TAPE FM AM PHONO C D DOWN MASTER VOLUME UP BASS TREBLE AV RECEIVER TX-DS575X DISPLAY FM AM 1 FM AM 2 DOWN TUNING UP Manual - Onkyo TX-DS575x | Owner Manual - Page 25
MODE PRESET/MODE ADJ MEMORY STANDBY/ON STANDBY POWER ON OFF A SPEAKERS B PHONES PTY/TP DISPLAY FM MUTE / MEMORY MODE DOWN EFFECT Re-EQ CONTROL MULTI CH INPUT DVD VIDEO 1 VIDEO 2 VIDEO 3 TAPE FM AM PHONO C D DOWN MASTER VOLUME UP BASS TREBLE AV RECEIVER TX-DS575X MODE AUDIO CH - Onkyo TX-DS575x | Owner Manual - Page 26
operation 1. Press the MODE AUDIO button. 2. Select the tuner as the source by pressing the TUN input selector button on the remote controller. 3. Press the CH (- or +) button. 2 MEMORY 3 ENTER or ENTER / SCAN Cancelling preset stations 1. Select the preset station you wish to remove as - Onkyo TX-DS575x | Owner Manual - Page 27
is displayed. RT: Radio Text When an RDS station broadcasting RT information is selected, the information received from the station is displayed. NOTE: In some cases, the characters displayed on the TX-DS575X's display may not be exactly the same as the ones broadcast by the radio station. Unusual - Onkyo TX-DS575x | Owner Manual - Page 28
Receiving RDS broadcasts (European models only) PTY/TP PRESET/MODE ADJ STANDBY/ON STANDBY POWER ON OFF A SPEAKERS CONTROL MULTI CH INPUT DVD VIDEO 1 VIDEO 2 VIDEO 3 TAPE FM AM PHONO C D DOWN MASTER VOLUME UP BASS TREBLE AV RECEIVER TX-DS575X preset No.) Program Service Name (Preset - Onkyo TX-DS575x | Owner Manual - Page 29
LFE LEVEL CONTROL MULTI CH INPUT DVD VIDEO 1 VIDEO 2 VIDEO 3 TAPE FM AM PHONO C D DOWN MASTER VOLUME BASS TREBLE AV RECEIVER TX-DS575X 1·3 Tape deck (TAPE) 3 Turntable CD player VCR, VDP DVD 2 DVD VIDEO 1 VIDEO 2 VIDEO 3 Recording an audio source Make all connections between - Onkyo TX-DS575x | Owner Manual - Page 30
Re-EQ LFE LEVEL CONTROL MULTI CH INPUT DVD VIDEO 1 VIDEO 2 VIDEO 3 TAPE FM AM PHONO C D DOWN MASTER VOLUME UP BASS TREBLE AV RECEIVER TX-DS575X 1·5 VDP, VCR, DVD (VIDEO 2, VIDEO 3) 2·5 5 Turntable CD player TAPE VCR (VIDEO 1) 3 VIDEO 2 VIDEO 3 Adding new sound to a video tape - Onkyo TX-DS575x | Owner Manual - Page 31
power standby. SEND/LEARN indicator This indicator acts as a guide when commands are programmed into or sent by the remote controller. It also warns the user when an error is made or battery power is low. Controlling the TX-DS575X 1. Press the MODE AUDIO button. 2. Press the desired operation - Onkyo TX-DS575x | Owner Manual - Page 32
volume level of the TXDS575X MUTING : Muting the sound from the TX-DS575X DVD operation buttons Numeric keys, ENT button 32 MODE DVD Controlling an Onkyo DVD player Note: Make sure that you point the transmission part on the remote controller toward the sensor area on the DVD player. 1. Press - Onkyo TX-DS575x | Owner Manual - Page 33
buttons: VOL q/u : Adjusting the volume level of the TXDS575X MUTING : Muting the sound from the TX-DS575X Controlling an Onkyo tape deck Note: First connect an Onkyo tape deck using the page 9.) connection. (See 1. Press the MODE AUDIO/TAPE button. 2. Press the desired tape deck operation - Onkyo TX-DS575x | Owner Manual - Page 34
to make sure the learning function works. Note: The remote controller codes for the Onkyo CD player, tape deck, DVD player, and MD recorder instruction manual for each product. • Even after codes have been memorized, please keep your old remote controller in a safe place. If the memorized codes - Onkyo TX-DS575x | Owner Manual - Page 35
remote controller codes of other devices into the RC-392M See page 39 for information on how to erase the learned codes from all buttons. SEND/LEARN indicator MODE buttons Erasing a learned code You can erase a learned code. You cannot erase preset codes. • Erasing a code the learned code. When - Onkyo TX-DS575x | Owner Manual - Page 36
remote controller into a single button. For example, you need to follow the steps below to play a CD player connected to the TX-DS575X without using the Macro function: 1: Press the MODE AUDIO button. → 2: Press the ON button. → 3: Press the CD (INPUT and may miss the next code. In this case, press - Onkyo TX-DS575x | Owner Manual - Page 37
. Point the RC-392M toward the TX-DS575X and press the MACRO DIRECT button, and make sure that the device responds as programmed. Transmitting the codes in Macro mode takes a while. During transmission, point the remote controller toward the device to be controlled. Note: • You may program up to - Onkyo TX-DS575x | Owner Manual - Page 38
ashes once. 2. Press the MACRO MODE button again. The SEND/LEARN indicator flashes twice slowly. The learned operation is erased. 1, 2 1 38 Erasing a learned remote controller button operation from the MACRO DIRECT button 1. Press and hold down any one of the MODE buttons and press the MACRO DIRECT - Onkyo TX-DS575x | Owner Manual - Page 39
in the buttons This procedure will erase all remote controller codes for the other devices and all macro operations up for about ten seconds, then turns off. All programmed codes are erased and the button memories return to the factory presets. Note: • Proceed to Step 3 immediately after Step - Onkyo TX-DS575x | Owner Manual - Page 40
the outlet and then plug it again. • Contact your Onkyo Service Center. • Press the MUTING button on the remote con- troller to turn it off. • Select the correct input. • Check connections, speaker leads, etc. • Contact your Onkyo Service Center. • Check the connection between the amplifier and the - Onkyo TX-DS575x | Owner Manual - Page 41
AMPLIFIER SECTION Continuous Average Power output (FTC) All channels: 70 watts per channel min. RMS at 8 ohms, 2 channels INPUT (FRONT L/R, SUR- ROUND L/R, CENTER): 300 mV, 50 kohms (SUBWOOFER 120 V, 60 Hz model) 13.2 kg, 29.1 lbs. (other models) REMOTE CONTROL Transmitter: Signal range: - Onkyo TX-DS575x | Owner Manual - Page 42
NIGHT / LFE LEVEL FRONT EFFECT Re-EQ CONTROL MULTI CH INPUT DVD VIDEO 1 VIDEO 2 VIDEO 3 TAPE FM AM PHONO C D DOWN MASTER VOLUME UP BASS TREBLE AV RECEIVER TX-DS575X 26 25 24 23 22 21 20 19 Display a bc d e f g hi SPEAKERS AB SLEEP AUTO STANDBY MPEG DOLBY DIGITAL DTS - Onkyo TX-DS575x | Owner Manual - Page 43
14 Remote controller Using the remote controller, you can control a CD player or cassette tape deck connected to the connector of the TX-DS575X. TX-DS575X.] 10. TRACK button [32] 11. CD/TAPE/DVD/MD operation buttons [31~33] 12. Input Selector buttons [17] The V4 button is not used for the TX-DS575X - Onkyo TX-DS575x | Owner Manual - Page 44
44SN 29342860 Sales & Product Planning Div. : 2-1, Nisshin-cho, Neyagawa-shi, OSAKA 572-8540, JAPAN Tel: 072-831-8111 Fax: 072-833-5222 ONKYO U.S.A. CORPORATION 200 Williams Drive, Ramesy, N.J. 07446, U.S.A. Tel: 201-825-7950 Fax: 201-825-8150 E-mail: [email protected] ONKYO EUROPE ELECTRONICS
-
 1
1 -
 2
2 -
 3
3 -
 4
4 -
 5
5 -
 6
6 -
 7
7 -
8
-
9
-
10
-
11
-
12
-
13
-
14
-
15
-
16
-
17
-
18
-
19
-
20
-
21
-
22
-
23
-
24
-
25
-
26
-
27
-
28
-
29
-
30
-
31
-
32
-
33
-
34
-
35
-
36
-
37
-
38
-
39
-
40
-
41
-
42
-
43
-
44
 |
 |
Contents
Before using
Important Safeguards
........................
2
Precautions
.......................................
3
Features
.............................................
4
Supplied accessories
.........................
4
Before operating this unit
.................
5
Preparation
Audio equipment connections
..........
6
Video equipment connections
..........
7
Connecting other devices
.................
8
Connecting speakers
.......................
10
Positioning speakers
.......................
11
Connecting the power
.....................
11
Making antenna connections
..........
12
Operation
Speaker setup
..................................
14
Selecting a sound source
................
17
Using Listening Mode
....................
21
Tuning in a radio station
.................
24
Using preset radio stations
..............
25
Receiving RDS broadcasts
(European models only)
...............
27
Recording a source
.........................
29
Using the remote controller
............
31
Programming the remote controller
codes of other devices into the
RC-392M
.....................................
34
Using a Macro function
..................
36
Appendix
Troubleshooting guide
....................
40
Specifications
.................................
41
Control guide
Control positions and names
..........
42
AV Receiver
TX-DS575X
Instruction Manual
Thank you for purchasing the Onkyo AV Receiver.
Please read this manual thoroughly before making
connections and turning on the power.
Following the instructions in this manual will enable
you to obtain optimum performance and listening
enjoyment from your new AV Receiver.
Please retain this manual for future reference.