Onkyo TX-DS838 Owner Manual
Onkyo TX-DS838 Manual
 |
View all Onkyo TX-DS838 manuals
Add to My Manuals
Save this manual to your list of manuals |
Onkyo TX-DS838 manual content summary:
- Onkyo TX-DS838 | Owner Manual - Page 1
station 33 Receiving RDS broadcasts (Not available in the U.S. and other 34 Entering characters 36 Recording a source 37 Using TAPE-2 MONITOR 40 Selecting a Surround mode 42 Setting the Surround mode parameters 44 TX-DS838 parameters 46 Troubleshooting guide 47 Specifications - Onkyo TX-DS838 | Owner Manual - Page 2
purchasing the Onkyo TX-DS838 Audio Video Control Receiver. Please read this manual thoroughly before making connections and operating the unit. Following the instructions in this manual will enable you to obtain optimum performance and listening enjoyment from your new A/V Receiver. Please retain - Onkyo TX-DS838 | Owner Manual - Page 3
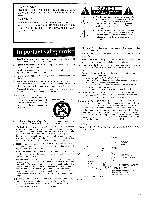
trouble inserting it, the user should seek the services instructions. All other servicing should be referred to qualified service personnel. 19. Outdoor Antenna Grounding - If an outside antenna is connected to the receiver, be sure the antenna system is grounded so as to provide some protection - Onkyo TX-DS838 | Owner Manual - Page 4
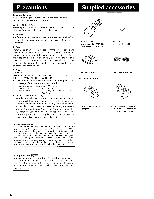
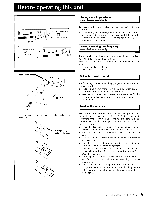
serviceable. If power does not come on, contact your Onkyo authorized service 1 Remote control U.S. & Canada: RC-P101S Other areas: RC-P201S 1 AM loop antenna Worldwide model only: the average, memory contents are protected over a period of a few climate. Dolby Surround Manufactured under license - Onkyo TX-DS838 | Owner Manual - Page 5
into the remote control according to the illustration. While pushing in, slide out the cover. 4 Setting the voltage selector (worldwide model only) 1. with this unit have a service life of approximately six months, depending on the frequency of use. • The TX-DS838 comes equipped with two AA - Onkyo TX-DS838 | Owner Manual - Page 6
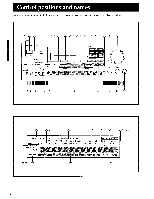
item. 5 nro. COM tegra 171-4K 'CORO'S Cl (9 0 0 9 ODE S.PROUN MODE - 16 18 J MPS-. ,OLLAIF Al,* V I.EO CONTROL, IER AMPLIFIER TX JS838 2 7 SPEAKERS A B VIDEO 11 AUDIO MUTING SLEEP T 2 MONITOR DIGITAL DOLBY SURROUND MODE OFF AC-3 PRO LOGIC HALL LIVE ARENA ACTION DRAMA MUSICAL STADIUM - Onkyo TX-DS838 | Owner Manual - Page 7
POWER indicator (SYSTEM switch and SYSTEM indicator on the European models) and STAND-BY/RECEIVED indicator [17, 29] The STAND-BY/RECEIVED indicator lights up each time a signal is received from the remote control. • Remote control sensor [5] ® AC-3 indicator [42] C) DIMMER button Used to change the - Onkyo TX-DS838 | Owner Manual - Page 8
are always available regardless of the device select switch f position. ® Remote control operation indicator Lights up each time a button on the remote control is pressed. ® POWER button Switches the TX-DS838 between stand-by status (the STAND-BY/ RECEIVED indicator is lit) and power-on status - Onkyo TX-DS838 | Owner Manual - Page 9
8 P1 E _LcIL \ 1 Cc) 19 RDE ` ) \ 1 GROUP TER [Tyre- TAPE rVCR APEO TUNER SELEPTO 'ADO-10I• REMOTE CONTROLL ONICY0 CD/TUNER controls: The following buttons can be used when the device select switch is set to CD/TUNER. © SLEEP button Refer to the explanation for this button under AMP - Onkyo TX-DS838 | Owner Manual - Page 10
11 II 6c \\ i DAM, 13 COL LEgl 'UTI:! 14 8 17 OL TAPE VCR [ APETU ao REMOTE CONTPOL~EP ON'ItIFO VCR (video cassette recorder) controls: The following buttons can be used when the device select switch • is set to VCR. C) PWR button Turns on and off the power. C) T button Toggles - Onkyo TX-DS838 | Owner Manual - Page 11
to the TX-DS838 from either the main room or the sub-room. (Refer to pages 20 to 22 for more details.) The following equipment (sold separately) is essential for using the Onkyo Multi-Room System: USA & Canada: * Onkyo's Multi-Room System kits HKT-600, HKT-700 (IR Remote Control Extension System - Onkyo TX-DS838 | Owner Manual - Page 12
Refer to the instruction manual of each component when TX-DS838. Even when one of these connectors are being used, do not disconnect the analog connection cable. OUTPUT CD player uT LINE IN I TI LINE OUT 1 =M.. 00 Tape deck LINE IN y iA LINE OUT =I= ooe ee Tape deck Remote control - Onkyo TX-DS838 | Owner Manual - Page 13
Refer to the instruction manual of each component when TXDS838's video input connector. NOTE: • When the video equipment is monaural, connect its audio output to the right (R) AUDIO input connector on this unit. • If a VDP's AC-3 RF output is connected to the TX-DS838's AC-3 RF DIGITAL INPUT - Onkyo TX-DS838 | Owner Manual - Page 14
equipment The TX-DS838 is equipped with an IPM system, which automatically turns on the receiver's power 3 to 5 seconds after the TV is turned on, and turns off the receiver's power 5 seconds after the TV is turned off. To use this function, connect the TV or monitor to the VIDEO-3 INPUT connectors - Onkyo TX-DS838 | Owner Manual - Page 15
does not affect the final quality of the sound image too much, so you can install it with the room layout in mind. Refer to the speaker instruction manual for more details. I I TV or Screen Sub- Center sP woofer speaker ght 000, Left Surround speaker Listene Right Surround speaker 15 - Onkyo TX-DS838 | Owner Manual - Page 16
Connecting speakers Front and Surround speakers Left Surround Speaker Right Surround Speaker Connecting speaker cables ( To listen to the Surround effects, Surround speakers must be connected. For best results, connect a center speaker. Front Right Speaker Front Le t Speaker Center speaker - Onkyo TX-DS838 | Owner Manual - Page 17
switch is set to ON, pressing the POWER button on the remote control switches the TX-DS838 between standby status (the STAND-BY/RECEIVED indicator is lit) and poweron status (the SYSTEM indicator is lit). Pressing the SYSTEM switch on the TX-DS838 to set it to OFF turns off the unit. (When the - Onkyo TX-DS838 | Owner Manual - Page 18
antenna.) Insert into the slot. The 75/300 ohm adaptor is only included with the worldwide model. Outdoor FM/TV antenna Indoor T-shaped antenna 300 ohm ribbon wire 75/300 ohm adaptor (worldwide model only) Connecting the T-shaped antenna or 300 ohm ribbon wire to the 75/300 ohm adaptor Loosen - Onkyo TX-DS838 | Owner Manual - Page 19
use only. Extend the antenna and move it until the clearest signal is received. Use tacks or similar objects to fix it in the T-shaped arrangement giving antenna is also for indoor use only. Position it where the clearest sound is received. Put it as far as possible away from his unit, the TV, - Onkyo TX-DS838 | Owner Manual - Page 20
components equipped with Onkyo RI connectors MAIN ROOM 1. Onkyo components (a) Speaker (Main room) TX-DS838 Speaker (Main room) 4. Connecting block Remote control SUB ROOM _5. IR Receiver, Dinky Link or J-Box Receiver 1. Set up the Onkyo RI components (a). 2. Connect the TX-DS838 to the - Onkyo TX-DS838 | Owner Manual - Page 21
Speaker (Main room) \ 4. Connecting block N \H_ Power supply 2. Power amplifier Remote control _5. Remote Sensor 3. Speaker \ (Sub room) 3. Speaker \ Sub room) 1. Set up the Onkyo RI components (a). 2. Connect the TX-DS838 to the power amplifier. (CD) 3. Connect the sub-room speaker cables - Onkyo TX-DS838 | Owner Manual - Page 22
OFF button on the TX-DS838 to make the indi- cator go off. (If the MR OFF indicator is lit, the multi-room system cannot be used.) 2. Set the MAIN/SUB selector switch on the remote control to SUB. 3. Press the appropriate INPUT SELECTOR button on the remote control to select your desired source and - Onkyo TX-DS838 | Owner Manual - Page 23
received, change the system setting. 1. To display the currently selected remote control. 3. Press the P. cursor button on the remote control to display the selected screen. 4. Select the desired parameter using the • or V cursor button on the remote control to the Surround mode selected. Pressing the - Onkyo TX-DS838 | Owner Manual - Page 24
Using the on-screen display function (remote control only) Screens Refer to the page whose number appears within parentheses for more details about the screen. Selecting certain settings for some parameters in the Surround Setup screen may result in other parameters either disappearing or being - Onkyo TX-DS838 | Owner Manual - Page 25
Using the on-screen display function (remote control only) Screen Setup screen When Screen Setup is selected, the following screen appears: 10.1\TX.,C40. ** Screen Setup ** Background Color A BLUE -1 Color 3 = GREEN GB Superimpose Mode = NORMAL GM Smmediate Display , ON BrI Character - Onkyo TX-DS838 | Owner Manual - Page 26
CENTER SPEAKER and SURROUND SPEAKERS connectors on the rear panel. Select this parameter and enter Tx.c.sro, ** s t_ en Set_ op 3 ** Balance Cort e -to] Ceneer [_ On-screen display operation 1. Press the ENTER button on the remote control to display the Menu screen. 2. Move the cursor to select - Onkyo TX-DS838 | Owner Manual - Page 27
Surround mode can be used and the setting will remain set to OFF. Speaker Distance Use this parameter to specify the distance of the speakers' position from the listener. The delay time is automatically set according to these distances. First, press the ENTER button on the remote control to select - Onkyo TX-DS838 | Owner Manual - Page 28
up A ** Speaker Setup p Speaker DSstance p ever. CaT lbsasion 11 ONKYO * T,eve Calibration * ESC Ssasting - he 'lest. Sign 0.1•TNE. sounds from the left front speaker. 3. Press the • cursor button on the remote control to select a speaker. r With each press of the button, the selected - Onkyo TX-DS838 | Owner Manual - Page 29
on playing the selected source with a Surround mode. Remote control and main unit operation 2 1 4 6 O®, 000 0O a. at I .1 I ago I l t l 000 3 7 1 2 0 6 • l° 0 0 °I 3 0 0 1. Press either the POWER button on the remote control or the POWER switch (SYSTEM on the European models) on the - Onkyo TX-DS838 | Owner Manual - Page 30
. (Refer to page 29 for more details.) Surround Mode Specifies the Surround mode. 5. Move the cursor over es. and press the ENTER button. 6. Follow the operating instructions for the selected unit to start playback. If TUNER is selected as the Sound input source, refer to Tuning in a radio station - Onkyo TX-DS838 | Owner Manual - Page 31
lit. Number 0 GROUP buttons OAP FM MUTE/MODE MEMORY 2- SCAN " I DIRECT TUNING km- DIREC JNI 1 ASC DEP STU 0 10 FM MUTE OFF Manual tuning 1. Press either the FM or AM button on the a broadcast is received. Direct tuning Canadian and worldwide models: Since the AM MUTE/MODE button on the - Onkyo TX-DS838 | Owner Manual - Page 32
00 FM MUTE/MODE MEMORY = rA- 1 I I IMMO ! NMI4- 2 Op 3 LR. :Oj1,11 4 GHI 5 DINO MEMORY CH Setting a preset station 1. Select the radio station preset number 10. NOTE: European models only: If the selected FM station broadcasts RDS signals with a PS (Program service name) the name ^f the - Onkyo TX-DS838 | Owner Manual - Page 33
operation 1. Press the ENTER button on the remote control to display the Menu screen. 2. Move the cursor to Input Selector and press the 110- cursor button on the remote control to display the Input Selector screen. 3. If TUNER is not selected as the Sound source, press the • or • cursor button to - Onkyo TX-DS838 | Owner Manual - Page 34
characters appear in the display, characters are being received that cannot be correctly displayed by the TX-DS838. This does not indicate a malfunction of the unit. PS: Program Service Name When an RDS station broadcasting PS information is selected, the station's name is displayed instead of the - Onkyo TX-DS838 | Owner Manual - Page 35
received, scan- ning stops for approximately 5 seconds, and then continues again. 4. When the desired station is found, press the SCAN button to stop scanning. Searching for traffic information (TP scan) If the selected < Entered characters or Program Service Name If the current station you - Onkyo TX-DS838 | Owner Manual - Page 36
receiving be given the name "ONKYO". 1. Select the desired station. (Refer to Selecting a preset station on TUNING button. After the selected character is deleted, all 1. Select the desired station. (Refer to Selecting a preset characters 1. Select the desired station. (Refer to Selecting a preset - Onkyo TX-DS838 | Owner Manual - Page 37
it: CD.Z.TMWO On-screen display operation ONKYO I .* 1. Press the ENTER button on the remote control to display the Menu screen. 2. Move the the selected source. NOTE: • Do not adjust any controls on the TX-DS838 after starting the recording operation. • Pressing an input selector button - Onkyo TX-DS838 | Owner Manual - Page 38
remote control to display the Rec Selector screen. 3. Move the cursor to Picture and/or Sound and press the 1 or IP. cursor button on the remote control to select Input Selector in the Menu screen, press the ► cursor button on the remote control to display the Input Selector screen, and then select - Onkyo TX-DS838 | Owner Manual - Page 39
a TV picture with FM/ CABLE TV sound When two VCRs are used, a TV broadcast can be recorded with a simulcast FM broadcast. 1. Receive the TV broadcast using the VCR tuner connected to VIDEO-1 INPUT. 2. Press the VIDEO-1 input selector button on the TX-DC838 to select the VCR that will be used to - Onkyo TX-DS838 | Owner Manual - Page 40
press the low cursor button on the remote control to display the Input Selector screen. 2. Move the cursor to TAPE-2 Moni. and press the l or O. cursor button to select ON. 3. Follow the operating instructions for the TAPE-2 tape deck to start playback. Only the sound from the TAPE-2 tape deck can - Onkyo TX-DS838 | Owner Manual - Page 41
ON to hear the sound that is just recorded. 4. Start recording using the TAPE-2 tape deck, then start playing the selected source. Refer to the tape deck instruction manual for more details. Remote control and main unit operation 1. Press an input selector button to select the source to be recorded - Onkyo TX-DS838 | Owner Manual - Page 42
of parameters which can be used to adjust the sound. (Refer to pages 44 and 45 for more details.) Remote control operation Main unit operation e 1. Press SURMODAE or erol to select the desired Surround mode. With each press of a button, the mode changes one at a time in the following sequence - Onkyo TX-DS838 | Owner Manual - Page 43
Selecting a Surround mode Various parameters are available in the Surround mode screens shown below. When not all parameters can be shown in one screen, t appears in the bottom right-hand corner of the screen. Press the V cursor button on the remote control to move the cursor to =. The screen - Onkyo TX-DS838 | Owner Manual - Page 44
DOLBY DIGITAL (AC-3) or DOLBY PRO LOGIC Surround modes only) Motion pictures are produced on the "ON" to reproduce an optimal sound for the home theater system. selected from seven settings between 0.4 and I .O. clavic"se-o. * fa l l S I ze * ESC .8 SriallerEICLarger Hall Shape You can select - Onkyo TX-DS838 | Owner Manual - Page 45
to this parameter and press the ► cursor button on the remote control to display the YES and NO settings. Move the cursor to YES and press the A cursor button to return all parameters in the displayed Surround Setup screen to their default settings. Move the cursor to NO and press the IP. cursor - Onkyo TX-DS838 | Owner Manual - Page 46
TX-DS838 parameters Refer to Selecting a Surround mode on page 42 for details on setting the Surround mode ri ON FEET/METER FRONT SPEAKERS 1-30ft (0.3-9m) CENTER SPEAKER 1-30ft (0.3-9m) A SURROUND SPEAKERS 1-30ft (0.3-9m) A BALANCE CONTROL RIGHT--4 60/ 40/ 30/ 25/ 20/ 18/ - 16/-14/-12 1/ - Onkyo TX-DS838 | Owner Manual - Page 47
Troubleshooting guide If a problem occurs, adjust the controls on the TX-DS838 front panel to confirm that the remote control is not malfunctioning or has worn out batteries. Trouble Cause Remedy Power, then immediately no power • The amplifier protection circuitry has been • Contact your - Onkyo TX-DS838 | Owner Manual - Page 48
preset memory and parameters stored in the memory, such as those for the Surround mode, are initialized and will return to the factory default settings. Problem with the RC-P101S, RC-P201S remote control The remote control does not operate. Some or all buttons on the video component don't function - Onkyo TX-DS838 | Owner Manual - Page 49
Hz ,ignal-to-noise ratio: PHONO: 80 dB (IHF A, 5mV input) (Surround mode: OFF) CD/TAPE: 100 dB (IHF A) Muting: -.OdB VIDEO SECTION Television format: NTSC (U.S. and Canadian models) NTSC/PAL (Other models) Input sensitivity/impedance IN (VIDEO-1 . 4) VIDEO (Composite): 1 Vp-p/75 ohms IN - Onkyo TX-DS838 | Owner Manual - Page 50
EUROPE ELECTRONICS GmbH Industriestrasse 18-20, 82110 Germering, GERMANY Tel: 089 84 93 20 Fax: 089 84 93 226 ONKYO FRANCE Immeuble Le Diamant, Domaine Technologique de Saclay, 4 Rue Rene Razel, 91892 SACLAY, FRANCE Tel: (1) 69 33 14 00 Fax: (1) 69 41 35 84 01-6 Z-
-
 1
1 -
 2
2 -
 3
3 -
 4
4 -
 5
5 -
 6
6 -
 7
7 -
8
-
9
-
10
-
11
-
12
-
13
-
14
-
15
-
16
-
17
-
18
-
19
-
20
-
21
-
22
-
23
-
24
-
25
-
26
-
27
-
28
-
29
-
30
-
31
-
32
-
33
-
34
-
35
-
36
-
37
-
38
-
39
-
40
-
41
-
42
-
43
-
44
-
45
-
46
-
47
-
48
-
49
-
50
 |
 |
Artistry
in
Sound
ONKYQ
Audio
Video
Control
Receiver
CONTENTS
TX-DS838
Instruction
Manual
O O
O
All
models
except
European
models
c=
0
0
0O
CO
0
0)
I
I
I I
000
I
Features
2
Important
safeguards
3
Precautions
4
Supplied
accessories
4
Before
operating
this
unit
5
Control
positions
and
names
6
Introduction
11
Connecting
audio
equipment
12
Connecting
video
equipment
13
Positioning
speakers
15
Connecting
speakers
16
Connecting
optional
amplifiers
17
Connecting
the
power
17
Connecting
antennas
18
Setting
up
the
Multi
-Room
Remote
System
20
Multi
-Room
Remote
Control
.22
Using
the
on
-screen
display
function
(remote
control
only)
.........
..„.
23
Setting
up
the
speaker
system
26
Listening
to
your
favorite
source
29
Tuning
in
a
radio
station
31
Using
preset
radio
stations
32
Selecting
a
preset
station
33
Receiving
RDS
broadcasts
(Not
available
in
the
U.S.
and
other
34
Entering
characters
36
Recording
a
source
37
Using
TAPE
-2
MONITOR
40
Selecting
a
Surround
mode
42
Setting
the
Surround
mode
parameters
44
TX-DS838
parameters
46
Troubleshooting
guide
47
ns
49