Onkyo TX-DS838 Owner Manual - Page 29
Onkyo TX-DS838 Manual
 |
View all Onkyo TX-DS838 manuals
Add to My Manuals
Save this manual to your list of manuals |
Page 29 highlights
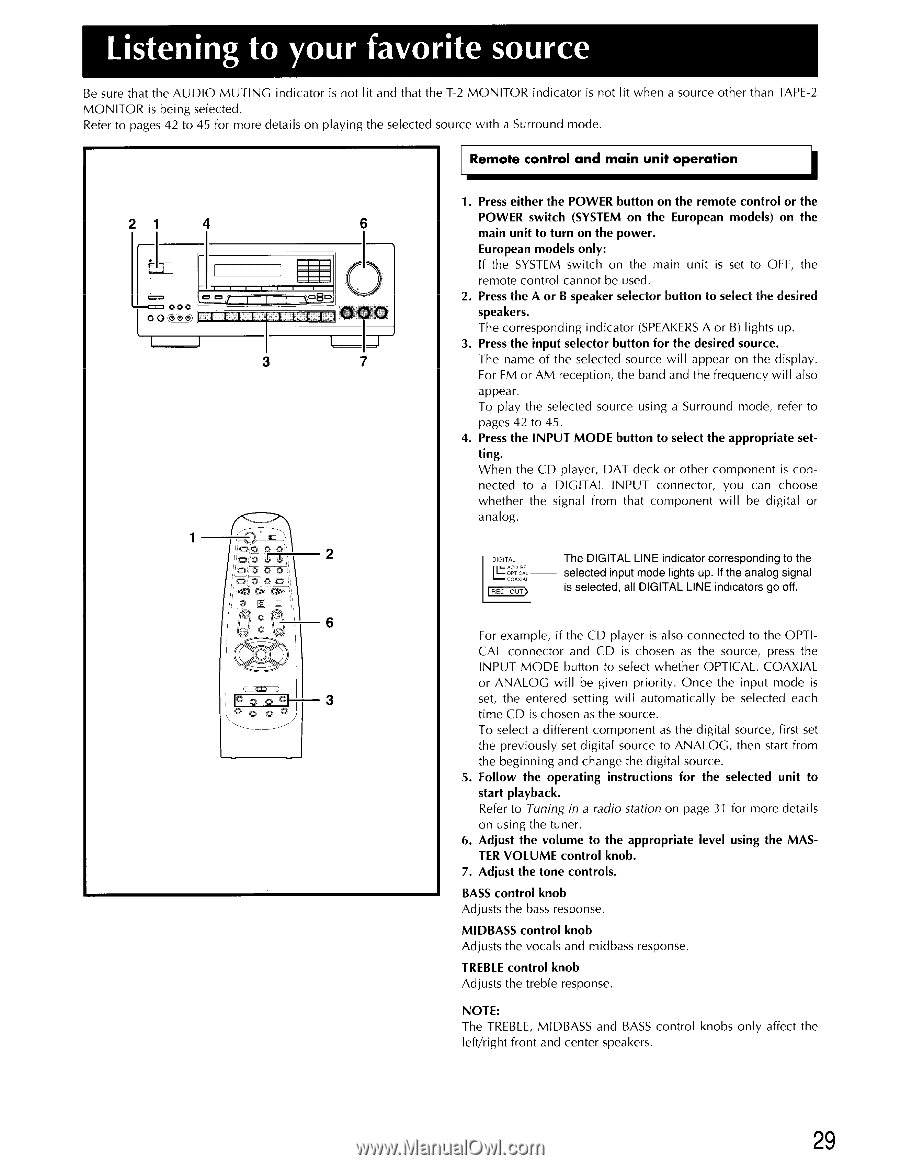
Listening to your favorite source Be sure that the AUDIO MUTING indicator is not lit and that the T-2 MONITOR indicator is not lit when a source other than TAPE-2 MONITOR is being selected. Refer to pages 42 to 45 for more details on playing the selected source with a Surround mode. Remote control and main unit operation 2 1 4 6 O®, 000 0O a. at I .1 I ago I l t l 000 3 7 1 2 0 6 • l° 0 0 °I 3 0 0 1. Press either the POWER button on the remote control or the POWER switch (SYSTEM on the European models) on the main unit to turn on the power. European models only: If the SYSTEM switch on the main unit is set to OFF, the remote control cannot be used. 2. Press the A or B speaker selector button to select the desired speakers. The corresponding indicator (SPEAKERS A or B) lights up. 3. Press the input selector button for the desired source. The name of the selected source will appear on the display. For FM or AM reception, the band and the frequency will also appear. To play the selected source using a Surround mode, refer to pages 42 to 45. 4. Press the INPUT MODE button to select the appropriate setting. When the CD player, DAT deck or other component is connected to a DIGITAL INPUT connector, you can choose whether the signal from that component will be digital or analog. DIGITAL I REG OUT> The DIGITAL LINE indicator corresponding to the selected input mode lights up. If the analog signal is selected, all DIGITAL LINE indicators go off. For example, if the CD player is also connected to the OPTICAL connector and CD is chosen as the source, press the INPUT MODE button to select whether OPTICAL, COAXIAL or ANALOG will be given priority. Once the input mode is set, the entered setting will automatically be selected each time CD is chosen as the source. To select a different component as the digital source, first set the previously set digital source to ANALOG, then start from the beginning and change the digital source. 5. Follow the operating instructions for the selected unit to start playback. Refer to Tuning in a radio station on page 31 for more details on using the tuner. 6. Adjust the volume to the appropriate level using the MASTER VOLUME control knob. 7. Adjust the tone controls. BASS control knob Adjusts the bass response. MIDBASS control knob Adjusts the vocals and midbass response. TREBLE control knob Adjusts the treble response. NOTE: The TREBLE, MIDBASS and BASS control knobs only affect the left/right front and center speakers. 29
-
 1
1 -
2
-
3
-
4
-
5
-
6
-
7
-
8
-
9
-
10
-
11
-
12
-
13
-
14
-
15
-
16
-
17
-
18
-
19
-
20
-
21
-
22
-
23
-
 24
24 -
 25
25 -
 26
26 -
 27
27 -
 28
28 -
 29
29 -
 30
30 -
 31
31 -
 32
32 -
 33
33 -
 34
34 -
35
-
36
-
37
-
38
-
39
-
40
-
41
-
42
-
43
-
44
-
45
-
46
-
47
-
48
-
49
-
50
 |
 |