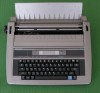
Panasonic KX-R530 Operating Instructions - Page 9
Power, Supply, Changing, Ribbon, Cassette
 |
UPC - 037988700851
View all Panasonic KX-R530 manuals
Add to My Manuals
Save this manual to your list of manuals |
Page 9 highlights
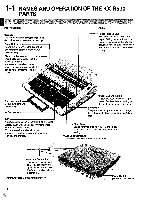
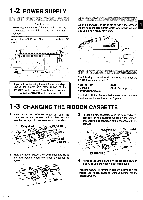
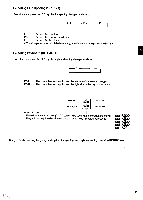
1-2 POWER SUPPLY Caution Power source voltage of this unit is listed on the nameplate. Do not fail to plug into the right voltage. Connect the AC Power Cord to a household AC Socket. When the POWER switch is set to "ON", the carriage will move to the left margin which was previously set. The unit is now ready for typing. O IMMIOH011iall00011C0NIIIIIHRE0 I AC Socket AC Power Cord If you will not be using the unit for several days, unplug the power cord after turning off the POWER switch. About 3 watts are consumed even while the POWER switch is turned off. The following information will be stored even after the POWER switch is turned off: •Stored Text •Margins •Typing Impression •Tabs •Mode Settings The built-in lithium battery that is used to retain these functions can be used for about 5 years. 1-3 CHANGING THE RIBBON CASSETTE After turning the POWER switch off, open the paper support and remove the front plate. You will see the carriage, ribbon cassette and daisywheel. Daisywheel Card Holder Carriage 3 To insert a new cassette, place the back end of the cassette, on the cassette holder on the carriage and snap the front portion of the cassette onto the carriage. Ribbon Metal Guides Card Holder Ribbon Cassette 2 Hold the ribbon cassette on both sides and lift up the front portion (where the ribbon is exposed) to remove. e) CS' ° Tension Knob 4 Advance the tension knob on the cassette counter- clockwise until the ribbon slack is removed. Press the CODE+K keys to initialize the carriage if you change the ribbon cassette without turning off the POWER switch. 9
-
 1
1 -
2
-
3
-
 4
4 -
 5
5 -
 6
6 -
 7
7 -
 8
8 -
 9
9 -
 10
10 -
 11
11 -
 12
12 -
 13
13 -
 14
14 -
15
-
16
-
17
-
18
-
19
-
20
-
21
-
22
-
23
-
24
-
25
-
26
-
27
-
28
-
29
-
30
-
31
-
32
-
33
-
34
-
35
-
36
-
37
-
38
-
39
-
40
-
41
-
42
-
43
-
44
-
45
-
46
-
47
 |
 |
