Panasonic KXTVS325 KXTVS125 User Guide - Page 45
Setting Telephone Numbers for Toll Saver
 |
View all Panasonic KXTVS325 manuals
Add to My Manuals
Save this manual to your list of manuals |
Page 45 highlights
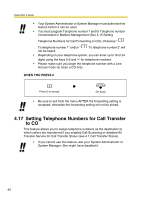
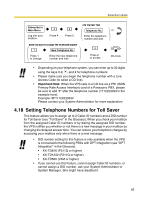
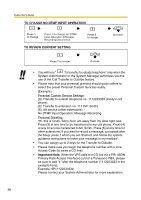
Subscriber's Guide Subscriber's Main Menu Log into your mailbox. 4 Press 4. 5 Press 5. WHEN YOU WANT TO CHANGE THE TELEPHONE NUMBER 1 New Telephone No. Press 1 to change. Enter the new telephone number and wait. FOR THE FIRST TIME Telephone No. or Enter the telephone number and wait. 2 Press 2 to accept. On-hook. • Depending on your telephone system, you can enter up to 32 digits using the keys 0-9, , and # for telephone numbers. • Please make sure you begin the telephone number with a Line Access Code (to seize a CO line). • Important Note: When the VPS calls to a CO line via a PRI (ISDN Primary Rate Access Interface) card of a Panasonic PBX, please be sure to add "#" after the telephone number (1112223333 in the example here): Example: 9P1112223333# Please contact your System Administrator for more explanation. 4.18 Setting Telephone Numbers for Toll Saver This feature allows you to assign up to 2 Caller ID numbers and a DID number for Toll Saver (see "Toll Saver" in the Glossary). When you check your mailbox from the assigned Caller ID numbers or by dialing the assigned DID number, the VPS notifies you whether or not there is a new message in your mailbox by changing the delayed answer time. You can reduce your telephone charges by accessing your mailbox only when there is a new message. • DID number setting for this feature is only available when the VPS is connected to the following PBXs with DPT Integration (see "DPT Integration" in the Glossary). • KX-TD816 (P311Q or higher) • KX-TD1232 (P211Q or higher) • KX-TD500 (V4M or higher) • If you cannot use this feature, cannot assign Caller ID numbers, or cannot assign a DID number, ask your System Administrator or System Manager. She might have disabled it. 45
-
 1
1 -
2
-
3
-
4
-
5
-
6
-
7
-
8
-
9
-
10
-
11
-
12
-
13
-
14
-
15
-
16
-
17
-
18
-
19
-
20
-
21
-
22
-
23
-
24
-
25
-
26
-
27
-
28
-
29
-
30
-
31
-
32
-
33
-
34
-
35
-
36
-
37
-
38
-
39
-
 40
40 -
 41
41 -
 42
42 -
 43
43 -
 44
44 -
 45
45 -
 46
46 -
 47
47 -
 48
48 -
 49
49 -
 50
50 -
51
-
52
-
53
-
54
-
55
-
56
-
57
-
58
-
59
-
60
-
61
-
62
-
63
-
64
 |
 |
