Panasonic TH50PX500U TH42PX500U User Guide - Page 8
CABLE BINDING INSTRUCTIONS, Cable cover, Removal, Fitting, Clamper, How to fix, AC cord, Close
 |
View all Panasonic TH50PX500U manuals
Add to My Manuals
Save this manual to your list of manuals |
Page 8 highlights
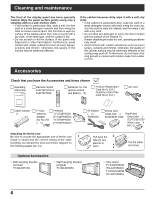
Cable binding instructions Cable cover Removal AC cord VIDEO AV IN Y Y PB PB PR PR R L AUDIO IN S VIDEO L AUDIO IN R 1 2 COMPONENT VIDEO INPUT 1 INPUT INPUT 2 OUTPUT 1 Push down hooks and pull the cover slightly towards yourself to disengage the claws (at 2 points). 2 Slowly pull out in the upward direction. Fitting Clamper Open Close Clamp How to fix: Fix by pushing in until a clicking sound is heard. 1 Insert the claws (at 2 points) at the bottom end. 2 Push until it clicks. How to release: Pull down while drawing the knob. Note: To avoid interference appearing on the screen, do not bundle the RF cable and mains lead together. Cable binding condition Attach the bands. Insert the spigot on the two bands into the pedestal. Band Fastening band Fastening To tighten. Loosening Pull off. Keep the knob pressed. Connect cables. Example of "connection cable routing" AC cord Clamp Binding strap Band 8
-
 1
1 -
2
-
 3
3 -
 4
4 -
 5
5 -
 6
6 -
 7
7 -
 8
8 -
 9
9 -
 10
10 -
 11
11 -
 12
12 -
 13
13 -
14
-
15
-
16
-
17
-
18
-
19
-
20
-
21
-
22
-
23
-
24
-
25
-
26
-
27
-
28
-
29
-
30
-
31
-
32
-
33
-
34
-
35
-
36
-
37
-
38
-
39
-
40
-
41
-
42
-
43
-
44
-
45
-
46
-
47
-
48
-
49
-
50
-
51
-
52
-
53
-
54
-
55
-
56
-
57
-
58
-
59
-
60
-
61
-
62
-
63
-
64
-
65
-
66
-
67
-
68
-
69
-
70
-
71
-
72
-
73
-
74
-
75
-
76
-
77
-
78
-
79
-
80
-
81
-
82
-
83
-
84
-
85
-
86
-
87
-
88
-
89
-
90
-
91
-
92
-
93
-
94
-
95
-
96
-
97
-
98
-
99
-
100
-
101
-
102
-
103
-
104
-
105
-
106
-
107
-
108
-
109
-
110
-
111
-
112
-
113
-
114
-
115
-
116
-
117
-
118
-
119
-
120
-
121
-
122
-
123
-
124
-
125
-
126
-
127
-
128
-
129
-
130
-
131
-
132
-
133
-
134
-
135
-
136
-
137
-
138
-
139
-
140
-
141
-
142
-
143
-
144
-
145
-
146
-
147
-
148
-
149
-
150
-
151
-
152
-
153
-
154
-
155
-
156
-
157
-
158
-
159
-
160
-
161
-
162
-
163
-
164
-
165
-
166
-
167
-
168
-
169
-
170
-
171
-
172
-
173
-
174
-
175
-
176
-
177
-
178
-
179
-
180
-
181
-
182
-
183
-
184
-
185
-
186
-
187
-
188
-
189
-
190
-
191
-
192
-
193
 |
 |
