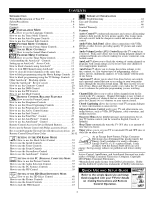
Philips 26PF9966 User manual - Page 7
Helpful Hint - remote control
 |
UPC - 037849948309
View all Philips 26PF9966 manuals
Add to My Manuals
Save this manual to your list of manuals |
Page 7 highlights
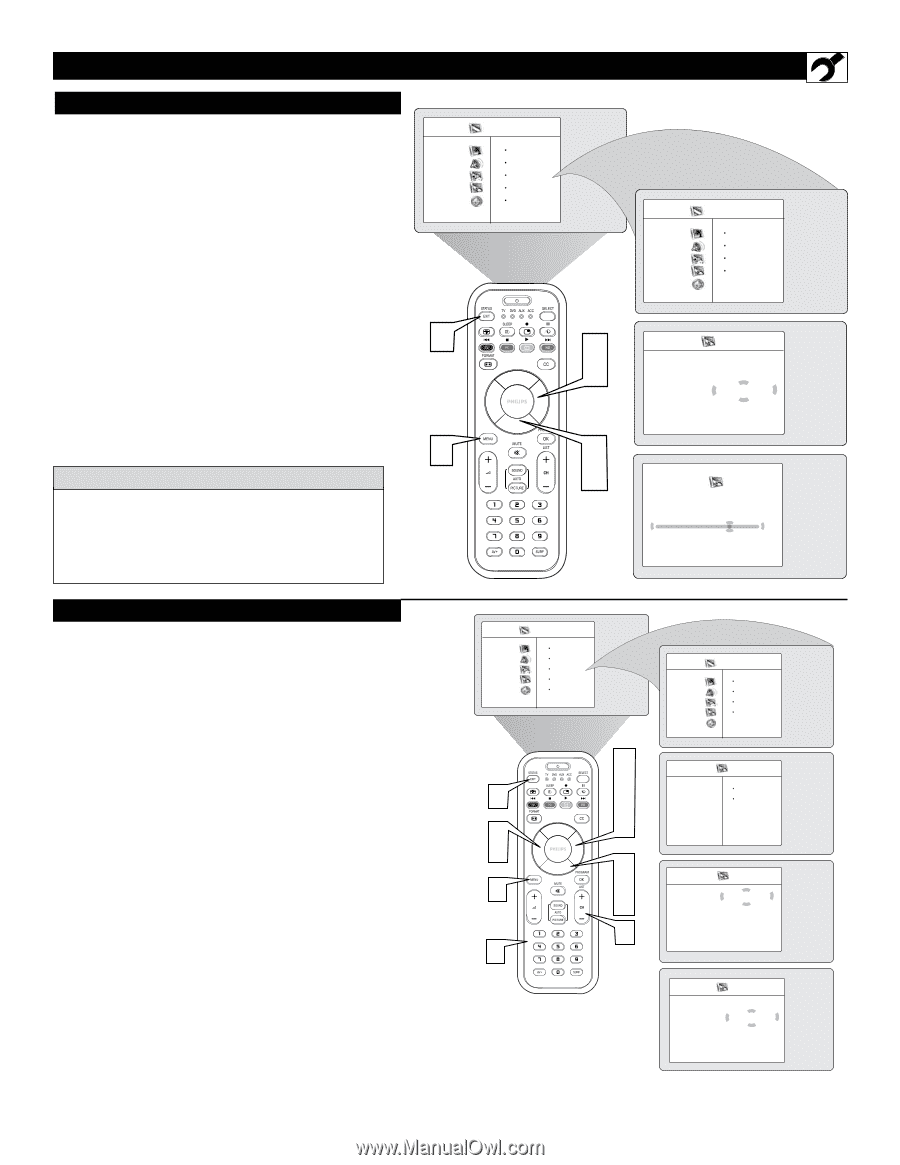
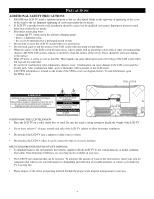
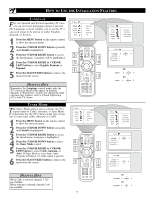
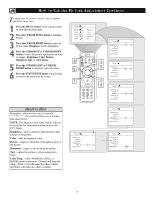
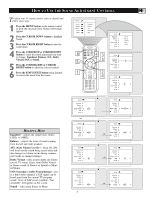
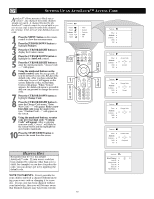
HOW TO USE THE INSTALLATION FEATURES AUTO PROGRAM Your TV can automatically set itself for local area (or cable TV) channels. This makes it easy for TV Menu Picture you to select only the TV stations in your area by Sound pressing the CHANNEL (+) or (-) button. Features Install 1 Press the MENU button on the remote control to show the onscreen menu. Mode 2 Press the CURSOR DOWN button repeatedly until Install is highlighted. 3 Press the CURSOR RIGHT button to enter the Install menu. Language will be highlighted. 4 Press the CURSOR DOWN button repeatedly until Auto Program is selected. "Start ?" will 6 appear. 5 Press the CURSOR RIGHT button to start the Auto Programming process. 6 Press the STATUS/EXIT button to remove the menu from the screen when the Auto programming process has finished. 1 HELPFUL HINT After you've run Auto Program, check out the results. Press the CHANNEL (+) or (-) button and see which channels you can select. Remember, an antenna or cable TV signal must first be connected to your TV, see Quick-Use Guide for making connections. Brightness Color Picture Sharpness Tint TV Menu Picture Sound Features Install Mode Language Tuner Mode Auto Program Channel Edit 3 5 2 4 Install Language É Tuner Mode É Auto Program Ñ Start ? É Channel Edit É Auto Program Channel É Ñ 8 É CHANNEL EDIT Channel Edit makes it easy for you to add or delete channels from the list of channels stored in the TV's memory. 1 Press the MENU button on the remote control to show the onscreen menu. 2 Press the CURSOR DOWN button repeatedly until Install is highlighted. 3 Press the CURSOR RIGHT button to enter the Install menu. Language will be highlighted. 4 Press the CURSOR DOWN button repeatedly until Channel Edit is selected. 5 Press the CURSOR RIGHT button to enter the Channel Edit menu. Channel will be highlighted. 6 Press the CURSOR RIGHT or CURSOR LEFT buttons to scroll through the list of available channels, you can also press the CH+ or CH- to scroll through the list of channels. Or, press the numbered buttons to select a specific numbered channel. 7 Press the CURSOR DOWN button to select Skipped while you are tuned to the channel to be skipped. 8 Press the CURSOR LEFT or CURSOR RIGHT button to select On to activate the skipping of a channel. Or, select Off, to deactivate the skipping of a channel. 9 Press the STATUS/EXIT button to remove the onscreen menu from the screen. TV Menu Picture Sound Features Install Mode 9 6 8 1 6 Brightness Color Picture Sharpness Tint 3 5 6 8 2 4 7 6 TV Menu Picture Sound Features Install Mode Language Tuner Mode Auto Program Channel Edit Install Language É Tuner Mode É Auto Program É Channel Edit É Channel Skipped Channel Edit Channel Ñ 4 É Skipped É Channel Edit Channel É Skipped Ñ On É 7
-
 1
1 -
 2
2 -
 3
3 -
 4
4 -
 5
5 -
 6
6 -
 7
7 -
 8
8 -
 9
9 -
 10
10 -
 11
11 -
 12
12 -
13
-
14
-
15
-
16
-
17
-
18
-
19
-
20
-
21
-
22
-
23
-
24
-
25
-
26
-
27
-
28
-
29
-
30
-
31
-
32
-
33
-
34
-
35
-
36
-
37
-
38
-
39
-
40
-
41
-
42
-
43
-
44
-
45
-
46
-
47
 |
 |