Pioneer DEH-P5900IB Owner's Manual - Page 7
Visit our website, Protecting your unit from, theft, About the demo mode, Before You Start - owners manual
 |
UPC - 012562845814
View all Pioneer DEH-P5900IB manuals
Add to My Manuals
Save this manual to your list of manuals |
Page 7 highlights
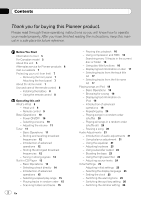
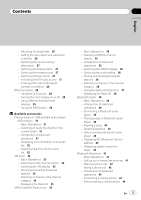
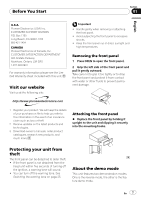
Before You Start Section 01 English U.S.A. Pioneer Electronics (USA) Inc. CUSTOMER SUPPORT DIVISION P.O. Box 1760 Long Beach, CA 90801-1760 800-421-1404 CANADA Pioneer Electronics of Canada, Inc. CUSTOMER SATISFACTION DEPARTMENT 300 Allstate Parkway Markham, Ontario L3R OP2 1-877-283-5901 For warranty information please see the Limited Warranty sheet included with this unit. Visit our website Visit us at the following site: Important ! Handle gently when removing or attaching the front panel. ! Avoid subjecting the front panel to excessive shocks. ! Keep the front panel out of direct sunlight and high temperatures. Removing the front panel 1 Press OPEN to open the front panel. 2 Grip the left side of the front panel and pull it gently outward. Take care not to grip it too tightly or to drop the front panel and protect it from contact with water or other fluids to prevent permanent damage. 1 Register your product. We will keep the details of your purchase on file to help you refer to this information in the event of an insurance claim such as loss or theft. 2 Receive updates on the latest products and technologies. 3 Download owner's manuals, order product catalogues, research new products, and much more. Attaching the front panel % Replace the front panel by holding it upright to the unit and clipping it securely into the mounting hooks. Protecting your unit from theft The front panel can be detached to deter theft. ! If the front panel is not detached from the head unit within five seconds of turning off the ignition, a warning tone will sound. ! You can turn off the warning tone. See Switching the warning tone on page 25. About the demo mode This unit features two demonstration modes. One is the reverse mode, the other is the feature demo mode. En 7
-
 1
1 -
 2
2 -
 3
3 -
 4
4 -
 5
5 -
 6
6 -
 7
7 -
 8
8 -
 9
9 -
 10
10 -
 11
11 -
 12
12 -
13
-
14
-
15
-
16
-
17
-
18
-
19
-
20
-
21
-
22
-
23
-
24
-
25
-
26
-
27
-
28
-
29
-
30
-
31
-
32
-
33
-
34
-
35
-
36
-
37
-
38
-
39
-
40
-
41
-
42
-
43
-
44
-
45
-
46
-
47
-
48
-
49
-
50
-
51
-
52
-
53
-
54
-
55
-
56
-
57
-
58
-
59
-
60
-
61
-
62
-
63
-
64
-
65
-
66
-
67
-
68
-
69
-
70
-
71
-
72
-
73
-
74
-
75
-
76
-
77
-
78
-
79
-
80
-
81
-
82
-
83
-
84
-
85
-
86
-
87
-
88
-
89
-
90
-
91
-
92
-
93
-
94
-
95
-
96
-
97
-
98
-
99
-
100
-
101
-
102
-
103
-
104
-
105
-
106
-
107
-
108
-
109
-
110
-
111
-
112
-
113
-
114
-
115
-
116
-
117
-
118
-
119
-
120
-
121
-
122
-
123
-
124
-
125
-
126
-
127
-
128
-
129
-
130
-
131
 |
 |