Pioneer DEH-P940MP Owner's Manual
Pioneer DEH-P940MP Manual
 |
View all Pioneer DEH-P940MP manuals
Add to My Manuals
Save this manual to your list of manuals |
Pioneer DEH-P940MP manual content summary:
- Pioneer DEH-P940MP | Owner's Manual - Page 1
ENGLISH FRANÇAIS DEUTSCH Multi-CD/DAB control DSP high power CD/MP3/WMA player with FM/AM tuner Syntoniseur FM/AM et lecteur de CD/MP3/WMA, "Puissance élevée", processeur de signal numérique (DSP) et contrôleur CD/DAB Operation Manual DEH-P940MP Mode d'emploi FRANÇAIS ITALIANO NEDERLANDS - Pioneer DEH-P940MP | Owner's Manual - Page 2
Features 5 About this product 5 About this manual 5 Important 5 Precaution 5 After-sales service for Pioneer products 6 About WMA 6 Switching the DSP setting and tracks 24 Pausing MP3/WMA playback 24 Multi-CD Player 25 Display and indicators 25 50-disc multi-CD player 25 Basic operation - Pioneer DEH-P940MP | Owner's Manual - Page 3
the wall paper pattern 55 Setting the entertainment display 55 Using the AUX source 57 Using the telephone muting/ attenuation .......... 57 Additional Information 58 CD player and care 58 MP3 and WMA files 59 Understanding built-in CD player error messages 61 Understanding auto-equalizing - Pioneer DEH-P940MP | Owner's Manual - Page 4
and without distor- tion. Once you have established a comfortable sound level: • Set the dial and leave it there. Taking a minute to do this now will dryer, noisy restaurant 80 Average city traffic, garbage disposals, alarm clock at two feet. THE FOLLOWING NOISES CAN BE DANGEROUS UNDER CONSTANT - Pioneer DEH-P940MP | Owner's Manual - Page 5
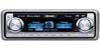
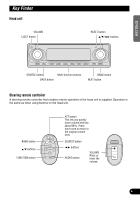
5/∞/2/3 buttons ESPAÑOL DEUTSCH FRANÇAIS SOURCE button Multi-function buttons BACK button BAND button NEXT button Steering remote controller A steering remote controller that enables remote operation of the head unit is supplied. Operation is the same as when using buttons on the head unit - Pioneer DEH-P940MP | Owner's Manual - Page 6
Features CD playback It is possible to play back music stored on CD/CD-R/CD-RW formats. MP3/WMA file playback It is possible to play back MP3/WMA files recorded on CD-ROM/CD-R/CD . This manual explains head unit operation. You can perform the same operations with the steering remote controller. - Pioneer DEH-P940MP | Owner's Manual - Page 7
After-sales service for Pioneer products Please contact the dealer or distributor from where you purchased the product for its aftersales service (including WMA data can be encoded by using Windows Media Player version 7, 7.1 or Windows Media Player for Windows XP. Microsoft, Windows Media, and the - Pioneer DEH-P940MP | Owner's Manual - Page 8
using this product. Please inquire of your dealer or nearest authorized Pioneer service station regarding the XM tuner that can be connected to this product. For operation of the XM tuner, refer to the XM tuner owner's manual. Note: • The XM Satellite Radio is developing a new band of radio - Pioneer DEH-P940MP | Owner's Manual - Page 9
is switched off while the ignition switch is set to ACC or ON. Pressing the button 6 during feature demo operation cancels the feature demo mode. Press the button 6 again to start the feature demo mode. Remember that if the feature demo continues operating when the car engine is switched OFF, it may - Pioneer DEH-P940MP | Owner's Manual - Page 10
Before Using This Product Remote controller and care Installing the lithium battery • Remove the cover on the back of the steering remote controller and insert the battery with the (+) and (-) poles pointing in the proper direction. Replacing the lithium battery • Remove the lithium battery. - Pioneer DEH-P940MP | Owner's Manual - Page 11
the problem, the unit may be damaged badly, resulting in a serious accident or fire. • Do not leave this unit free (unattached) inside the car. When the car stops = T.LIST = PAUSE = TTLin Note: • Refer to "Built-in CD player function menu" on page 18. AUDIO button operation • Press AUDIO to select - Pioneer DEH-P940MP | Owner's Manual - Page 12
Before Using This Product Detaching and replacing the front panel 3. Use the protective case provided to store/carry the detached front panel. Theft protection The front panel of the head unit is detachable to discourage theft. Precaution: • Never use force or grip the display tightly when - Pioneer DEH-P940MP | Owner's Manual - Page 13
• External unit refers to a Pioneer product (such as one available in set in the multi-CD player. * AUX (auxiliary setting) is set to off. (Refer to page 52.) • When this product's blue/white lead is connected to the car's auto-antenna relay control terminal, the car manual. Important In this manual, - Pioneer DEH-P940MP | Owner's Manual - Page 14
for a button, that button is not currently active. Example of multi-function button operation Here the "random play" function of the built-in CD player is used as an example to illustrate operation of the multi-function buttons. 1. Press NEXT to display "FUNC". Press NEXT repeatedly until "FUNC - Pioneer DEH-P940MP | Owner's Manual - Page 15
DEUTSCH Display example (e.g., built-in CD player) Key guidance indicator This product's display features key guidance indicators. These light selections and perform other operations. Key guidance indicators Note: • In this manual, operation for each mode is given mainly in terms of the multi- - Pioneer DEH-P940MP | Owner's Manual - Page 16
Tuner Display and indicators FORM 1 q we r FORM 2 q e t wt r qBand wLOC indicator ePreset number rFrequency tStereo indicator Basic operation 1. Press SOURCE to select the tuner. Press SOURCE until "Tuner" appears. 2. Press VOLUME to extend the VOLUME outward. • When you press VOLUME, it - Pioneer DEH-P940MP | Owner's Manual - Page 17
menu The tuner function menu has the following functions: Selecting stations from the pre- set channel list The preset channel list lets you see the list of preset stations and select one of them to receive. 1. Press FUNC and then press chLIST to select the preset channel list mode. 2. Press - Pioneer DEH-P940MP | Owner's Manual - Page 18
tTrack title Basic operation The built-in CD player plays one standard 12 cm or 8 cm (single) CD at a time. Do not use an adapter when playing an 8 cm CD. 1. Press EJECT to open the front panel. 2. Insert a CD into the CD loading slot. When a CD is inserted, the front panel closes automatically - Pioneer DEH-P940MP | Owner's Manual - Page 19
SCROLL Scrolls the displayed title. Built-in CD player function menu The built-in CD player function menu has the following functions: Note 2, the titles are displayed up to 24 letters long. • A CD TEXT disc is a CD featuring recorded text information such as disc title, artist name and track title - Pioneer DEH-P940MP | Owner's Manual - Page 20
Built-in CD Player Playing tracks in random order Random play lets you play back tracks on the CD in random order. 1. is automatically canceled, select the scan mode again. Note: • After scanning of a CD is finished, normal playback of the tracks will begin again. Selecting tracks from the track - Pioneer DEH-P940MP | Owner's Manual - Page 21
have been entered, the data for a new disc will overwrite the oldest one. • If you connect a multi-CD player, you can input disc titles for up to 100 discs. • When a multi-CD player that does not support disc title functions is connected, you cannot enter disc titles in this product. 20 FRANÇAIS - Pioneer DEH-P940MP | Owner's Manual - Page 22
indicator uPlay time iFile name Basic operation The built-in CD player can playback MP3/WMA files recorded on CD-ROM discs. (See page 59.) 1. Press EJECT to open the front panel. 2. Insert a CD-ROM into the CD loading slot. When a CD-ROM is inserted, the front panel closes automatically. 3. Press - Pioneer DEH-P940MP | Owner's Manual - Page 23
be played back, "No audio" is displayed. • If the built-in CD player cannot operate properly, an error message (such as "ERROR-12") appears on the display. certain text information is not recorded on a MP3/WMA file, "No ~" (e.g., "No title") is displayed. FRANÇAIS ITALIANO NEDERLANDS 22 - Pioneer DEH-P940MP | Owner's Manual - Page 24
mode (TTLin), the display is not returned automatically.) • When playing a CD-ROM disc, if you switch to the disc title input mode (TTLin), "Can't input" is displayed and you cannot input the title. Repeating play When playing back MP3/WMA files, there are three repeat play ranges: one-track repeat - Pioneer DEH-P940MP | Owner's Manual - Page 25
begin again. • If you turn scan play on during one-track repeat, the repeat range changes to folder repeat. Pausing MP3/WMA playback Pause lets you temporarily stop playback of the MP3/WMA. 1. Press FUNC and then press PAUSE to select the pause mode. 2. Press PAUSE to turn the pause on. The - Pioneer DEH-P940MP | Owner's Manual - Page 26
CD player Only those functions described in this manual are supported for 50-disc multi-CD players. Basic operation This product can control a multi-CD player is displayed. Refer to the multi-CD player owner's manual. • If there are no discs in the multi-CD player magazine, "No disc" is displayed - Pioneer DEH-P940MP | Owner's Manual - Page 27
disc is a CD featuring recorded text information such as disc title, artist name and track title. • If certain text information is not recorded on a CD TEXT disc, "No ~" (e.g., "No title") is displayed. • If you have not input disc titles, "No title" is displayed. Multi-CD player function menu The - Pioneer DEH-P940MP | Owner's Manual - Page 28
Playing tracks in random order Random play lets you play back tracks in random order within the repeat range: multi-CD player repeat and disc repeat. 1. Select the repeat range. Refer to "Repeating play" on page 26. 2. Press FUNC and then press RDM to select the random - Pioneer DEH-P940MP | Owner's Manual - Page 29
disc" is displayed next to the disc number when no disc is set in the magazine. • You cannot display "7" - "12" when a 6-disc multi- CD player is connected. Pausing CD playback Pause lets you temporarily stop playback of the CD. 1. Press FUNC and then press PAUSE to select the pause mode. 2. Press - Pioneer DEH-P940MP | Owner's Manual - Page 30
. Press COMP repeatedly to switch between the following settings: COMP OFF = COMP 1 = COMP 2 = COMP OFF = DBE 1 = DBE 2 • When this mode is exited except for "COMP OFF" is selected, "COMP" appears on the basic display. Note: • If the multi-CD player does not support these func- tions, "No COMP" is - Pioneer DEH-P940MP | Owner's Manual - Page 31
When you turn on ITS play, tracks from ITS memory in the multi-CD player will begin to play. 1. Select the repeat range. Refer to " Playback begins of those tracks from ITS memory within the selected repeat range: multi-CD player repeat or disc repeat. • Press ITS.P again to turn ITS play off. - Pioneer DEH-P940MP | Owner's Manual - Page 32
tuner-specific operation/features, see your DAB tuner's manual. • This set announcement support is received, the letters in parentheses light. DAB status indications Indicator EXTRA TXT DAB Status The currently received service has a secondary service component. The currently received service - Pioneer DEH-P940MP | Owner's Manual - Page 33
lights. • Press TA again to turn the road traffic flash and transport flash off. Canceling road traffic flash and transport flash interruptions part way through 1. Press NEXT to display "TA". Press NEXT until "TA" appears. 2. To cancel a road traffic flash or transport flash interruption and - Pioneer DEH-P940MP | Owner's Manual - Page 34
label is currently being received, "No text" is support) For operation of the announcement support, refer to "Setting the announcement support interruption" on page 34. w chLIST (preset service list) For operation of the preset service list, refer to "Selecting services from the preset service - Pioneer DEH-P940MP | Owner's Manual - Page 35
support on. Button WTHR ANNC Announcement Area weather flash Announcement Note: • You can also use 2, 3 and 5 to select and turn on the desired announcement. • You can turn the news flash on or off by pressing NEWS. Selecting services from the pre- set service DAB receives the desired PTY service. - Pioneer DEH-P940MP | Owner's Manual - Page 36
product to control a XM tuner (e.g., GEX-P900XM), which is sold separately. For details of XM tuner-specific operation/features, see your XM tuner's manual. Display and indicators FORM 1 q w er t FORM 2 q we t r qBand wPreset number eChannel number rXM tuner information tChannel select - Pioneer DEH-P940MP | Owner's Manual - Page 37
to select the desired display. Press DISP repeatedly to switch between the following XM tuner infromations: Channel number = Channel name = Artist name/Feature = Song/Program title = Additional information Note: • You can scroll the additional information by press- ing and holding DISP. XM tuner - Pioneer DEH-P940MP | Owner's Manual - Page 38
explains how to use this product to control a TV tuner, which is sold separately. For details of TV tuner-specific operation/features, see your TV tuner's manual. • With this product, you can operate preset chan- nel list as one additional function. Display and indicators FORM 1 q w FORM - Pioneer DEH-P940MP | Owner's Manual - Page 39
menu The TV tuner function menu has the following functions: Selecting channels from the pre- set channel list The preset channel list lets you see the list of preset channels and select one of them to receive. 1. Press FUNC and then press chLIST to select the preset channel list mode. 2. Press - Pioneer DEH-P940MP | Owner's Manual - Page 40
Adjustments Operation modes This product features two operation modes: the 3-way network mode (NW) and the standard mode (STD). You can switch between modes as desired. Initially, the DSP setting is set to the standard mode (STD). (Refer to "Switching the DSP setting mode" on page 7.) • The 3-way - Pioneer DEH-P940MP | Owner's Manual - Page 41
mode (SW1). • "SLA" is not displayed when you select FM tuner as the source. • "A.EQ" is displayed after the auto-equalizer curve has been set. • Press the same button again to cancel the selected listening position. Note: • You can also use 5, ∞, 2 or 3 to select the listen- ing position. Button - Pioneer DEH-P940MP | Owner's Manual - Page 42
. Button SEDAN WAGON M.VAN SUV CUSTM Type of car Sedan Wagon Mini van SUV Custom • "Custom" is an adjusted time alignment that you can create for yourself. Using balance adjustment You can select a balance setting that provides an ideal listening environment in all occupied seats. 1. Press AUDIO - Pioneer DEH-P940MP | Owner's Manual - Page 43
the reproduced frequency band for each speaker unit. • The H.P.F. cuts frequencies (low) below the set frequency, letting high frequencies through. • The L.P.F. cuts frequencies (high) above the set frequency, letting low frequencies through. Continued overleaf. FRANÇAIS ITALIANO NEDERLANDS 42 - Pioneer DEH-P940MP | Owner's Manual - Page 44
may improve the continuity of sound between speakers. Points concerning network adjustments Cut-off frequency adjustment • With the low-range speaker installed in the rear tray, if you set the "L LPF" cut-off frequency high, bass sound is separated so that it appears to come from the rear. You are - Pioneer DEH-P940MP | Owner's Manual - Page 45
ENGLISH ESPAÑOL DEUTSCH 2. Press the corresponding button to select the speaker unit (filter) to be adjusted. Button L LPF M HPF M LPF H HPF Speaker unit (filter) Low-range speaker LPF Middle-range speaker HPF Middle-range speaker LPF High-range speaker HPF 3. Press MUTE to mute the selected - Pioneer DEH-P940MP | Owner's Manual - Page 46
can adjust the cut-off frequency and the output level of the subwoofer. 1. Press AUDIO and NEXT and then press SW2 to select the subwoofer setting mode. 2. Press 2 or 3 to select the cut-off frequency. Each press of 2 or 3 selects cut-off frequencies in the following order: 50 Ô 63 Ô 80 Ô 100 - Pioneer DEH-P940MP | Owner's Manual - Page 47
curves The graphic equalizer lets you adjust equalization to match the car interior acoustic characteristics as desired. There are seven stored equalizer the effect of the equalizer curves by switching alternatively between "FLAT" and a set equalizer curve. Note: • You can also use 2 and 3 to - Pioneer DEH-P940MP | Owner's Manual - Page 48
, you can adjust the level of each band. • A separate "CUSTOM1" curve can be created for each source. (The built-in CD and the multi-CD players are set to the same equalizer adjustment setting automatically.) If you make adjustments when a curve other than "CUSTOM2" is selected, the equalizer curve - Pioneer DEH-P940MP | Owner's Manual - Page 49
to reproduce the realistic sound fields of the four programs in your car. Octaver makes the bass sound louder. With BBE, playback very to cancel the selected sound field program. Switching the octaver setting You can switch the octaver setting. "OCTAVER2" has a stronger effect than "OCTAVER1". 1. - Pioneer DEH-P940MP | Owner's Manual - Page 50
automatic sound levelizer While driving, the noise in the car changes according to the driving speed and the road also be adjusted using source level adjustment. • The built-in CD and the multi-CD players are both set to the same source level adjustment volume automatically. Switching the digital - Pioneer DEH-P940MP | Owner's Manual - Page 51
will be adjusted automatically to either subwoofer output and high pass filter setting for rear speaker. • If you carry out auto-equalizing when an , the previous curve will be erased. Carrying out auto-equalizing 1. Stop the car in a place that is as quiet as possible, close all doors, windows and - Pioneer DEH-P940MP | Owner's Manual - Page 52
the location of " 2" by turning on the feature demo. 8. Press A.EQ to start the auto-equalizing. 9. Get out of the car and close the door within 10 seconds when the part way through, press any button. 10.When auto-equalizing is completed, "Complete" is displayed. When correct measurement of car - Pioneer DEH-P940MP | Owner's Manual - Page 53
menu. 1 to enter the initial • When the source is off, you can check the location of " 1" by turning on the feature demo. Note: • Press BAND to cancel the initial settings menu. Using reverse mode If you do not carry out an operation within about 30 seconds, screen indications will start to - Pioneer DEH-P940MP | Owner's Manual - Page 54
this product is muted or attenuated automatically when a call is made or received using a connected cellular telephone. • "20dB ATT" has a stronger effect than "10dB ATT", and "TEL mute" has a stronger effect than "20dB ATT". Setting the warning tone The warning tone sounds to remind you to detach - Pioneer DEH-P940MP | Owner's Manual - Page 55
function within about 60 seconds, the display is automatically returned. Off clock display When the time display is turned on, the calendar display appears with the time display when sources and the feature demo are off. Setting the date The calender display adjusted in this mode appears only when - Pioneer DEH-P940MP | Owner's Manual - Page 56
brightness. • "00" - "31" is displayed as the brightness is increased or decreased. Switching the dimmer setting To prevent the display from being too bright at night, the display is automatically dimmed when the car's headlights are turned on. You can switch the dimmer on or off. 1. Press NEXT to - Pioneer DEH-P940MP | Owner's Manual - Page 57
spectrum analyzer. Note: • The spectrum analyzer display will disappear tem- porarily when you perform other operations, but will be displayed again after three seconds. Setting the ASL display You can display the ASL effect level. (Refer to page 49.) • Press ENT and then press ASL to select the ASL - Pioneer DEH-P940MP | Owner's Manual - Page 58
CD-RB20 or CD-RB10 (sold separately) lets you connect this product to auxiliary equipment featuring RCA output. For more details, refer to the IP-BUS-RCA interconnector's owner's manual or attenuated automatically when a call is made or received using a connected cellular telephone. Note: • The - Pioneer DEH-P940MP | Owner's Manual - Page 59
or the storage conditions in the car. • Titles and other text information recorded on a CD-R/CD-RW disc may not be CD player. Condensation may cause the CD player not to operate properly. If you think that condensation is a problem, turn off the CD player for an hour or so to allow the CD player - Pioneer DEH-P940MP | Owner's Manual - Page 60
Windows Media Player version 7, 7.1 or Windows Media Player for Windows This product allows playback of MP3/WMA files on CD-ROM, CD-R and CD-RW discs. Disc recordings setting of the playback order. Precaution: • When naming an MP3 or a WMA file, add the corre- sponding filename extension (.mp3 - Pioneer DEH-P940MP | Owner's Manual - Page 61
ÑOL DEUTSCH About folders and MP3/WMA files • An outline of a CD-ROM with MP3/WMA files on it is shown below. Subfolders are shown as folders in the folder currently selected. First Second Third level level level Note: • This product assigns folder numbers. The user can not assign folder numbers - Pioneer DEH-P940MP | Owner's Manual - Page 62
method of correcting the problem. If the error cannot be corrected, contact your dealer or your nearest Pioneer service center. Display Cause Remedy ERROR- 11, 12, 17, 30 Dirty disc. Clean disc. ERROR- 11, 12, 17, 30 Scratched disc. Replace disc. ERROR- 22, 23 The CD format cannot be played - Pioneer DEH-P940MP | Owner's Manual - Page 63
set by a working group (MPEG) of the ISO (International Standards Organization). MP3 is able to compress audio data to about 1/10th the level of a conventional disc. Multi-session Multi-session is a recording method that allows additional data to be recorded later. When recording data on a CD - Pioneer DEH-P940MP | Owner's Manual - Page 64
24 dB - +6 dB/Mute (1 dB) Phase Normal/Reverse CD player System Compact disc audio system Usable discs Compact disc Signal format Sampling -A network) Dynamic range 92 dB (1 kHz) Number of channels 2 (stereo) MP3 decoding format ........ MPEG-1 and 2 AUDIO LAYER-3 WMA decoding format Ver. 7 - Pioneer DEH-P940MP | Owner's Manual - Page 65
Left Distance High Right Mid Left Mid Right Low Left Low Right Standard mode (STD) Network setting Filter Cutoff frequency Level Phase SW1 (SW2) HPF F HPF R Time alignment setting Speaker unit Distance Front Left Front Right Rear Left Rear Right Sub. W Equalizer curves "Custom2 - Pioneer DEH-P940MP | Owner's Manual - Page 66
emploi 5 Précaution 5 Service après-vente des produits PIONEER ........ 6 A propos de un MP3/WMA 24 Lecteur de CD à chargeur 25 Affichages et témoins 25 Lecteur de CD à support d'annonce 34 Choix d'un service sur la liste prédéfinie des services 34 Choix d'un service sur la liste des services - Pioneer DEH-P940MP | Owner's Manual - Page 67
du niveau sonore (ASL 47 Réglage du niveau des sources 47 Mise en service de l'atténuateur numérique .... 47 Création de la courbe d'égalisation à apporter au lecteur de CD 56 Les fichiers MP3 et WMA 57 Signification des messages d'erreur du lecteur de CD intégr 59 Signification des - Pioneer DEH-P940MP | Owner's Manual - Page 68
Cher Client: La sélection d'un équipement audio de qualité comme l'unité que vous venez d'acheter n'est que le début de votre plaisir musical. Maintenant, il est temps de penser à la manière de profiter au maximum des plaisirs que vous offre votre équipement. Ce fabricant et le Groupe "Consumer - Pioneer DEH-P940MP | Owner's Manual - Page 69
ENGLISH Disposition des touches Appareil central Bouton Volume Touche EJECT Bouton RESET Touches 5/∞/2/3 FRANÇAIS DEUTSCH FRANÇAIS Touche SOURCE Touches multifonctions Touche BACK Touche BAND Touche NEXT Boîtier de télécommande de volant Un boîtier de télécommande qui se monte sur le - Pioneer DEH-P940MP | Owner's Manual - Page 70
L'appareil peut lire la musique enregistrée sur des disques au format CD/CD-R/CD-RW. Lecture de fichiers MP3/WMA L'appareil peut lire les fichiers MP3/WMA enregistrés sur des CD-ROM/CD-R/CD-RW (enregistrement respectant la norme ISO9660 Niveau 1/Niveau 2). (Reportez-vous à la page 60.) Quelques mots - Pioneer DEH-P940MP | Owner's Manual - Page 71
Pioneer Electronics (USA) Inc. CUSTOMER SUPPORT DIVISION P.O. Box 1760 Long Beach, CA 90801-1760 800-421-1404 CANADA Pioneer électroniques du Canada, Inc. Département de service être codées avec à Windows Media Player version 7, 7,1 ou Windows Media Player for Windows XP. Microsoft, Windows Media et - Pioneer DEH-P940MP | Owner's Manual - Page 72
appareil. Veuillez vous renseigner auprès de votre revendeur ou du centre de service autorisé Pioneer le plus proche en ce qui concerne le tuner XM pouvant être connect l'appareil pour la première fois après son installation. L'appareil ne fonctionne pas convenablement. Des informations erron - Pioneer DEH-P940MP | Owner's Manual - Page 73
ées sur l'écran s'inversent, et continuent de s'inverser toutes les 10 secondes. Si vous appuyez sur la touche 5 alors que l'appareil n'est pas en service et que le contacteur d'allumage est sur la position ACC ou ON, a pour effet d'annuler le mode inverse. Appuyez une nouvelle fois sur la touche - Pioneer DEH-P940MP | Owner's Manual - Page 74
Avant d'utiliser cet appareil Présentation et soin du boîtier de télécommande Installation de la pile au lithium • Retirez le couvercle au dois du boîtier de télécommande de volant et mettez en place la pile en respectant - Pioneer DEH-P940MP | Owner's Manual - Page 75
le boîtier de télécom- mande tandis que vous tournez le volant car cela peut entraîner un accident. • Si vous devez absolument faire FUNCTION pour choisir le mode de fonctionnement désirée (par exemple, le lecteur de CD intégré). Appuyez de manière répétée sur la touche FUNCTION pour passer d'un - Pioneer DEH-P940MP | Owner's Manual - Page 76
dans les cinq secondes qui suivent la coupure de l'allumage, un signal sonore d'avertissement se fait entendre. Remarque: • Vous pouvez mettre hors service ce signal sonore d'avertissement. (Reportez-vous à la page 51.) Ouverture automatique de la face avant Si vous ne retirez pas la face avant - Pioneer DEH-P940MP | Owner's Manual - Page 77
suivantes: Lecteur de CD intégré (MP3/WMA) = Syntoniseur de télévision = Syntoniseur = Syntoniseur DAB = Syntoniseur XM = Lecteur de CD à chargeur = la touche SOURCE pour mettre hors service la source. Remarque: • "Appareil extérieur" désigne un appareil Pioneer (qui pourra être disponible dans - Pioneer DEH-P940MP | Owner's Manual - Page 78
touche NEXT pour afficher la fonction désirée (par exemple, le lecteur de CD intégré). Appuyez de manière répétée sur la touche NEXT pour passer d' trouve en mode de lecture au hasard, vous pouvez également mettre en service, ou hors service, la lecture au hasard au moyen des touches 5 et ∞. • Si - Pioneer DEH-P940MP | Owner's Manual - Page 79
DEUTSCH Exemple d'écran (par exemple, le lecteur de CD intégré) Témoins d'utilisation des touches Cet appareil ou tout autre menu, et vous pouvez immédiatement connaître la touche qui met en service ou hors service une source, rappelle une sélection à répéter, ou exécute une autre opération. - Pioneer DEH-P940MP | Owner's Manual - Page 80
Syntoniseur Affichages et témoins FORM 1 (Ecran type 1) q we r FORM 2 (Ecran type 2) q e t wt r qGamme d'onde wTémoin LOC eNuméro de présélection rFréquence tTémoin de réception stéréophonique Opérations de base 1. Appuyez sur la touche SOURCE pour choisir le syntoniseur. Appuyez sur la - Pioneer DEH-P940MP | Owner's Manual - Page 81
des stations les plus puissantes. 1. Appuyez sur la touche FUNC pour choisir la fonction BSM. 2. Appuyez sur la touche BSM pour mettre en service la fonction BSM. L'indication "Searching" s'éclaire. Les fréquences des six émetteurs les plus puissants sont mises en mémoire, par ordre décroissant - Pioneer DEH-P940MP | Owner's Manual - Page 82
pas d'adaptateur pour la lecture des disques de 8 cm. 1. Appuyez sur la touche EJECT pour ouvrir la face avant. 2. Introduisez un CD dans la fente pour CD. Dès que le CD est introduit, la face avant se referme. 17 3. Appuyez sur le bouton VOLUME pour qu'il fasse saillie. • Quand vous appuyez sur - Pioneer DEH-P940MP | Owner's Manual - Page 83
la lecture d'un disque CD TEXT, vous pouvez afficher diverses informations telles que le nom de l'interprète ou le titre de la plage musicale. Si le texte comporte plus de 32 caractères, vous pouvez le faire défiler. 1. Appuyez sur la touche TITLE pour mettre en service l'affichage des informations - Pioneer DEH-P940MP | Owner's Manual - Page 84
les 10 premières secondes de chaque plage musicale gravée sur le CD. 1. Appuyez sur la touche FUNC puis sur la touche SCAN pour choisir le mode d'examen du disque. 2. Appuyez sur la touche SCAN pour mettre en service l'examen du disque. L'indication s'éclaire. Les 10 premières secondes de chaque - Pioneer DEH-P940MP | Owner's Manual - Page 85
impossible. • Après la frappe de 48 titres, tout nouveau titre remplace le plus ancien. • Si l'installation comporte un lecteur de CD à chargeur, vous pouvez frapper 100 titres de disque. • Si le lecteur de CD à chargeur ne peut pas prendre en compte la frappe des titres, vous n'avez aucun moyen - Pioneer DEH-P940MP | Owner's Manual - Page 86
touche SOURCE. • Lors de la lecture de disques renfermant des fichiers MP3/WMA et des données audio (CD-DA), par exemple des CD-EXTRA ou des CD MIXED MODE, vous pouvez alterner la lecture des deux types en commutant le mode entre MP3/WMA et CD-DA avec BAND. Lorsque vous commutez entre des fichiers - Pioneer DEH-P940MP | Owner's Manual - Page 87
l'indication "No audio" s'affiche. • Si le lecteur de CD intégré présente une anomalie, un message d'erreur (par Appuyez sur la touche TITLE pour mettre en service l'affichage des informations. 2. Appuyez sur la ées sur le fichi- er MP3/WMA, l'indication "No ~" (par exemple, "No title - Pioneer DEH-P940MP | Owner's Manual - Page 88
du titre dún disque (TTLin) pendant la lecture d'un CD-ROM, l'indication "Can't input" apparaît sur l'é dossier lit uniquement les plages musicales (fichiers MP3/WMA) du dossier actuel. Elle 23 ne 3. Appuyez sur la touche RDM pour mettre en service la lecture au hasard. L'indication s'éclaire. Les - Pioneer DEH-P940MP | Owner's Manual - Page 89
/WMA La pause est un arrêt momentané de la lecture du MP3/WMA. 1. Appuyez sur la touche FUNC puis sur la touche PAUSE pour choisir la pause. 2. Appuyez sur la touche PAUSE pour mettre en service la pause. L'indication s'éclaire. La lecture du disque marque une pause. • Appuyez une nouvelle fois sur - Pioneer DEH-P940MP | Owner's Manual - Page 90
à chargeur présente une anomalie, un message d'erreur tel que "ERROR-12" peut s'afficher. Reportez-vous au mode d'emploi du lecteur de CD à chargeur. • L'indication "No disc" apparaît sur l'écran si le chargeur du lecteur ne contient aucun disque. Sélection directe d'un disque Vous pouvez utiliser - Pioneer DEH-P940MP | Owner's Manual - Page 91
grâce à un lecteur de CD compatible CD TEXT, vous pouvez afficher diverses informations telles que le nom de l'interprète ou le titre de la plage musicale. Si le texte comporte plus de 32 caractères, vous pouvez le faire défiler. 1. Appuyez sur la touche TITLE pour mettre en service l'affichage des - Pioneer DEH-P940MP | Owner's Manual - Page 92
de lecture au hasard. 3. Appuyez sur la touche RDM pour mettre en service la lecture au hasard. L'indication s'éclaire. Les plages musicales sont lues au sont lues. Si vous avez choisi la répétition des disques d'un lecteur de CD à chargeur, les 10 premières secondes de la première plage musicale - Pioneer DEH-P940MP | Owner's Manual - Page 93
La pause est un arrêt momentané de la lecture du CD. 1. Appuyez sur la touche FUNC puis sur la touche PAUSE pour choisir la pause. 2. Appuyez sur la touche PAUSE pour mettre en service la pause. L'indication s'éclaire. La lecture du disque marque une pause. • Appuyez une nouvelle fois sur la touche - Pioneer DEH-P940MP | Owner's Manual - Page 94
la liste de vos plages musicales favorites parmi toutes celles que contiennent les disques du lecteur de CD à chargeur. Lorsque la liste est terminée, il vous suffit de mettre en service la fonction ITS pour n'écouter que les plages appartenant à cette liste. Création d'une liste par programmation - Pioneer DEH-P940MP | Owner's Manual - Page 95
rence à une plage musicale de la liste que contient la mémoire ITS, il faut que la fonction ITS soit en service. 1. Mettez en service la fonction ITS pendant la lecture du CD dont la référence à une plage musicale doit être effacée de la mémoire ITS. Reportez-vous ci-dessus au paragraphe "Lecture - Pioneer DEH-P940MP | Owner's Manual - Page 96
(announce) N (EWS)* Bulletin d'informations (news) T (RFC)* Bulletin d'informations routières ou bulletin d'informations sur les transports * Si le service du support d'annonce est reçu, les lettres entre parenthèses s'éclairent. Indications d'état DAB Indication EXTRA TXT DAB Etat Le - Pioneer DEH-P940MP | Owner's Manual - Page 97
1. Appuyez sur la touche NEXT pour afficher "1" - "6". Appuyez sur la touche NEXT jusqu'à ce que "1" - "6" apparaisse sur l'écran. 2. Lorsque se présente un service que vous désirez mettre en mémoire, maintenez la pression d'un doigt sur une des touches 1 à 6 jusqu'à ce que le numéro de présélection - Pioneer DEH-P940MP | Owner's Manual - Page 98
de l'interruption de support d'annonce". w ChLIST (Liste prédéfinie des services) Pour de plus amples détails concernant l'usage de la liste prédéfinie des services, reportez-vous à la page 34, "Choix d'un service sur la liste prédéfinie des services". e S.LIST (Liste des services disponibles) Pour - Pioneer DEH-P940MP | Owner's Manual - Page 99
d'annonce 1. Appuyez sur la touche FUNC puis sur la touche AS pour choisir le support d'annonce. 2. Appuyez sur la touche correspondant au support d'annonce que vous désirez mettre en service. Touche WTHR ANNC Annonce Bulletin météo pour la région Annonce Remarque: • Vous pouvez également - Pioneer DEH-P940MP | Owner's Manual - Page 100
Syntoniseur de télévision Les explications qui suivent permettent d'utiliser cet appareil pour commander un syntoniseur de télévision, vendu séparément. Pour de plus amples détails concernant le syntoniseur de télévision, reportez-vous au mode d'emploi du syntoniseur de télévision. • Cet appareil - Pioneer DEH-P940MP | Owner's Manual - Page 101
ITALIANO NEDERLANDS qw q BSSM (Mémoire séquentielle des meilleures stations) Appuyez de manière répétée sur la touche BSSM pour mettre en service, ou hors service, la mémoire séquentielle des meilleures stations. Lorsque l'opération est terminée, la liste des canaux préréglés apparaît sur l'écran - Pioneer DEH-P940MP | Owner's Manual - Page 102
Réglages sonores Modes de fonctionnement L'appareil offre deux modes de fonctionnement: le mode réseau à 3 voies (NW), et le mode standard (STD). Vous pouvez commuter entre les modes à votre convenance. Initialement, le DSP est réglé en mode standard (STD). (Reportez-vous à "Commutation du mode de - Pioneer DEH-P940MP | Owner's Manual - Page 103
qui permettent d'agir sur les sons pour prendre en compte l'installation et vos goûts. • Utilisation du réducteur d'octave et n'est affichée que si la sortie vers le haut-parleur d'extrêmes graves est en service pour le mode de sortie vers haut-parleur d'extrêmes graves (SW1). • L'indication "SLA - Pioneer DEH-P940MP | Owner's Manual - Page 104
Réglages sonores Utilisation de la différence de marche La différence de marche permet de tenir compte de la distance qui sépare chaque hautparleur de la position d'écoute à l'intérieur du véhicule. La mémoire de l'appareil contient cinq types d'habitacle de véhicule, que vous pouvez rappeler à - Pioneer DEH-P940MP | Owner's Manual - Page 105
Sub. W (Haut-parleur d'extrêmes graves) • Vous ne pouvez pas choisir "SUB.W" si la sortie vers le haut-parleur d'extrêmes graves n'est pas en service. 4. Utilisez les touches 5 et ∞ pour régler la distance entre le haut-parleur choisi et la position d'écoute. Chaque pression sur la touche 5, ou sur - Pioneer DEH-P940MP | Owner's Manual - Page 106
de la coupure de fréquence • Si vous réglez une la coupure de fréquences "L LPF" élevée avec le haut-parleur des basses fréquences installé dans la plage arrière, les sons graves sont séparés de sorte qu'ils semblent provenir de l'arrière. Il est recommandé de régler la - Pioneer DEH-P940MP | Owner's Manual - Page 107
ENGLISH FRANÇAIS DEUTSCH 2. Appuyez sur la touche correspondante pour choisir le haut-parleur (filtre) que vous voulez régler. Touche Haut-parleur (filtre) L LPF M HPF Filtre passe-bas du haut-parleur des graves Filtre passe-haut du haut-parleur des fréquences intermédiaires M LPF Filtre - Pioneer DEH-P940MP | Owner's Manual - Page 108
graves Lorsque la sortie vers le haut-parleur d'extrêmes graves est en service, vous pouvez en régler la fréquence de coupure et l'amplitude. 1. pas lorsque la sortie pour le haut-parleur d'extrêmes graves n'est pas en service et que le mode de sortie pour le haut-parleur d'extrêmes graves (SW1) - Pioneer DEH-P940MP | Owner's Manual - Page 109
produit une courbe de correction. (Reportez-vous à la page 48, "Création de la courbe d'égalisation automatique".) Vous pouvez mettre en service, ou hors service, l'égalisation automatique. 1. Appuyez sur la touche AUDIO puis appuyez deux fois sur la touche NEXT. 2. Appuyez sur la touche A.EQ pour - Pioneer DEH-P940MP | Owner's Manual - Page 110
tre créée pour chaque source. (Le lecteur de CD intégré et le lecteur de CD à chargeur sont automatiquement placés dans les mêmes conditions une marque déposée de BBE Sound, Inc. Mise en service du réducteur d'octave Vous pouvez mettre en service le réducteur d'octave. "OCTAVER2" a un effet plus - Pioneer DEH-P940MP | Owner's Manual - Page 111
BBE • Appuyez une nouvelle fois sur la même touche pour abandonner la correction de champ sonore choisie. Mise en service du réducteur d'octave Vous pouvez mettre en service le réducteur d'octave. "OCTAVER2" a un effet plus prononcé que "OCTAVER1". 1. Appuyez sur la touche AUDIO puis sur la touche - Pioneer DEH-P940MP | Owner's Manual - Page 112
galement être réglé à l'aide de cette fonction. • Le lecteur de CD intégré et le lecteur de CD à chargeur sont automatiquement placés dans les mêmes conditions de niveau sonore. Mise en service de l'atténuateur numérique Lors de l'écoute d'un CD ou d'une autre source dont le niveau sonore est élev - Pioneer DEH-P940MP | Owner's Manual - Page 113
: • Procéder à l'égalisation automatique dans les conditions suivantes peut endommager les haut-parleurs. Vérifiez soigneusement les conditions d'installation avant d'effectuer l'égalisation automatique. - Les haut-parleurs ne sont pas correctement raccordés. (Par exemple, un haut-parleur arri - Pioneer DEH-P940MP | Owner's Manual - Page 114
d'un doigt sur la touche SOURCE pour mettre la source hors service. 6. Maintenez la pression d'un doigt sur la touche 2 pour les haut-parleurs que peut comporter l'installation sont utilisés, l'égalisation automatique exige du soleil car cela peut le déformer, le décolorer ou interdire - Pioneer DEH-P940MP | Owner's Manual - Page 115
affichées sur l'écran s'inversent, et continuent de s'inverser toutes les 10 secondes. Vous pouvez mettre en service, ou hors service, le mode inverse. 1. La source étant hors service, maintenez la pression d'un doigt sur la touche 1 pour choisir le mode inverse. 2. Appuyez sur la touche - Pioneer DEH-P940MP | Owner's Manual - Page 116
vous rappelle de déposer la face avant. (Reportez-vous à la page 11.) Vous avez la possibilité de mettre en service, ou hors service, le signal d'avertissement. 1. La source étant hors service, maintenez la pression d'un doigt sur la touche 1. 2. Appuyez sur la touche NEXT puis sur la touche DT-WRN - Pioneer DEH-P940MP | Owner's Manual - Page 117
de la date La date réglée de la manière ci-dessous n'apparaît que si les sources et la démonstration sont hors service. 1. Appuyez sur la touche NEXT pour afficher "CLK". Appuyez sur la touche NEXT jusqu'à ce que "CLK" apparaisse sur l'écran. 2. Appuyez sur la touche CLK - Pioneer DEH-P940MP | Owner's Manual - Page 118
l'afficheur ne soit trop lumineux la nuit, son éclairage est automatiquement atténué dès que les feux de route sont en service. Vous pouvez mettre en service, ou hors service, l'atténuateur de luminosité. 1. Appuyez sur la touche NEXT pour afficher "C.MENU". Appuyez sur la touche NEXT jusqu'à ce que - Pioneer DEH-P940MP | Owner's Manual - Page 119
touche ENT, puis appuyez sur la touche E.CLK pour choisir l'affichage du signal de l'heure. Abandon de la page de divertissement Vous pouvez mettre hors service la page de divertissement (page écran évoquant le cinéma, page d'analyse du spectre audible, etc.) • Appuyez sur la touche ENT puis sur la - Pioneer DEH-P940MP | Owner's Manual - Page 120
Autres fonctions Utilisation de la source AUX Grâce à un interconnecteur IP-BUS-RCA tel que le modèle CD-RB20 ou le modèle CDRB10 (vendus séparément), vous pouvez relier cet appareil à un équipement auxiliaire doté d'une sortie Cinch (RCA). Pour de plus - Pioneer DEH-P940MP | Owner's Manual - Page 121
les disques avant de les écouter. Rejetez tout disque fendu, rayé ou voilé car leur lecture peut être impossible. N'utilisez pas de disque en mauvais état. pensez que de la condensation s'est formée, mettez le lecteur de CD hors service pendant une heure environ, le temps nécessaire à son séchage - Pioneer DEH-P940MP | Owner's Manual - Page 122
WMA peuvent être codées avec à Windows Media Player version 7, 7,1 ou Windows Media Player for Windows XP. • Selon l'application qui a premiers caractères s'affichent. • Lors de la lecture de disques renfermant des fichiers MP3/WMA et des données audio (CDDA), par exemple des CD-EXTRA et des CD - Pioneer DEH-P940MP | Owner's Manual - Page 123
FRANÇAIS DEUTSCH A propos des dossiers et des fichiers MP3/WMA • Nous donnons ci-dessous un aperçu d'un CDROM renfermant des fichiers MP3/WMA. Les sous-dossiers sont indiqués comme des dossiers du dossier actuellement choisi. Premier Deuxième Troisième niveau niveau niveau Remarque: • C'est - Pioneer DEH-P940MP | Owner's Manual - Page 124
service d'entretien agréé par Pioneer. Messages Causes possibles Actions correctives ERROR- 11, 12, 17, 30 Disque sale enregistré, ou la lecture du format du CD n'est pas possible. Utilisez un autre à ce que le microphone soit convenablement installé. ERROR CHECK SYSTEM Le bruit environnant est - Pioneer DEH-P940MP | Owner's Manual - Page 125
MP3 et ATRAC3 font appel à des méthodes de codage différentes, une comparaison simple est possible.) Ecriture par paquets Il s'agit d'un terme général qui désigne une méthode d'écriture des CD codées avec à Windows Media Player version 7, 7,1 ou Windows Media Player for Windows XP. Microsoft, Windows - Pioneer DEH-P940MP | Owner's Manual - Page 126
/Sourdine audio (1 dB) Phase Normal ou inverse Lecteur de CD Système Système audio disque compact Disques utilisables Disques compacts Gamme dynamique 92 dB (1 kHz) Nombre de canaux 2 (stéréo) Format de décodage MP3 .... MPEG-1 et 2 AUDIO LAYER-3 Format de décodage WMA Ver. 7 et 8 Syntoniseur - Pioneer DEH-P940MP | Owner's Manual - Page 127
ENGLISH FRANÇAIS DEUTSCH Feuille d'inscription des paramètres de réglage du DSP Mode réseau à 3 voies (NW) Réglage du réseau Filtre Fréquence de coupure Niveau Pente Phase L LPF M HPF M LPF H HPF Réglage de la différence de marche Haut-parleur High Left High Right Distance Mid Left - Pioneer DEH-P940MP | Owner's Manual - Page 128
Col. Del Valle Mexico, D.F. C.P. 03100 TEL: 55-5688-52-90 Published by Pioneer Corporation. Copyright © 2002 by Pioneer Corporation. All rights reserved. Publication de Pioneer Corporation. Copyright © 2002 Pioneer Corporation. Tous droits de reproduction et de traduction réservés.
-
 1
1 -
 2
2 -
 3
3 -
 4
4 -
 5
5 -
 6
6 -
 7
7 -
8
-
9
-
10
-
11
-
12
-
13
-
14
-
15
-
16
-
17
-
18
-
19
-
20
-
21
-
22
-
23
-
24
-
25
-
26
-
27
-
28
-
29
-
30
-
31
-
32
-
33
-
34
-
35
-
36
-
37
-
38
-
39
-
40
-
41
-
42
-
43
-
44
-
45
-
46
-
47
-
48
-
49
-
50
-
51
-
52
-
53
-
54
-
55
-
56
-
57
-
58
-
59
-
60
-
61
-
62
-
63
-
64
-
65
-
66
-
67
-
68
-
69
-
70
-
71
-
72
-
73
-
74
-
75
-
76
-
77
-
78
-
79
-
80
-
81
-
82
-
83
-
84
-
85
-
86
-
87
-
88
-
89
-
90
-
91
-
92
-
93
-
94
-
95
-
96
-
97
-
98
-
99
-
100
-
101
-
102
-
103
-
104
-
105
-
106
-
107
-
108
-
109
-
110
-
111
-
112
-
113
-
114
-
115
-
116
-
117
-
118
-
119
-
120
-
121
-
122
-
123
-
124
-
125
-
126
-
127
-
128
 |
 |

Multi-CD/DAB control DSP high power
CD/MP3/WMA player with FM/AM tuner
Syntoniseur FM/AM et lecteur de CD/MP3/WMA,“Puissance élevée”,
processeur de signal numérique (DSP) et contrôleur CD/DAB
Operation Manual
DEH-P940MP
Mode d’emploi
ENGLISH
FRANÇAIS
DEUTSCH
FRANÇAIS
ITALIANO
NEDERLANDS