Roku HD1000 User Guide
Roku HD1000 - PhotoBridge - Digital AV Player Manual
 |
UPC - 029610841001
View all Roku HD1000 manuals
Add to My Manuals
Save this manual to your list of manuals |
Roku HD1000 manual content summary:
- Roku HD1000 | User Guide - Page 1
USER GUIDE For Software Release 1.5.18 HD1000 - Roku HD1000 | User Guide - Page 2
- Roku HD1000 | User Guide - Page 3
digital media from your PC, or pop in a variety of memory cards and watch your HDTV come to life with high-definition digital photos, art and music. This guide provides the basics for using your new HD1000. For the most up-to-date information about tips and tricks, networking, troubleshooting - Roku HD1000 | User Guide - Page 4
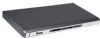
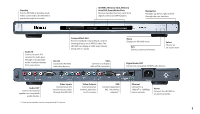
• Roku HD1000 • Component Video Cable • Remote Control • Two AAA Batteries • Audio Cable • Power Cable Optional Accessories • Rack Ears • Wi-Fi Adapter • Roku Art Packs • Crestron Driver Visit www.rokulabs.com for more information on optional accessories. 2 The Roku HD1000 The Roku Remote Enjoying - Roku HD1000 | User Guide - Page 5
in Standby mode. Video connected to the HD1000 is passed through in this state. SD/MMC, Memory Stick, Memory Stick PRO, SmartMedia Slots Receive standard memory cards from digital cameras and MP3 players. Navigation Navigate up, down, right and left through the user interface. Audio IN Connect - Roku HD1000 | User Guide - Page 6
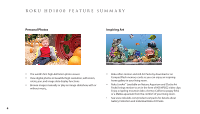
Roku HD1000 Feature summ ary Personal Photos Inspiring Art • The world's first high-definition photo viewer. • View digital photos in beautiful high resolution, with zoom, rotate, pan, and image data display functions. • Browse images manually or play an image slideshow, with or without music. • - Roku HD1000 | User Guide - Page 7
recorded segments on their HDTV through the Roku HD1000. • Third-party applications are available to support additional formats. Roku Open Platform & SDK • The Roku HD1000 is based on the Roku OS, an open-source, Linuxbased platform optimized for digital media. • Software Developer Kit (SDK) enables - Roku HD1000 | User Guide - Page 8
player designed specifically for your high-def TV. • Memory card slots on the front give easy access to digital media on CompactFlash, SD, MMC, Memory Stick, and SmartMedia cards. XD cards can also be used with a simple adapter. • Network ready with built-in Ethernet or Wi-Fi adapter. • Supports - Roku HD1000 | User Guide - Page 9
For more information on this connection method, see "Connecting Your HD1000 to Use the Video Pass-Through Feature" below. From the factory, the HD1000 is set to output Component 480i. This connection is widely supported by most HDTVs, but the other options yield superior results and are recommended - Roku HD1000 | User Guide - Page 10
cables are connected to the Video Out connection on the HD1000). If there is still no picture, proceed to "Connecting Without On-Screen Display." 7. You should see the Display Format setup screen on your display at this point, and it should read "Component 480i." The Power LED will begin blinking - Roku HD1000 | User Guide - Page 11
Video Output Format setup screen on your display at this point (in black and white or green), and it should read "Component 480i." The Power LED Connect an S-Video cable to the Video Out S-Video connector on the back of the HD1000. 2. Connect the other end of the cable to an S-Video input connector - Roku HD1000 | User Guide - Page 12
the Video Output Format setup screen on your display at this point (in black and white or green), and it should read "Component 480i." The Power HD1000. However, once the HD1000 has started up, you can use the front-panel buttons to step through the HD1000's supported output connections and formats - Roku HD1000 | User Guide - Page 13
confirm your choices. Audio Connections You may connect your HD1000 to an amplifier, a display with powered speakers or an external set of powered speakers to enjoy music playback. The HD1000 supports both analog audio output and digital (S/PDIF) audio output. 1. Decide which audio output you want - Roku HD1000 | User Guide - Page 14
above to connect the HD1000 Video-Out to your display. When your HD1000 is in Standby mode (Power LED not lit), the signal present on the Video In connector will now be sent to the Video Out connector. Pressing the Power key for your HD1000 displays the HD1000's signal. Use the Setup option on the - Roku HD1000 | User Guide - Page 15
to set the type of connection used from the HD1000 to your display, the output resolution and many other options. See the "Setup and Preferences" section for additional details. Images. The Images section will appear in the Main Menu when a selected media source contains photos, art or video. You - Roku HD1000 | User Guide - Page 16
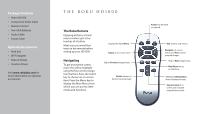
or MPEG video from the selected media source. If your HD1000 is currently showing the Main Menu and you insert a memory card with photos, art or MPEG video, the slideshow begins automatically, displaying the content from that card. Images advance every five seconds. Refer to "The Roku Remote" on - Roku HD1000 | User Guide - Page 17
prior screen. Viewing MPEG Video The HD1000 has the capability of playing ATSC-compliant MPEG2 transport streams. This is the type of signal typically broadcast over the air by a local digital television station. These streams may be either standard- or high-definition, and may include multichannel - Roku HD1000 | User Guide - Page 18
the Listen button and press the Pause/Play button on the remote. To exit the Music Player, press Pause if you want to stop playing music, then press Menu on your remote control. playlist formats; iTunes playlists are currently not supported. Playing Music During a Slideshow It is easy to listen to - Roku HD1000 | User Guide - Page 19
for networking setup instructions specific to each supported platform. You can press Select to navigate to the next level down in the folder structure, or press Play on your remote to play all media inside the active folder (and any of its subfolders). Browsing Directories Your Roku HD1000 scans - Roku HD1000 | User Guide - Page 20
sustained read speed of 3 MBps or more for viewing high-definition MPEG2 video and LiveArt.™ Only CompactFlash cards or the network drive connected via 100MBps wired Ethernet may be used for high-definition video playback. Need help? Go to www.rokulabs.com/support or contact [email protected]. 18 - Roku HD1000 | User Guide - Page 21
The basics Your HD1000's image viewer has several user-configurable options: * remote once you've closed the window.) In either case, you just make your choices and click the Done button. Roku remembers your settings until you change them, even if you turn your HD1000 off. Press Exit on the remote - Roku HD1000 | User Guide - Page 22
, photography is still pretty much back in the old square (well, 4:3 anyway) box. Therefore, most pictures taken with a digital camera won't fit perfectly on a 16:9 HDTV. Also, many artists (especially the pesky Renaissance types) were a bit lax in maintaining a proper 16:9 wide-screen aspect ratio - Roku HD1000 | User Guide - Page 23
zoom rocker on the remote. Tip #5: Zoom in on the action Your HD1000 supports a multilevel zoom feature. useful for finding your way around a picture at high magnifications. Tip #6: Panning for gold When you zoom in the middle! No problem. Use the four arrow keys on the remote control to scroll a - Roku HD1000 | User Guide - Page 24
on the HD1000 remote also rotates the picture counterclockwise, which for most images will put the top where it should be. Some people, however, rotate their cameras the other of rotation: First, some PC image editing software will rotate an image but leave the thumbnail in its original orientation. If you - Roku HD1000 | User Guide - Page 25
in the works for a later software upgrade. Tip #8: Just the facts about this picture, Ma'am If you're like a lot of digital camera owners, you have lots and lots of pictures. You may have so many of them that you can hardly remember when you took them. Fortunately, your HD1000 can help. When viewing - Roku HD1000 | User Guide - Page 26
directional arrow buttons on the remote control move the highlight one come on a CompactFlash card similar to the ones used in digital cameras. When you media source. To play the pictures and music together, just press the button under Roku set for your usual viewing. This is normal. Need help? Go - Roku HD1000 | User Guide - Page 27
first two it finds available as sources for photos, art and music. Access the Network Servers panel to manually specify which network shares your Roku HD1000 should use. Visit www.rokulabs.com/support to download a PDF document containg detailed instructions for connecting the HD1000 to your home - Roku HD1000 | User Guide - Page 28
the video output format, consult the "Connecting the HD1000" section in this manual. Video Placement This setup panel allows you to optimize the size and position (placement) of the video output signal your HD1000 sends to your television. Most HD television and monitors have their own settings for - Roku HD1000 | User Guide - Page 29
placement adjustments to fit the Roku HD1000's video output to the full screen and use the circle as a guide to maintaining a true 16:9 aspect ratio. Note: When changing the video output connector and resolution, you may choose a setting which your display does not support. If this happens, your - Roku HD1000 | User Guide - Page 30
the Done button to use these settings to connect to the wireless network. DVD player to the video input connectors, whenever you turn your DVD player on, the Roku HD1000 will automatically switch to pass- Sample Content through video and display the DVD player's output. When you turn the DVD - Roku HD1000 | User Guide - Page 31
, you are in initial setup mode. If the Power LED is steadily lit, see "Resetting Your Roku HD1000 to Initial Setup Mode" below to put your unit back into initial setup mode. 2. Check that the display is set to the correct input. 3. Check that the video cable from the HD1000 is connected to the - Roku HD1000 | User Guide - Page 32
to set up your video mode. 6. If your HD1000 is not in initial setup mode (indicated by a steady Power LED or no Power LED), unplug your Roku HD 1000 for 10 seconds. Plug it in again. Wait two minutes and repeat this procedure. 7. If you still cannot get your Roku HD1000 reset to initial setup mode - Roku HD1000 | User Guide - Page 33
from the Internet) are not supported. Also, video files must be played over a wired (Ethernet) network. Playback over a wireless network is currently not supported. Symptom: Files recently saved on networked media source don't appear on HD1000. To refresh the HD1000's browser, click Menu. Browse to - Roku HD1000 | User Guide - Page 34
Need help? Go to www.rokulabs.com/support or contact [email protected]. Note: The Roku software is based in part on the work of the Independent JPEG Group. © 2004 Roku, LLC. All rights reserved. ROKU, the ROKU logo, and LiveArt are trademarks of Roku, LLC in the United States and other countries. - Roku HD1000 | User Guide - Page 35
www.rokulabs.com
-
 1
1 -
 2
2 -
 3
3 -
 4
4 -
 5
5 -
 6
6 -
 7
7 -
8
-
9
-
10
-
11
-
12
-
13
-
14
-
15
-
16
-
17
-
18
-
19
-
20
-
21
-
22
-
23
-
24
-
25
-
26
-
27
-
28
-
29
-
30
-
31
-
32
-
33
-
34
-
35
 |
 |
USER GUIDE
HD1000
For Software Release 1.5.18