Samsung CLP 600N User Manual (ENGLISH) - Page 23
Using Control Panel Menus (CLP- 600N Only), Accessing Control Panel Menus - printer driver
 |
UPC - 635753703016
View all Samsung CLP 600N manuals
Add to My Manuals
Save this manual to your list of manuals |
Page 23 highlights
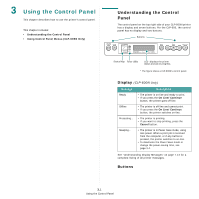
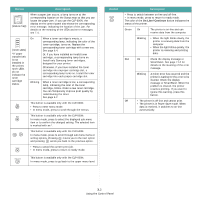
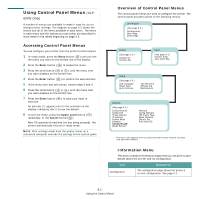
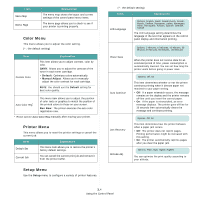
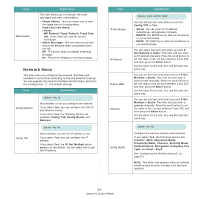
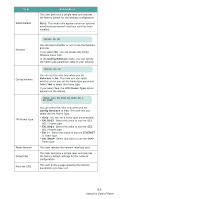
Using Control Panel Menus (CLP- 600N Only) A number of menus are available to make it easy for you to change printer settings. The diagram on page 3.3 shows the menus and all of the items available in each menu. The items in each menu and the options you can select are described in more detail in the tables beginning on page 3.3. Accessing Control Panel Menus You can configure your printer from the printer's control panel. 1 In ready mode, press the Menu button ( ) until you see the menu you want on the bottom line of the display. 2 Press the Enter button ( ) to access the menu. 3 Press the scroll button ( or ) until the menu item you want displays on the bottom line. 4 Press the Enter button ( ) to confirm the selected item. 5 If the menu item has sub menus, repeat steps 3 and 4. 6 Press the scroll button ( or ) until the menu item you want displays on the bottom line. 7 Press the Enter button ( ) to save your input or selection. An asterisk (*) appears next to the selection on the display, indicating that it is now the default. 8 To exit the menu, press the Upper Level button ( ) repeatedly, or the Cancel button( ). After 60 seconds of inactivity (no key being pressed), the printer automatically returns to ready mode. NOTE: Print settings made from the printer driver on a connected computer override the settings on the control panel. Overview of Control Panel Menus The control panel menus are used to configure the printer. The control panel provides access to the following menus: Information (See page 3.3.) Configuration Menu Map Demo Page Printer (See page 3.4.) Default Set Current Job Color (See page 3.4.) Custom Color Auto Color Reg Setup (See page 3.4.) LCD Language Power Save Auto Continue Jam Recovery Altitude Adj. Maintenance Network (See page 3.5.) Config Network Config TCP IP Get Method IP Address Subnet Mask Gateway Config WLAN* WLAN Default* Netware Config Netware IPX Frame Type Reset Network Default Set Print Net CFG * This menu only appears when an optional wired/wireless network interface card has been installed. Information Menu This menu contains information pages that you can print to give details about the printer and its configuration. Item Configuration Explanation The configuration page shows the printer's current configuration. See page 6.1. 3.3 Using the Control Panel
-
 1
1 -
2
-
3
-
4
-
5
-
6
-
7
-
8
-
9
-
10
-
11
-
12
-
13
-
14
-
15
-
16
-
17
-
 18
18 -
 19
19 -
 20
20 -
 21
21 -
 22
22 -
 23
23 -
 24
24 -
 25
25 -
 26
26 -
 27
27 -
 28
28 -
29
-
30
-
31
-
32
-
33
-
34
-
35
-
36
-
37
-
38
-
39
-
40
-
41
-
42
-
43
-
44
-
45
-
46
-
47
-
48
-
49
-
50
-
51
-
52
-
53
-
54
-
55
-
56
-
57
-
58
-
59
-
60
-
61
-
62
-
63
-
64
-
65
-
66
-
67
-
68
-
69
-
70
-
71
-
72
-
73
-
74
-
75
-
76
-
77
-
78
-
79
-
80
-
81
-
82
-
83
-
84
-
85
-
86
-
87
-
88
-
89
-
90
-
91
-
92
-
93
-
94
-
95
-
96
-
97
-
98
-
99
-
100
-
101
-
102
-
103
-
104
-
105
-
106
-
107
-
108
-
109
-
110
-
111
-
112
-
113
-
114
-
115
 |
 |
