Samsung RF4289HARS Quick Guide (easy Manual) (ver.1.0) (English) - Page 69
How To Use The Dispenser - problems
 |
UPC - 036725560529
View all Samsung RF4289HARS manuals
Add to My Manuals
Save this manual to your list of manuals |
Page 69 highlights
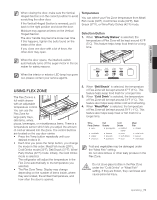
02 operating How to use the dispenser Touch the dispenser status on the Home screen to select the type of dispenser you want. Place your cup under the ice outlet and push gently against the dispenser lever. Make sure the glass is in line with the dispenser to prevent the ice from bouncing out. When Cubed Ice is selected after using the Crushed Ice feature, a small amount of residual crushed ice might be produced. Please wait 2 seconds before removing the CAUTION glass under the dispenser to prevent spills. • Do not press the test button continuously when the tray is filled with ice or water. Water may overflow or ice may jam the bucket. • Normal Use To fill the ice bucket to maximum capacity after installation, follow these steps: 1. Allow your refrigerator to operate and cool down for 24 hours (or 1 full day). - Waiting 24 hours will allow your ice maker to cool properly. 2. Dispense 4 to 6 ice cubes into the glass. 3. After 8, and then 16 hours, dispense a full glass of ice. • When you press the Test button, you will hear the refrigerator chime (ding-dong). When the chime sounds, release the Test button. • The chime sounds automatically again to let you know the ice maker is working well. If a power failure occurs, ice cubes may melt CAUTION then freeze together when the power comes back on, causing the dispenser to be out of order. If the Refrigerator door opens, the Dispenser does not work. • Water Dispenser Installation After installation, press the dispenser arm for at least 2 minutes to remove trapped air from the water line and to fill the water system. • Do not pull the lever out. You could damage or break the lever's spring. • To clean the ice bin/bucket, wash with a mild detergent, rinse well, and dry thoroughly it. Do not use harsh or abrasive cleaners or solvents. To prevent this problem, after a power failure, pull out the ice bucket and discard the residual ice or water. After you dump the ice from the ice bucket, CAUTION you should press the dispenser lever once with the 'CUBED' or 'CRUSHED' function ON. check the water level Test button • In case ice doesn't come out, pull out the ice bucket and press the test button located on the right side of ice maker. The ice maker will make new ice faster after you return the ice bucket in the refrigerator. If you use all the ice at once, you must repeat Steps 2 and 3 on the previous page. However, only wait 8 hours before dispensing the first 4 to 6 ice cubes. This will replenish the ice cubes and ensure maximum ice production. operating _69
-
 1
1 -
2
-
3
-
4
-
5
-
6
-
7
-
8
-
9
-
10
-
11
-
12
-
13
-
14
-
15
-
16
-
17
-
18
-
19
-
20
-
21
-
22
-
23
-
24
-
25
-
26
-
27
-
28
-
29
-
30
-
31
-
32
-
33
-
34
-
35
-
36
-
37
-
38
-
39
-
40
-
41
-
42
-
43
-
44
-
45
-
46
-
47
-
48
-
49
-
50
-
51
-
52
-
53
-
54
-
55
-
56
-
57
-
58
-
59
-
60
-
61
-
62
-
63
-
 64
64 -
 65
65 -
 66
66 -
 67
67 -
 68
68 -
 69
69 -
 70
70 -
 71
71 -
 72
72 -
 73
73 -
 74
74 -
75
-
76
-
77
-
78
-
79
-
80
-
81
-
82
-
83
-
84
-
85
-
86
 |
 |
