Samsung S700 User Manual (ENGLISH) - Page 39
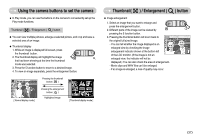
Thumbnail, Enlargement, button, Voice, memo / Up button
 |
UPC - 044701007012
View all Samsung S700 manuals
Add to My Manuals
Save this manual to your list of manuals |
Page 39 highlights
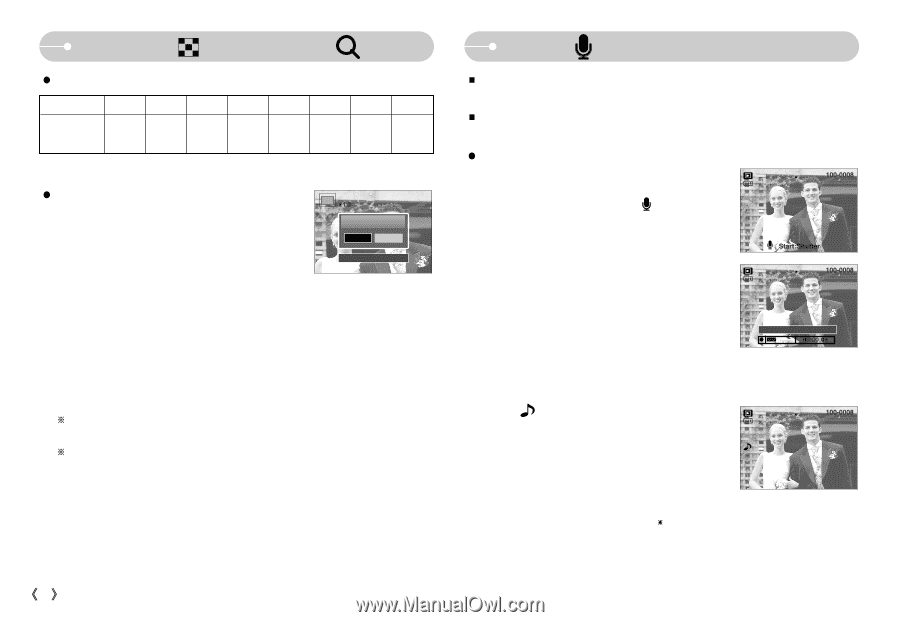
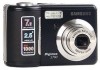
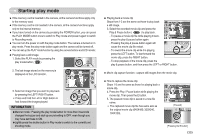
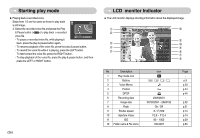
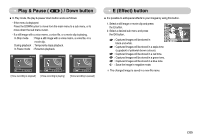
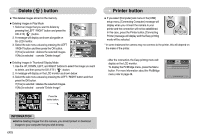
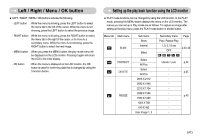
Thumbnail ( ) / Enlargement ( ) button ƃ The maximum enlargement rate in proportion to the image size. Image size 7M 6M 5M 4M Maximum enlargement rate X12.0 X 11.0 X 10.1 X 8.9 3M X 8.0 2M X 6.3 1M VGA X 4.0 X 2.5 ƃ Trimming : You can extract part of the image that you want and save it separately. 1. Select an image that you want to enlarge and Trimming? press the enlargement button. Yes No 2. Different parts of the image can be viewed by Confirm:OK pressing the 5 function button. 3. Press the MENU button and a message will be displayed as shown alongside. 4. Select a desired sub menu by pressing the LEFT / RIGHT button and press the OK button. [Yes] : The trimmed image will save as a new file name, and display on the LCD monitor. [No] : The trimming menu will disappear. ſ If there is little memory space to save the trimmed image, the image can't be trimmed. ſ To delete the enlarged image during the trimming function, press the delete button. ŝ38Ş Voice ( ) memo / Up button ƈ When the menu is displayed on the LCD monitor, pressing the UP button makes the menu cursor move up. ƈ When the menu is not displayed on the LCD monitor, the UP button operates as the voice memo button. You can add your voice to a stored still image. ƃ Adding a Voice Memo to a Still Image 1. Press the LEFT / RIGHT button to select an image that you wish to add sound to. 2. Press the voice memo button ( ) and the voice memo indicator will display. The camera is now ready to record a voice memo. 3. Press the shutter button to start recording and voice will be recorded to the still image for 10 seconds. While the voice is recording, the recording status window will be displayed as shown alongside. Stop:Shutter 4. The recording can be stopped by pressing the shutter button again. 5. The ( ) icon will be displayed on the LCD monitor after voice memo recording has finished. - Voice memos can't be recorded onto movie clip and voice recording files. - A distance of 40cm between you and the camera (microphone) is the best distance to record sound. - The voice memo will be saved in ҭ.wav format, but has the same file name as the still image to which it corresponds. - If you add a new voice memo to the still image that already has a voice memo, the existing voice memo will be erased.
-
 1
1 -
2
-
3
-
4
-
5
-
6
-
7
-
8
-
9
-
10
-
11
-
12
-
13
-
14
-
15
-
16
-
17
-
18
-
19
-
20
-
21
-
22
-
23
-
24
-
25
-
26
-
27
-
28
-
29
-
30
-
31
-
32
-
33
-
 34
34 -
 35
35 -
 36
36 -
 37
37 -
 38
38 -
 39
39 -
 40
40 -
 41
41 -
 42
42 -
 43
43 -
 44
44 -
45
-
46
-
47
-
48
-
49
-
50
-
51
-
52
-
53
-
54
-
55
-
56
-
57
-
58
-
59
-
60
-
61
-
62
-
63
-
64
-
65
-
66
-
67
-
68
-
69
-
70
-
71
-
72
-
73
-
74
-
75
-
76
-
77
-
78
 |
 |